 20
20
ASUS ROG Maximus Z690 Extreme Glacial Review
(20 Comments) »Introduction
In today's review, we are covering ASUS's flagship motherboard, the ROG Maximus Z690 Extreme Glacial! In late 2021 Intel released the 12th Gen Core processors and accompanying LGA 1700 socket. This platform held the privilege of being the first to bring PCIe Gen 5.0 and DDR5 to the consumer market. With AMD's upcoming release window for its the next generation of Ryzen CPUs and a new CPU socket on the horizon, Intel is hard at work to keep all eyes on them with the 13th Gen Core processors set to debut later in 2022.
Like clockwork, every new generation of Intel CPUs comes with a new chipset, which often includes technologies introduced previously in the enterprise market. Compared to the previous LGA 1200 socket and Intel Z590 chipset, the largest change besides PCIe Gen5 and DDR5 support in the new Intel lineup is the introduction of E-cores in Intel desktop processors. These E-cores are designed to offload smaller background system tasks, while leaving larger and more complex system tasks to the P-Cores. This leap in computing power, paired with an increase in PCIe lane count and a connection speed boost to the chipset has paved the way for motherboard manufacturers to offer a variety of configurations at different price points. Ultimately, this gives the consumer multiple avenues to fit their personal needs, wants and desires.

The Maximus family serves as ASUS's flagship line for Intel motherboards, with premium looks, premium features, blazing performance, and broad overclocking support. The Maximus lineup typically comprises four models, the Hero, Apex, Formula, and Extreme. ASUS has collaborated with EKWB once again to bring out the best of the LGA 1700 socket by combining the flagship ASUS ROG Maximus Z690 Extreme motherboard and talents of an industry leader in watercooling for this generation's Extreme Glacial motherboard.
The ASUS ROG Maximus Z690 Extreme Glacial features an EK Ultrablock (monoblock) designed to provide cooling for the 24+1+2 VRM, CPU and M.2 sockets. Catering to the ultra-high-end, nothing is left out providing features like ASUS's stress-free overclocking with AI Optimized for the casual overclockers, to a full fledged out BIOS for those who want to get deeply technical. The ROG Maximus Z690 Extreme Glacial also offers great connectivity with the newest WiFi 6E technology, Thunderbolt 4, and five onboard M.2 slots. There is a lot to cover in this review, so let's take a closer look!
Specifications
| Specifications | |
|---|---|
| CPU Support: | Intel Socket LGA1700 12th Gen Core, Pentium Gold, and Celeron processors |
| Power Design: | CPU Power: 24+1+2-phase iGPU Power: 1-phase |
| Chipset: | Intel Z690 |
| Integrated Graphics: | Supported |
| Memory: | 4x DIMM, Support up to 128GB 2x Single Rank DDR5-6400+ (OC) 4x Single Rank DDR5-4400+ (OC) |
| BIOS: | 2x 256 Mbit AMI UEFI |
| Expansion Slots: | 6x SATA 6 Gb/s ports 1x M.2 Socket (PCIe Gen5 x4)* 1x M.2 Socket (PCIe Gen4 x4) 1x M.2 Socket (SATA/PCIe Gen4 4x) 2x DIMM.2 (M.2 PCIe Gen4 4x) *Disables 2nd 16x PCIe Slot |
| Storage: | 4x SATA 6 Gb/s ports 3x M.2 Sockets (PCIe Gen4 x4) 1x M.2 Socket (SATA/PCIe Gen4 x4) |
| Networking: | 1x Intel® 2.5 Gb Ethernet port 1x Marvell® AQtion 10Gb Ethernet port 1x Intel Wi-Fi 6E AX210 |
| Rear Ports: | 1x Thunderbolt™ 4 USB Type-C port 1x USB 3.2 Gen 2x2 port (1x USB Type-C®) 8x USB 3.2 Gen 2 ports (7x Type-A + 1x USB Type-C®) 1x HDMI® port 1x ASUS Wi-Fi Module 1x Intel® 2.5 Gb Ethernet port 1x Marvell AQtion 10Gb Ethernet port 5x LED-illuminated audio jacks 1x Optical S/PDIF out port 1x BIOS FlashBack button 1x Clear CMOS button |
| Audio: | ROG SupremeFX 7.1 ALC4082 Codec ESS® SABRE9018Q2C DAC/AMP LED-illuminated audio jacks Supports up to 32-Bit/384 kHz playback |
| Multi-GPU: | NVIDIA 2-Way SLI® Technology |
| Fan Headers: | 2 x 4-pin Chassis Fan headers 2x 4-pin Radiator Fan headers 2x W_PUMP+ headers 1x WB_SENSOR header 1x 2-pin Water In header 1x 2-pin Water Out header 1x 3-pin Water Flow header |
| Form Factor: | E-ATX Form Factor: 12.0 x 10.6 in.; 30.5 x 27.0 cm |
| Exclusive Features: |
|
Packaging and Contents

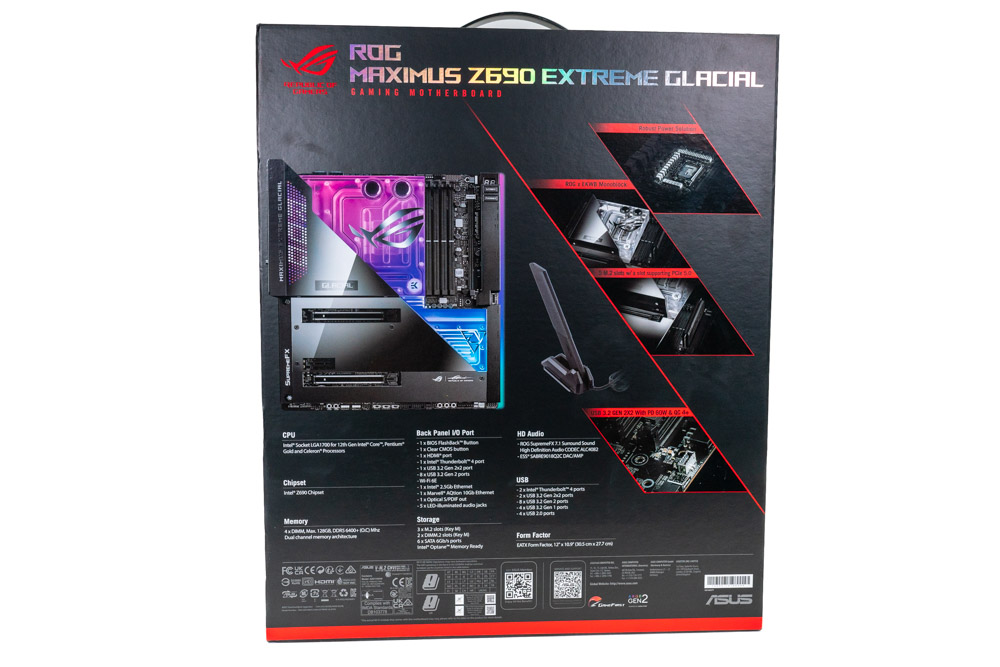
In traditional ASUS fashion, the ROG motherboards come in a distinct matte black box with red accents. When looking at this as a product that is marketed and sold under premium tier title, from the outset, it comes across as normal box. But once you get up close, it becomes apparent that this box is basically a mini suitcase—an unexpected and welcome approach to packaging.
The back of the box has a depiction of the motherboard RGB, which is fairly accurate, giving a idea what what it will look like when in use. Below the picture is a detailed specification list that is split into different sections for easy reading. Finally, on the right side is a few highlights such as M.2 PCIe Gen5 support and a EKWB waterblock dubbed "Ultrablock" by ASUS.


After unlatching the "suitcase box", it unfolds into two sides. One part is the EKWB Ultrablock, while the other side holds the motherboard.


After removing the monoblock, multiple smaller compartments can be found below, each holding different peripherals like the DIMM.2, fan controller, USB Audio-DAC and all the other motherboard accessories listed below.
The full list of accessories includes:
Cables
- 1x 1-to-3 ARGB splitter cable
- 1x 1-to-2 ARGB splitter cable
- 2x 1-to-4 fan splitter cables
- 1x RGB extension cable
- 3x ROG weave SATA 6G cables
- 1x 3-in-1 Thermistor cables pack
- 1x ROG Fan Controller
- 1x Fan EXT PWR cable
- 1x ARGB input cable
- 1x USB input cable
- 1x ROG Fan Controller 3M Mounting tape
- 1x Fan Controller manual
- 1x ROG DIMM.2 with heatsink
- 1x M.2 pad for ROG DIMM.2
- 2x M.2 screw package for ROG DIMM.2
- 1x Monoblock
- 3x Screw package for monoblock
- 1x Thermal pad for monoblock
- 1x Fittings for monoblock
- 1x M.2 heatsink
- 1x ASUS Wi-Fi moving antennas
- 1x M.2 SSD screw package
- 1x Q-connector
- 1x ROG CLAVIS DAC
- 1x ROG graphics card holder
- 1x ROG key chain
- 1x ROG logo plate stickers
- 1x ROG screwdriver
- 1x ROG stickers
- 1x ROG thank you card
- 1x USB drive with utilities and drivers
- 1x User guide
Board Layout


The ASUS ROG Maximus Z690 Extreme Glacial is using the E-ATX format, which can look a bit on the larger side to some who aren't used to the form factor. While it is generally frowned upon to increase the PCB size without a purpose besides a bit of "I'm bigger, therefore better" marketing, in this case the ASUS engineering team has put the extra space to good use. All of which we will go into detail further along in this review.
Before that, a quick glance at the back and it can be seen that this motherboard has a protective back-shield with an RGB strip down one side. This It isn't meant to be taken apart as wires can be seen taped down. It is easy to rip these connectors out if not careful in disassembly. These types of black plates can add passive thermal heat dissipation with thermal pads and or PCB support. In this case, it's just to help strengthen the PCB.


The ASUS ROG Maximus Z690 Extreme Glacial offers two PCI Express x16 slots, with the top two reinforced for extra stress support. PCIe slot one and two are PCIe Gen5 certified with a total of x16 lanes coming from the CPU. This means that slot one can either operate at x16 or x8. Slot 2 is wired for PCIe Gen5 x8 and will split the available lanes with the first slot when populated. This second 16x PCIe slot will become disabled if the M.2 Gen5 socket is populated because it shares the PCIe lanes.
These are all backwards compatible, allowing older PCIe devices to work without issue. Sandwiched between the two is a dedicated 1x PCIe Gen3 slot (open-ended) which does not become disabled even when the motherboard is fully populated. This is good news for those who may have a use for an additional PCIe slot.


The M.2 socket configuration can often become complicated without first consulting the motherboard manual. First up is the PCIe Gen5 4x socket (at the top), which shares bandwidth with the PCIe 16x slots as explained previously. Next is two Gen4 4x sockets, one of which is routed through the Z690 chipset while the other is directly connected to the CPU. All three M.2 sockets here make direct contact with the monoblock.


More M.2 sockets can be connected via the ASUS ROG DIMM.2 slot. Essentially a proprietary add-on card that allows for two additional Gen4 4x M.2 sockets. These are routed through the Intel Z690 chipset.

Across the bottom of the motherboard is numerous headers, switches and buttons. First up are three switches; RSVD_1, SLOW_MODE, V_Latch. RSVD_1 is for ASUS authorized technicians and has no function for the consumer. Next is slow SLOW_MODE. This sets the CPU to the lowest frequency (800 MHz) in real-time and can be used for extreme overclocking between benchmark runs.
Lastly is the V_Latch. This is a special circuit that allows extremely accurate recordings of the CPU Vcore maximum and minimum values during CPU load showing the overshoot and Vdroop. Without an oscilloscope it is unlikely the data would be seen otherwise due to the slow refresh rate and/or limited data capture points in software. With V_Latch enabled, it can now be paired with HWiNFO software and gets its own sensor tab. It will record in real-time and can be exported as a CSV file for bonus points.

Next up is a few buttons which read as the following; RETRY_BUTTON, BIOS_SWITCH and SAFE_BOOT. In order, the Retry button can be pressed when the motherboard is stuck in the boot process. Every time this is pressed, the system will retry the current step until it passes on or you give up (mostly used for failed memory training). BIOS switch is self explanatory. The ASUS ROG Maximus Z690 Extreme Glacial has two BIOSes to pick from. Press the button to switch between the two. Lastly is the Safe boot. This will boot directly into the BIOS safe-mode while retaining all the overclocking settings. This allows for adjustments to be made without losing the current unsaved BIOS profile that Clear CMOS would remove otherwise.

The final set of specialty buttons on this motherboard is the BCLK+/-. This allows for the BCLK frequency to be adjusted plus or minus 1 MHz in real time. Note that this must be enabled in the BIOS. It is disabled by default.

A quick look from the side can give a better perspective for header placement. These will be revisited in closer detail as we continue along in this review.


ASUS has included voltage read points on the motherboard which is a nice addition to see for overclocking enthusiasts.


The Maximus Z690 Extreme Glacial RGB headers are a bit misleading visually. At first it seems like only two are available after the top 5 V header is paired off with the EK Monoblock. This would potentially only leave one 5 V and one 12 V standardized RGB header on the motherboard to be used. Though don't be fooled into thinking that is everything. Part of the accessories is extra 1-2 RGB breakout cables and an additional custom 6-pin header can be found on the side which uses a different breakout cable for an additional two. On top of all these, is the ROG RGB fan controller that is an option as well, increasing the number of 5 V ARGB headers by another six.


The ASUS ROG Maximus Z690 Extreme Glacial has two USB 3.2 Gen1 headers and two USB 2.0 headers in total. On the side next to the Thunderbolt 4 port is an internal USB 3.2 Gen 2x2 (20 Gbps) Type-E header as well.

The ASUS ROG Maximus Z690 Extreme Glacial uses an Intel JHL8540 for its Thunderbolt 4 connectivity in the rear I/O section (and internally). It may also be used to output integrated graphics from an Intel CPU over USB-C or DisplayPort 1.4.

A Marvell AQtion AQC113C 10GbE LAN chip is used for the 10 Gb LAN.

This motherboard also features dual 8-pin EPS connectors to make sure power delivery is never an issue when it comes to overclocking the CPU.

The standard debug POST is included for troubleshooting via code output. Below that is a Start button and a FlexKey. This FlexKey can be configured in the BIOS to be the Restart, Safe Boot or Aura On/Off button. By default it is set as a Restart button.

The Z690 chipset (PCH) before it is covered and actively cooled by the monoblock.

The board has a total of six SATA 6 Gb/s ports on the side, angled 90 degrees from the board. These ports draw their bandwidth from the Z690 chipset.


As expected from any flagship motherboard, ASUS has gone all out in terms of external connectivity options. The only thing missing would be the PS/2 port, which has limited use-case in modern computers and is unlikely to be missed.
Starting off, the rear section has seven USB 3.2 Gen2 Type-A 10 Gbps ports. This should provide enough USB connectivity for the average user. If that isn't enough, an additional 20 Gbps and 10 Gbps USB-C port is present. A single Thunderbolt 4 port (40 Gbps) can be used as a USB hub and 10 Gb LAN brings even more high-speed connectivity across the network. A few things are less obvious, like the Clear CMOS button and BIOS Flashback USB port (labeled "BIOS") which is found here as well. Overall ASUS has done a great job in providing enough connectivity options for every type of user.
- 1x Thunderbolt 4 USB Type-C port
- 1x USB 3.2 Gen 2x2 port (1x USB Type-C)
- 8x USB 3.2 Gen 2 ports (7x Type-A + 1x USB Type-C)
- 1x HDMI port
- 1x ASUS Wi-Fi Module
- 1x Intel 2.5Gb Ethernet port
- 1x Marvell AQtion 10 Gb Ethernet port
- 5x LED-illuminated audio jacks
- 1x Optical S/PDIF out port
- 1x BIOS FlashBack button
- 1x Clear CMOS button
Our Patreon Silver Supporters can read articles in single-page format.
Jul 24th, 2025 21:42 CDT
change timezone
Latest GPU Drivers
New Forum Posts
- TPU's Nostalgic Hardware Club (20572)
- Your PC ATM (35545)
- RX7800XT Fan spins at max speed on boot (5)
- R9 7900X - 5070Ti - Lags / Stuttering (16)
- Last game you purchased? (870)
- What are you playing? (24003)
- Which Linux flavor? (55)
- Lexar NM790 (4TB) made my PC go back to Windows XP days, since it caused my PC to be SO slow and laggy! (23)
- Current Sales, Bundles, Giveaways (10348)
- What's your latest tech purchase? (24357)
Popular Reviews
- Noctua NF-A12x25 G2 PWM Fan Review
- MSI MPG B850I Edge Ti Wi-Fi Review
- UPERFECT UMax 24 Review
- Cougar OmnyX Review
- TerraMaster F4-424 Max Review - The fastest NAS we've tested so far
- Thermal Grizzly WireView Pro Review
- Sharkoon OfficePal C10 Review - Affordable and Decent
- VAXEE XE V2 Wireless Review
- Upcoming Hardware Launches 2025 (Updated May 2025)
- Razer Blade 16 (2025) Review - Thin, Light, Punchy, and Efficient
TPU on YouTube
Controversial News Posts
- Some Intel Nova Lake CPUs Rumored to Challenge AMD's 3D V-Cache in Desktop Gaming (140)
- AMD Radeon RX 9070 XT Gains 9% Performance at 1440p with Latest Driver, Beats RTX 5070 Ti (131)
- AMD's Upcoming UDNA / RDNA 5 GPU Could Feature 96 CUs and 384-bit Memory Bus (119)
- NVIDIA GeForce RTX 5080 SUPER Could Feature 24 GB Memory, Increased Power Limits (115)
- NVIDIA DLSS Transformer Cuts VRAM Usage by 20% (99)
- AMD Sampling Next-Gen Ryzen Desktop "Medusa Ridge," Sees Incremental IPC Upgrade, New cIOD (97)
- NVIDIA Becomes First Company Ever to Hit $4 Trillion Market-Cap (94)
- Windows 12 Delayed as Microsoft Prepares Windows 11 25H2 Update (92)