 1
1
Building a Keyboard 13: Wind Sin65 Custom Keyboard Kit
(1 Comment) »Introduction
Wind Studio is a custom mechanical keyboard company that was established as recently as 2021. So while it doesn't enjoy the reputation of longer lasting brands in this highly competitive market, I had already heard good things about its products such as the Wind Z75 and Wind X98. In particular, Wind Studio appears to go the group-buying route for its kits that are highly customizable and entail a lot more building than what we have usually covered in this series. A representative from the brand contacted me on TechPowerUp directly and a few messages back and forth led to this article.

Today we are building another keyboard but it happens to be the most intensive such venture taken thus far. While there is no soldering to be done anywhere, the new Wind Sin65 keyboard kit necessitates you to assemble the entire kit from various components that all come neatly packed and shipped together. If you are into DIY PC building then perhaps this is exactly what you need to scratch off that itch after the PC is complete. The Sin65 comes in a lot of different options when it comes to the case type and color in addition to the PCB and connectivity features. You can choose what you prefer based on the ongoing group buy and even there Wind Studio will provide further customization options in terms of the keyboard mount style before we even get to stabilizers, switches, and keycaps. Thanks to Wind Studio for providing a sample of the Sin65 kit as well as some stabilizers and switches!
Wind Sin65: Packaging and Accessories


Wind Studio can be considered as a small boutique keyboard brand compared to the vast majority of other keyboard makers we have covered on TechPowerUp to date. As such, I was not surprised to see a large, thick cardboard box custom made for the Sin65. In fact, even the company logo has been customized to include the Sin from Sin65 in it in addition to the lettering in the middle. That same sticker extends around the side and on to the back where you get confirmation of the exact type of kit you ordered—anodized orange for this sample. The lid can be removed to access the contents inside beginning with a thick foam piece for added protection to the accessory box underneath. There is also a simple installation document which basically leads you to this page providing more details on how to put the kit together.


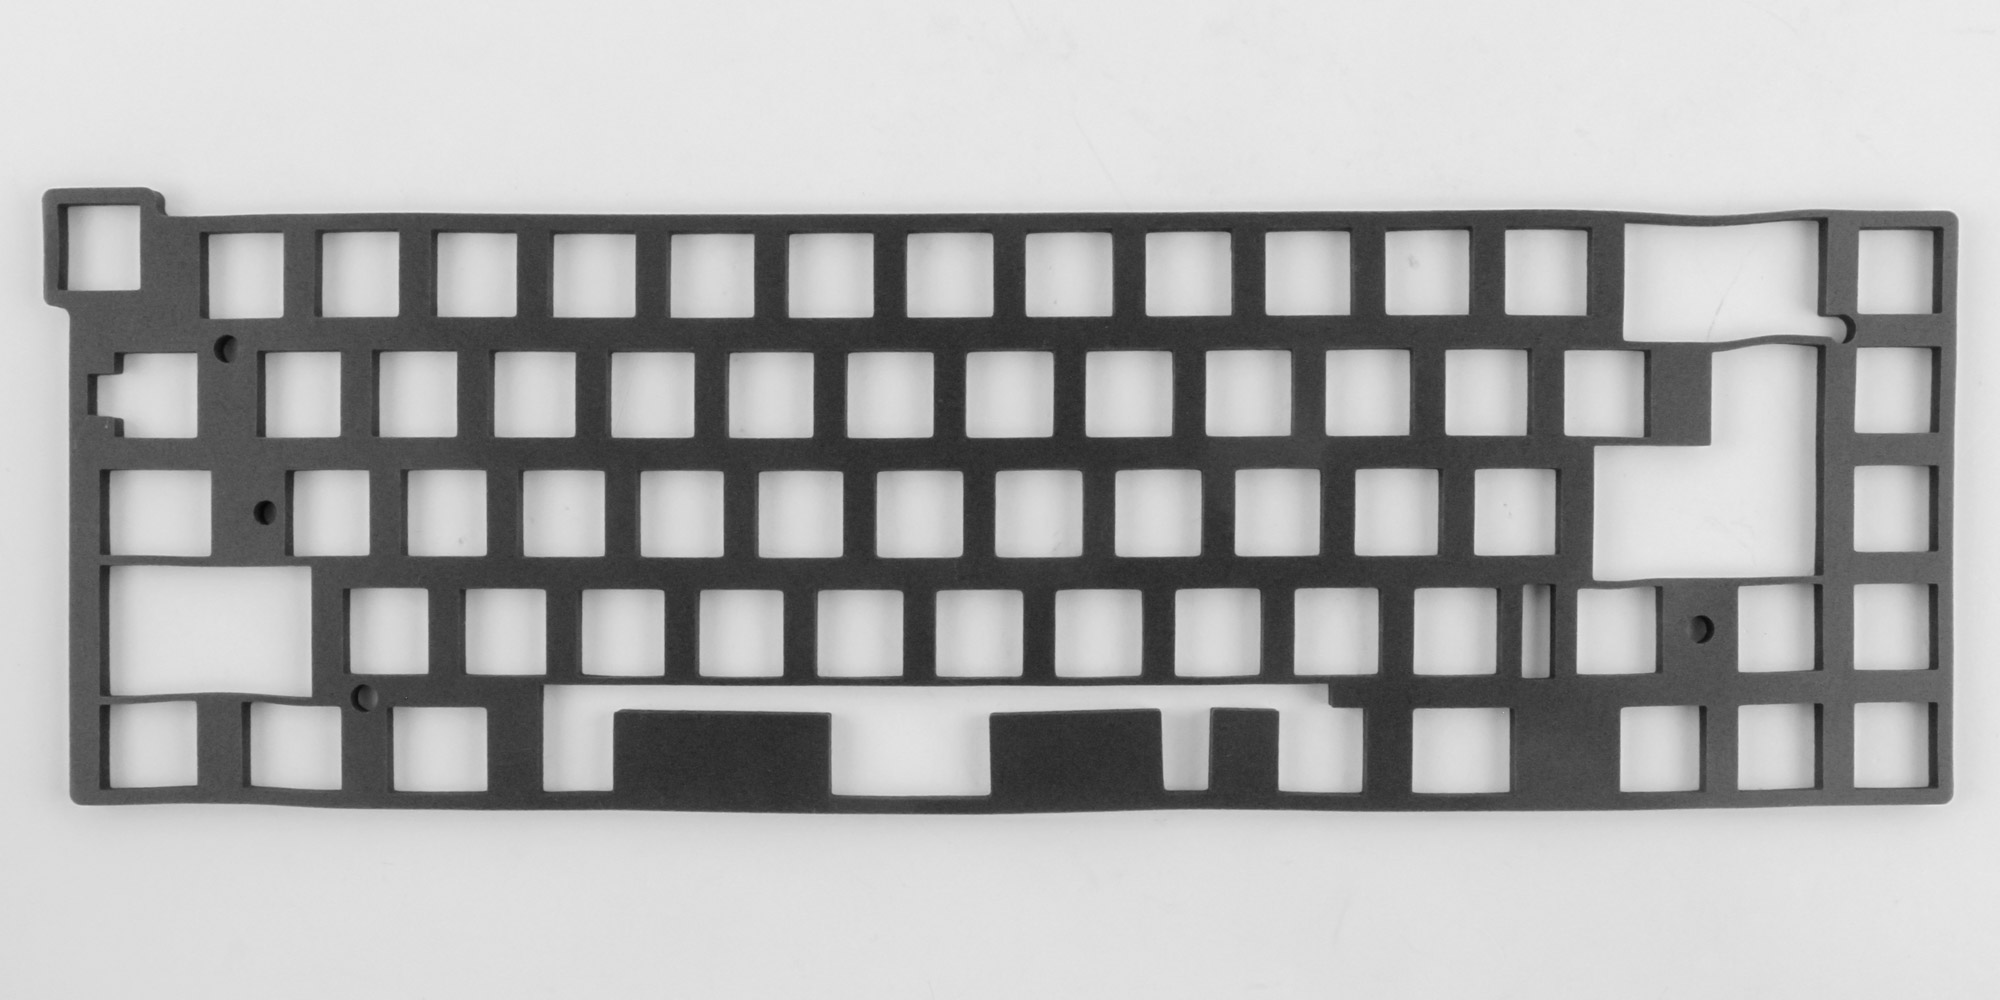

There is a lot going on here with individually wrapped elements you need to put together into the kit. These come nicely protected and labeled to help avoid confusion, which is handy since newcomers to keyboards may otherwise be overwhelmed by the similar looking items. For example, here we have two pieces of battery foam, 1 mm Poron foam +2 mm hot swap foam + 3.5 (and an optional 5) mm poron foam + IXPE sheets, a polycarbonate plate as well as an aluminium plate.


We then get to the PCB which is either wired (soldered only), wired + hot swap, or wired/Bluetooth + hot swap depending on which option you went for. I have the wired + hot swap version here characterized by the Gateron switch sockets pre-installed. No matter which version you go with, the PCB will be adorned in maths on the front because, if you didn't guess it by now, the Sin in Sin65 is short for Sine and we will see the use of sin(x) in the case design too. Powering this PCB is an ST Microelectronics STM32F103C8 32-bit ARM Cortex-M3 USB microcontroller with 64 KB of onboard memory and a relatively faster, more powerful processor compared to what's usually seen on keyboards. The best part is this MCU has open-source firmware support with QMK so you can expect to see VIA/VIAL support for software customization. The other two PCBs may well have a different controller as I know the wireless one at least relies on a Chinese driver which also feels quite competently made. The various components are soldered neatly on this multi-layer PCB as expected.


The accessory box also provides a bunch of similarly packed and labeled screws as well as an L-shaped Allen key which came in its own little pouch. Wind Studio also sent over a set of screw-in stabilizers to use but you are otherwise expected to provide your own stabilizers here—I fully expect anyone looking at this kit to already know exactly which stabilizers they want to use as well as likely manually lubing them too.

The bottom layer has even more foam and here we see the case itself in one final wrap. Needless to say that Wind Studio is not going cheap with packing materials here and you will have a pristine unboxing experience.
Wind Sin65: Closer Examination and Assembly


When asked about which kit version I'd like to examine, I took a look at the various options and thought that orange might be a nice change from the norm. This particular version happens to be anodized aluminium given a color closer to burnt orange than a brighter orange, although it does change hue slightly depending on the incident light making it hard to photograph consistently. No matter which version you go with, the kit measures in at 336 x 120 x 33.5 mm and the weight varies since you can have an aluminium kit or a polycarbonate one. The kit ships with just the top and bottom panels assembled although the retail units may have even these separate if the assembly manual is to go by. Note the separated Esc key though; this is a deliberate choice to reduce accidental hitting of Esc on this 65% form factor kit. On the back we see a pre-installed weight which also may ship separately packed in the final version. There is a sine curve in the middle with the product series alongside and I like the ripple-like pattern applied to the weight. There is a built-in 7° elevation integrated on the back given the absence of any keyboard feet and at this stage I decided to separate the two pieces to make the kit assembly much easier. It also gives a closer look at the internals and the flawless finish throughout. Begin by placing the four round rubber pads on the corners at the back as seen above. This will help raise the keyboard off your desk, thus preventing scratches and also adding friction in use.


The wireless kit will have two separate batteries pre-installed in the recesses you see in the bottom case panel. This wired-only version thus comes with two "battery foam" pieces that you need to fit in those spaces so as to keep things as compact as possible. The next step is to install the Type-C daughterboard between the two foam pieces using the provided PCB board and screws. At this point, you can choose to install the provided 1 mm case foam or leave it out depending on how dampened you want the typing sound to be. I am going for a max damping and isolated keyboard here so I have added it along with the 2 mm thick hot-swap foam sheet as well. These have cutouts that go around the hot swap switch sockets snugly and there is now very little room left in the case. Wind Studio had pre-installed four round silicone stands in the corners too but the instructions suggest these may ship separately for you to do so yourself.


Time to assemble the plate/PCB section. Begin with inserting your choice of screw-in stabilizers for L.Shift, Space Bar, R.Shift, and Enter keys. I went with the ones Wind Studio had provided after applying a dab of lube at each end. Make sure you install them correctly—this can be easier if you first place the 0.5 mm IXPE sheet on top of the PCB on the front which will help align where the stabilizers are supposed to go. Screw the stabilizers from the back and then do the same for four brass standoffs—this can be fiddly—as seen above.


Those standoffs help screw the plate in place on the PCB. But here too you have a choice of adding either the 3.5 mm foam sheet, if you are going with the plate, or the thicker 5 mm foam sheet for a plate-less mount. Note that the plate-less mount option is only on the wired, soldered PCB so that is why I don't have the 5 mm foam sheet in the box either. I went with the 3.5 mm foam and the aluminium plate here; the polycarbonate plate can be slightly more flexible and I knew I wanted a gasket mount anyway. Indeed, this is why I then installed the foam gaskets around the PCB on either side. You can also go for a top mount here as Wind Studio provides the hardware to do so as well.


Once you have finalized the exact configuration of the bottom case panel as well as the plate/PCB section, it's time to connect the two and get the keyboard kit ready to go. The internal cable from the Type-C daughterboard goes into the connector on the PCB and is locked in place. Then flip over the plate/PCB section and—if you have gone for the gasket mount—simply orient it to have the gaskets be in the recesses in the bottom case panel before you put the top panel over and screw it all together from the back.
Our Patreon Silver Supporters can read articles in single-page format.
Jul 21st, 2025 06:19 CDT
change timezone
Latest GPU Drivers
New Forum Posts
- BIOS RX580 2048sp chipset 215-0876406 micron (4)
- What are you playing? (23984)
- What's your latest tech purchase? (24335)
- 14900k high voltage (22)
- Your PC ATM (35525)
- Garbage Asus Software (39)
- How GPU-Z works in an AMD CPU virtual environment (1)
- raid sata ports and windows upgrade (3)
- weird artifacts on my windows 11 background (11)
- STAR CITIZEN - RSI POLARIS Project (47)
Popular Reviews
- Thermal Grizzly WireView Pro Review
- Razer Blade 16 (2025) Review - Thin, Light, Punchy, and Efficient
- TerraMaster F4-424 Max Review - The fastest NAS we've tested so far
- Cougar OmnyX Review
- AVerMedia Live Gamer Ultra S (GC553Pro) Review
- Pulsar X2 Crazylight Review
- MSI GeForce RTX 5060 Gaming OC Review
- Upcoming Hardware Launches 2025 (Updated May 2025)
- Sapphire Radeon RX 9060 XT Pulse OC 16 GB Review - An Excellent Choice
- AMD Ryzen 7 9800X3D Review - The Best Gaming Processor
TPU on YouTube
Controversial News Posts
- Some Intel Nova Lake CPUs Rumored to Challenge AMD's 3D V-Cache in Desktop Gaming (140)
- AMD Radeon RX 9070 XT Gains 9% Performance at 1440p with Latest Driver, Beats RTX 5070 Ti (131)
- NVIDIA Launches GeForce RTX 5050 for Desktops and Laptops, Starts at $249 (127)
- NVIDIA GeForce RTX 5080 SUPER Could Feature 24 GB Memory, Increased Power Limits (115)
- NVIDIA DLSS Transformer Cuts VRAM Usage by 20% (99)
- AMD Sampling Next-Gen Ryzen Desktop "Medusa Ridge," Sees Incremental IPC Upgrade, New cIOD (97)
- NVIDIA Becomes First Company Ever to Hit $4 Trillion Market-Cap (94)
- Windows 12 Delayed as Microsoft Prepares Windows 11 25H2 Update (92)