 1
1
CORSAIR Hydro X Series XD3 Pump/Reservoir Combo Review
Installation & Lighting »Closer Examination


It has been a while since I last had my hands on a DDC pump/reservoir combo unit, with most opting to go the D5 route with cylindrical or rectangular cuboid reservoirs attached. The Xylem DDC appears to have been brought back because of the ever-growing popularity of distribution plates, once a modder's challenge to design and build, and reservoirs and even cases built with a distro plate as the theme. These tend to use the DDC pump owing to the flatter and lower profile of the pump, which had in turn led to flatter reservoirs with DDC pumps as standalone products to fit in with this aesthetic. CORSAIR decided that wasn't for them and went with a more cubical form factor here, which still clearly fits in with the rest of their Hydro X series of custom cooling parts. As with the Hydro XD5, six BSP G1/4" threaded ports provide options of fill port, in/return, out, and the temperature sensor stop plug.
The reservoir is made out of polished nylon, which works well for the intended applications and then some. It is lighter than borosilicate glass, which may be a deal breaker for some who absolutely want thick glass for reasons of their own. For just about everyone else, this is going to be just fine, and the level of transparency is good for colored coolants and/or RGB lighting customization. Indeed, there are 16 integrated digital RGB LEDs underneath the top and shining inward to allow for a light show here as well, which is why there are two sets of cables off the side. We also see channels in the reservoir to push the coolant through a longer travel distance, which in turn gives air bubbles more time to separate from the coolant and not get pushed back into the loop.


The other three unused ports are meant to be closed with the provided three stop plugs, and this is also where the tool to install them easily comes in handy. The pump is a Xylem DDC pump with PWM control, which is rated for a nominal current draw of 1.5 A on the 12 VDC rail and a maximum of 18 W. The first set of cables is for the pump itself, with unsleeved PWM control via a 4-pin header and power via a full-size MOLEX connector, essentially just adding in the pump as received from Xylem. I would have liked to see these sleeved or in black generally since the next set using ribbon cables in black looks better simply because of the more neutral color scheme, and apparently this is happening in the future, but take that for what you will. This second set has a cable that connects to a compatible CORSAIR Commander PRO or Lighting Node PRO, and the other is the pass-through cable powering a single LED header for more than just this pump/reservoir combo. There are also four rubber-lined screw feet at the bottom to dampen vibrations from and to the case.


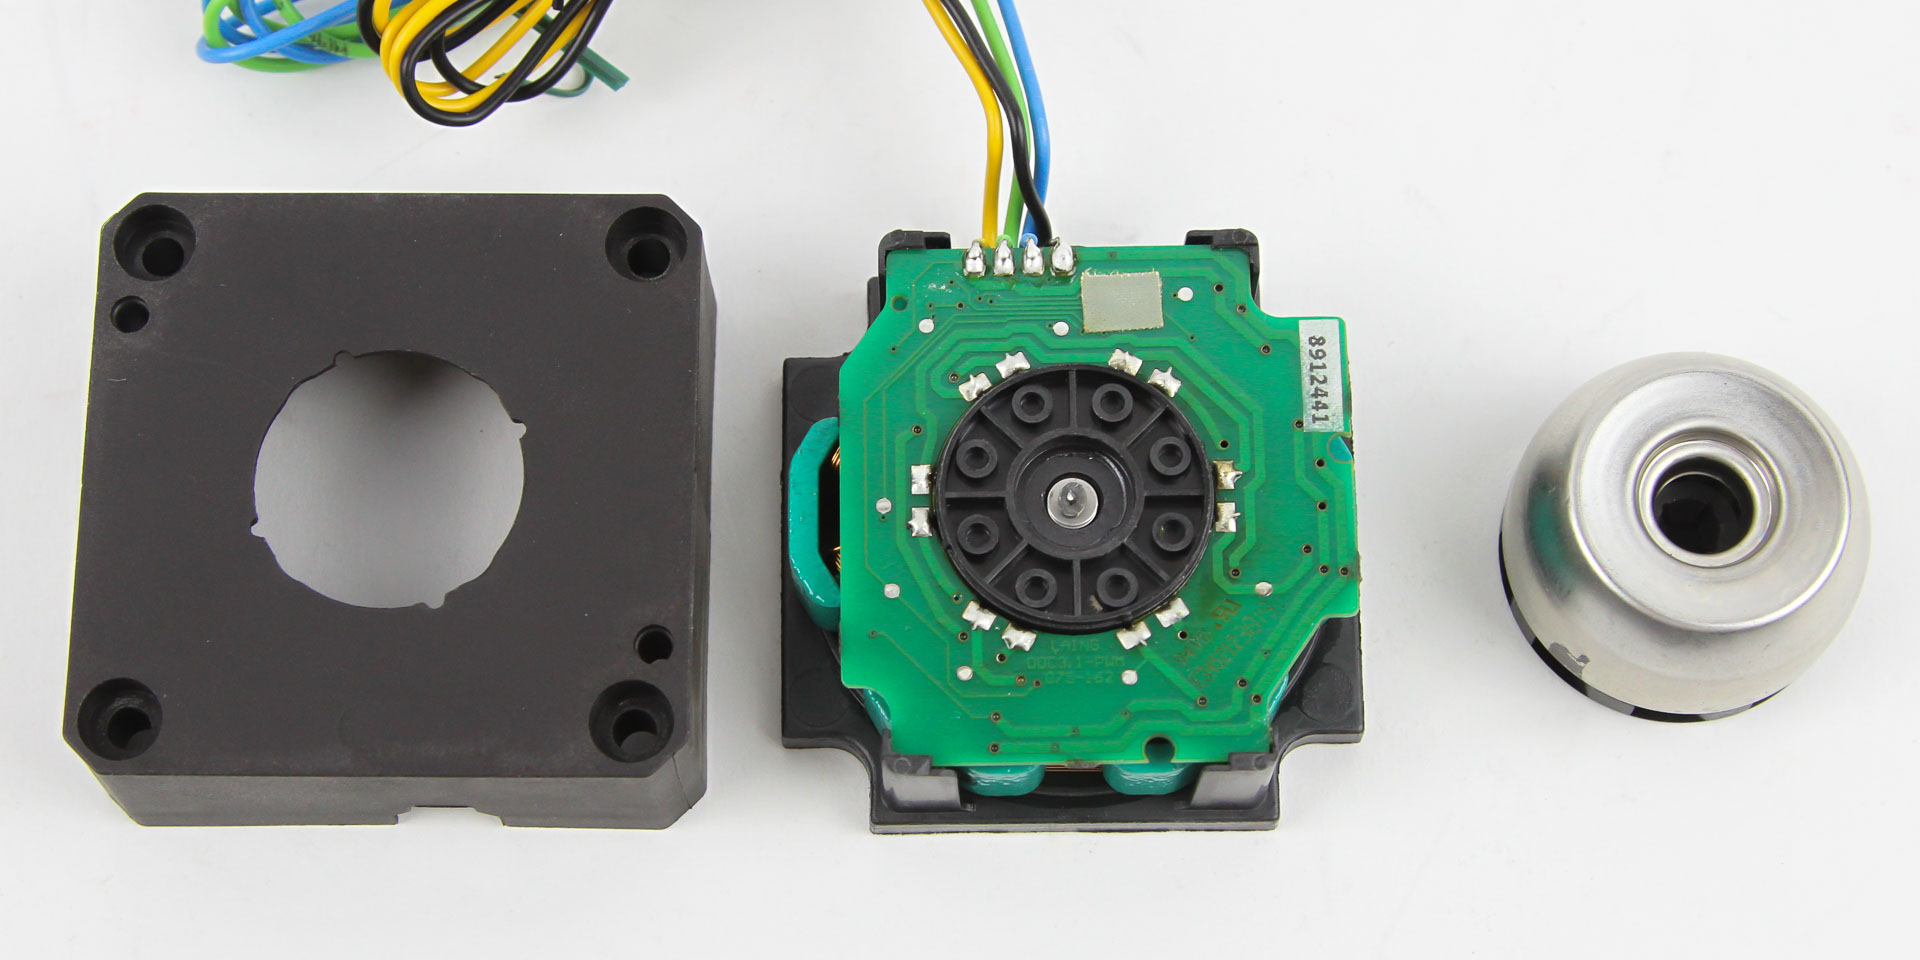
Disassembly was done after testing was complete, although there really is nothing to gain from taking it apart unless you have to clean it up past a simple flush. This has to be done in stages, beginning at the bottom with the removal of four screw feet, which hold the bottom ABS plastic cover/base with room to hide the cables, especially the LED cables we now see come from the side and pass through cable-routing cutouts. The pump itself is held in place via four H2.5 screws and comes out easily to give us a better look at the Xylem DDC. If you have not seen one before, you still have the usual O-ring around the impeller and flow path to keep the coolant confined, a magnetic impeller which goes over a shaft with a ceramic ball bearing—so never run this dry—and a lot more plastic for the pump housing with the motor underneath. The pump top is integrated with the reservoir housing, again in nylon to complement the reservoir with a fairly standard-looking volute. There are no heatsinks added for the DDC motor, which may run warmer than the equivalent D5 in this case. The Xylem DDC is built to withstand higher operating temperatures relative to the D5 either way.


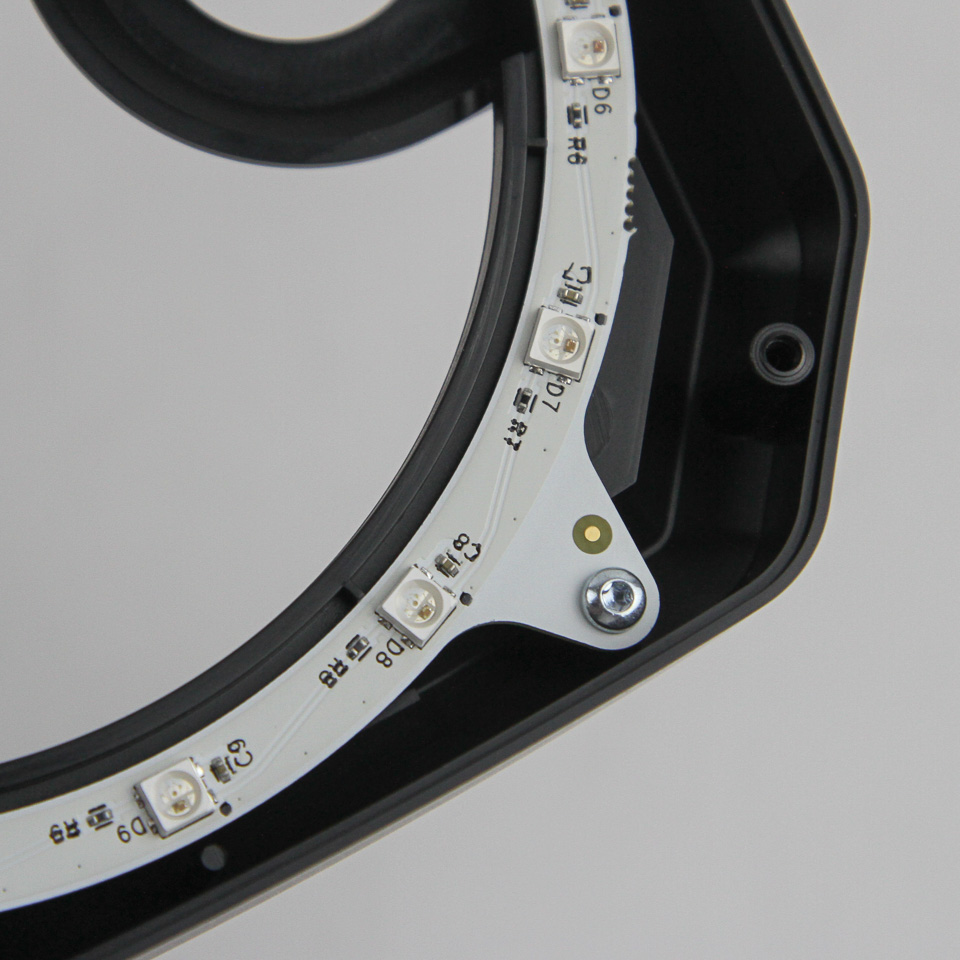

A few more screws here keep the pump top and reservoir body together. Some of these can be removed to get a better look at the RGB LEDs themselves, but there are many more holding the nylon reservoir body in place. I did not bother going past this point as there is nothing else to see, knowing that CORSAIR has used the same RGB LEDs as with their other Hydro series components. For those interested, budget for ~180 mL of coolant for the reservoir if filled up.
Jun 28th, 2025 15:54 CDT
change timezone
Latest GPU Drivers
New Forum Posts
- Page loading issues from Russia (50)
- Can anyone recomend a video course on basic computer repair? (39)
- Kingston WI-Drive 128GB looking ill today!! (14)
- X79 and/or rampage IV OC'ing thread for those of us still left.... (2417)
- The TPU UK Clubhouse (26503)
- Can you guess Which game it is? (187)
- What air cooler should I get for Jonsbo Z20-9800X3D? (4)
- Newbie to Python (22)
- Which CPU to Choose for a 7900 XT? Ryzen 7 7700 or Ryzen 5 9600X? (20)
- Throttlestop Functionality Suggestions + Inquiries (5)
Popular Reviews
- ASRock Phantom Gaming Z890 Riptide Wi-Fi Review
- Sapphire Radeon RX 9060 XT Pulse OC 16 GB Review - Samsung Memory Tested
- SCHENKER KEY 18 Pro (E25) Review - Top-Tier Contender
- Lexar NQ780 4 TB Review
- AMD Ryzen 7 9800X3D Review - The Best Gaming Processor
- Upcoming Hardware Launches 2025 (Updated May 2025)
- AVerMedia CamStream 4K Review
- Sapphire Radeon RX 9070 XT Nitro+ Review - Beating NVIDIA
- NVIDIA GeForce RTX 5060 8 GB Review
- Intel Core Ultra 7 265K Review
TPU on YouTube
Controversial News Posts
- Intel's Core Ultra 7 265K and 265KF CPUs Dip Below $250 (287)
- NVIDIA Grabs Market Share, AMD Loses Ground, and Intel Disappears in Latest dGPU Update (204)
- Microsoft Partners with AMD for Next-gen Xbox Hardware (105)
- NVIDIA Launches GeForce RTX 5050 for Desktops and Laptops, Starts at $249 (101)
- Intel "Nova Lake‑S" Series: Seven SKUs, Up to 52 Cores and 150 W TDP (100)
- Reviewers Bemused by Restrictive Sampling of RX 9060 XT 8 GB Cards (88)
- NVIDIA GeForce RTX 5050 Reportedly Scheduled for July Release (87)
- GPU IPC Showdown: NVIDIA Blackwell vs Ada Lovelace; AMD RDNA 4 vs RDNA 3 (79)