 17
17
Deepcool Tristellar Review
Value & Conclusion »Assembly

As it seemed quite simple, installing the GPU could be a great place to start the assembly process. Deepcool advertises 340 mm when it comes to the maximum length of graphics cards. With our card just below 300 mm, their specification seems correct.


To complete this pod's assembly process, you will also have to add the 2.5" drives of your choice. To do so, simply pull one of the trays out and secure the drive with the black screws Deepcool provides. Now, slide it back into position to have the connector attach to the drive, which will hold it in place nicely.
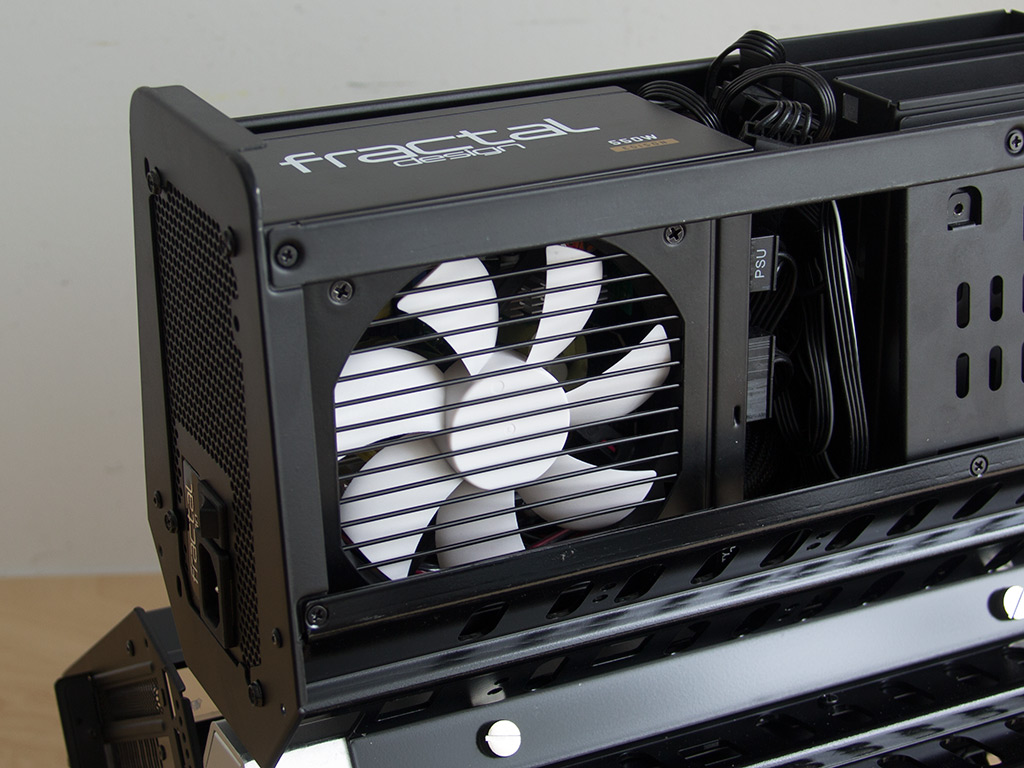
Moving on to the compartment for the power supply, the storage drives' cables have all been pre-routed, so you only have to squeeze the mainboard's and PCIe's leads through the Tristellar's compact spine. Our PSU fit just fine, but the cable mess is still apparent here, though we made a point of only using those modular cables we simply had to include to connect everything to the PSU.


To complete assembly in this pod, you will once again have to install some drives. 3.5" drives are installed with the use of attachable rails, which allow you to sink a drive into the cage until it snaps into place; it has now been connected and is ready for use.


The optical drive bay may be revealed by pulling off the front of the chassis and removing the silver metal cover. Once free, simply slide the drive in and secure it with some tiny screws. Deepcool unfortunately does not offer any such screws, so you will have to find some yourself. Once in place, put the cover back and place the metal plate on the tray. As it is completely solid and comes with just a thin film of adhesive, it does not stick to the drive as well as it could. Deepcool could improve here by milling the center out a bit or using a thicker layer of adhesive, which would allow for elements like the eject button to have less of an impact while maximizing the adhesive's surface area. It would have also been excellent had a slot-loading cover been included - it would have made a fine addition to the Tristellar.


Installing the motherboard is done as a last step, once all the cables are routed to the compartment. You could use a low-profile air cooler of up to 80 mm in height, but considering the fact that users will most likely want to stuff something rather powerful inside the Tristellar, a liquid-cooling solution makes more sense. Our 120 mm unit fits into the Tristellar perfectly, with its fan blowing air through the cooler and out the side.


With the two components installed in this pod, system assembly is complete. You can see that there are some possibilities to route cables, and the backside of the motherboard tray is essentially free, which allows you to remove a cooler and its backplate without taking out the whole board.


With all the parts in place, the compartments manage to convey their purposes quite clearly, and the system looks more like a stripped drone from the future, not a PC chassis.
Finished Looks


As a last step, you will have to apply the metal mesh covers onto both air vents. These are on the Tristellar's underside, out of view. The first vent allows for the PSU to draw fresh air into the system.


The second vent is meant to allow for air to leave the chassis, once it has been pushed through the radiator by the mounted fan. You may also place one of those metal mesh covers onto this vent. The strong magnets will hold these in place nicely.


With everything in place, the Tristellar makes an amazing impression. The power button lights up the Gamerstorm logo nicely, in a red hue much like the heart of an autonomous system from the future (Skynet, anyone?).


Look at its front and only the red LED will give away the fact that there is something inside, while the rear is naturally much more revealing. The Tristellar's unique design here allows for all the cables to easily be plugged into their appropriate ports. It would have been great of Deepcool to include some Velcro strips to wrap all those individual leads together into a single cable. Another option would have been to equip that silver centerpiece with a cable hook similar to what you might find behind TVs or Monitors to make routing all those external cables away as one possible.
Jun 16th, 2024 03:18 EDT
change timezone
Latest GPU Drivers
New Forum Posts
- new tv/display what one? what to avoid? (28)
- Alphacool - problem with radiators - bad fin soldering? (27)
- Is the ThermalRight Frozen Prism 360 AIO good? (104)
- Black screen in SOME games 6800xt Sapphire Pulse (10)
- i7-9750H Core voltage not applying, everything else is (3)
- Jefferson Lab in Newport News Openhouse (5)
- EZ debug light VGA without any problems (0)
- FINAL FANTASY XIV: Dawntrail Official Benchmark (96)
- when using only 2 out of 4 ram slots which 2 are best? (11)
- What are you playing? (20831)
Popular Reviews
- Pulsar Xlite V3 eS Review
- Aune AR5000 Headphones + S17 Pro Headphones Amplifier Review
- VAXEE Outset AX Wireless (4K) Review
- Upcoming Hardware Launches 2024 (Updated May 2024)
- Team Group T-Force G70 Pro 2 TB Review
- AMD Ryzen 7 7800X3D Review - The Best Gaming CPU
- Intel Lunar Lake Technical Deep Dive - So many Revolutions in One Chip
- NZXT H6 Flow RGB Review
- ASUS Radeon RX 7900 GRE TUF OC Review
- Thermal Grizzly KryoSheet Review - Tested on RX 7900 XTX with 475 W
Controversial News Posts
- Possible Specs of NVIDIA GeForce "Blackwell" GPU Lineup Leaked (132)
- NVIDIA RTX 5090 "Blackwell" Founders Edition to Implement the "RTX 4090 Ti" Cinderblock Design (118)
- AMD Ryzen 9000 Zen 5 Single Thread Performance at 5.80 GHz Found 19% Over Zen 4 (106)
- AMD Outs Ryzen 5000XT Processors for Socket AM4, an 8-year Old Socket (105)
- Nightmare Fuel for Intel: Arm CEO Predicts Arm will Take Over 50% Windows PC Market-share by 2029 (105)
- AMD Says Ryzen 9000 Series Won't Beat 7000X3D Series at Gaming (101)
- AMD Zen 5 Storms into Gaming Desktops with Ryzen 9000 "Granite Ridge" Processors (100)
- Biden Administration to Revive Trump-Era Tariffs on China-made GPUs and Motherboards (95)