 4
4
EVGA Hadron Air Review
Assembly & Finished Looks »A Closer Look - Inside

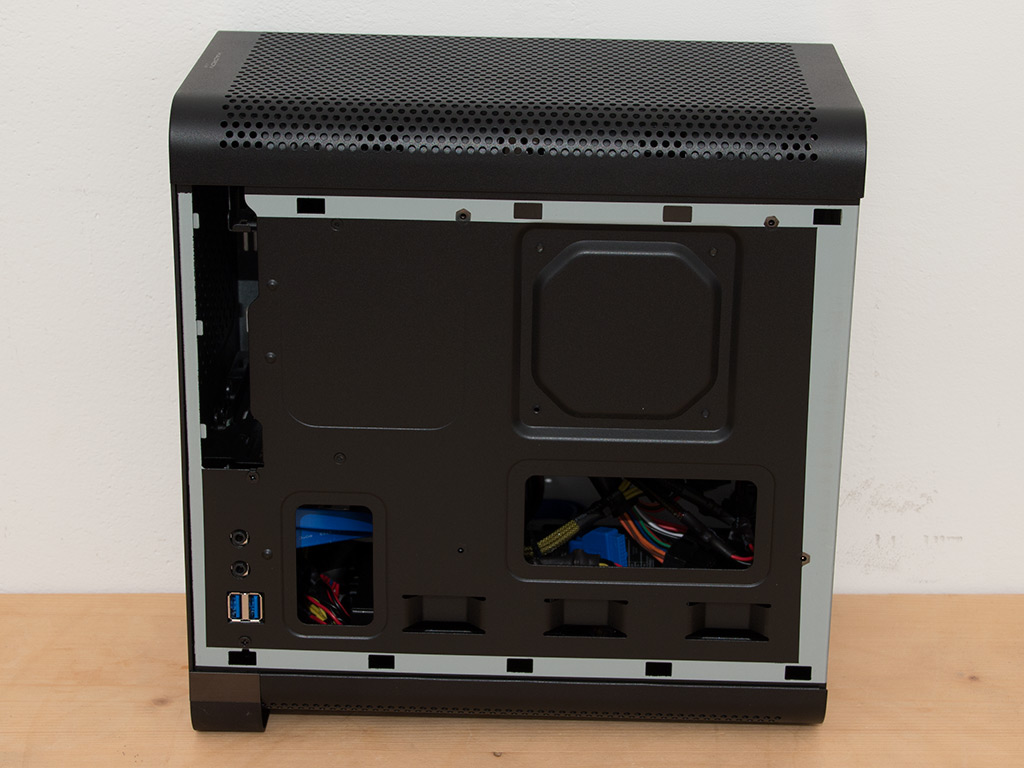
The main side panel of the Hadron Air is secured with thumbscrews, while the other panel requires the use of a screwdriver. Once removed, it becomes apparent that the actual frame of the chassis is "OEM gray", as I like to call it. Only the motherboard tray and the visible areas of the chassis are black. The same goes for the side panels: gray on the inside and black on the outside. It would have been nice to have an all-black interior instead. The second issue is the lack of any openings under the CPU area of the motherboard, since you will have to remove the entire board to access the CPU or exchange the cooler. It also forces you to install the motherboard with the CPU cooler attached, which makes wiring things up a bit tricky. Nor does the size of the Hadron Air allow you to route anything behind the motherboard tray.


The cage in the front holds the hard-drive trays and mounting frame for the slimline optical-drive bay. You may install either 2.5" or 3.5" storage units here. The entire floor of the chassis is taken up by the 500W EVGA-branded PSU in black housing. Last but not least, the two expansion slots are protected by individual covers held in place by normal screws.

Tipping the chassis over on its side, one can clearly see both 120 mm exhaust fans in the ceiling. Their individual 3-pin connectors have been adjoined, so you only need a single motherboard header to power both. Before you wonder whether there is enough room for a 240 mm radiator here: no, that won't be possible. But don't be sad, users who want such a setup can grab the Hadron Hydro EVGA will release soon. We also noticed that the feet are not covered in a layer of rubber, which will scratch up the bottom bars acting as standoffs, and your working surface if solidified pieces of dust get caught in-between the chassis and table. It would be nice of EVGA to then slap some rubber on these feet.


Unfortunately, the cables are pretty standard as well. It would have been nice if the Hadron Air had all-black sleeving on these, but the case and USB 3.0 cables come in their default colors.
The 500W PSU


We took the power supply out of the chassis to take a closer look at it. The PSU's underside has, interestingly enough, been left unpainted, which goes to show that several parts were painted after the chassis was partially assembled. The unit itself is quite heavy and makes an excellent first impression.
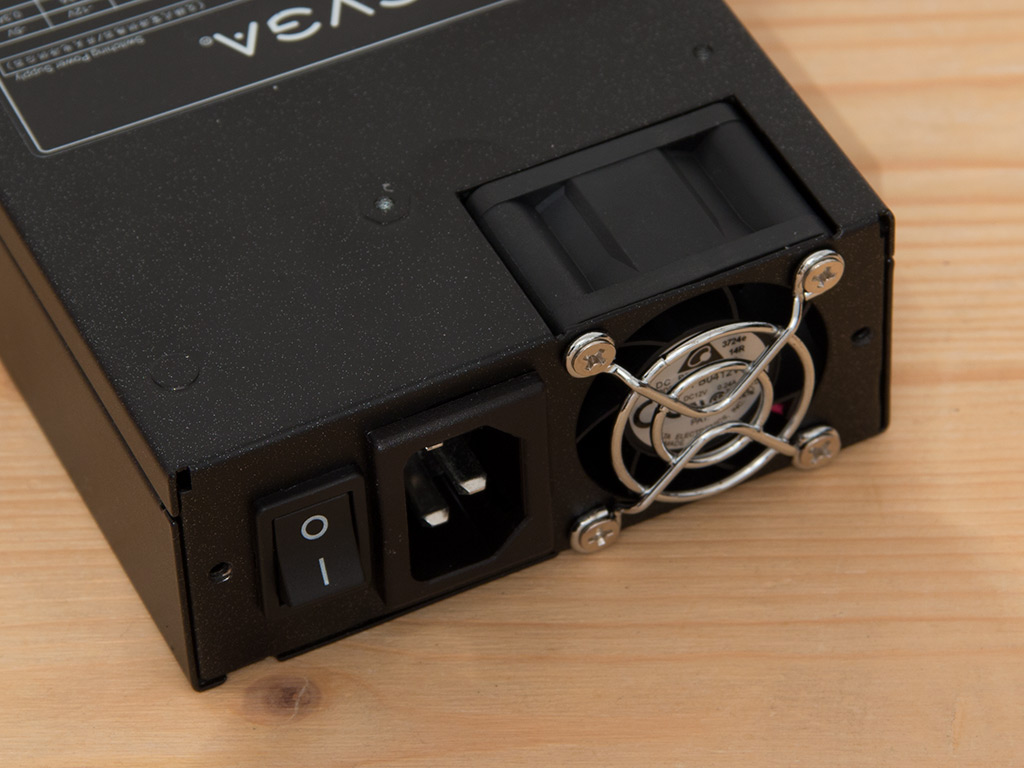

As this is a U1 power supply, the tiny fan in the back is the only thing pushing air across its internal components. You should then not expect it to be as quiet as an ATX PSU. The label on the unit reveals that it is rated for 500W, is 80Plus Gold certified, and features a single 40 Amp +12V rail, which is plenty for any setup you could stuff into the Hadron Air.


All the power cables are firmly attached to the unit. There are the standard 20+4-Pin and 8-Pin ATX/CPU power connectors, a dual-head 8-Pin PCIe lead, four Molex connectors on two separate cables, and a single stand with two SATA plugs. While that is a good mix, it would have been better to have four SATA and two Molex connectors instead, as nobody really uses drives that require Molex connectors.
May 6th, 2024 17:03 EDT
change timezone
Latest GPU Drivers
New Forum Posts
- HELP-pc turns on then off instantly (12)
- GPU Hot Spot Temperature 105 Celsius, fans at 3000 RPM, while GPU Temperature is max 70 Celsius (39)
- 7900 XTX Seriously lacking (118)
- Overheating/undervolt/setup issues (8)
- nvflashk - Flash any BIOS to NVIDIA GPUs - Safe board ID bypass up to 4xxx series (240)
- Is this Sapphire PULSE RX 5600 XT legit or fake? (42)
- Only some humans can see refresh rates faster than others, I am one of those humans. (181)
- Envinda RX 580 2048SP 8GB no image (20)
- AAF Optimus DCH Audio Modded Driver for Windows 10/11 - For ALL HDAUDIO Enumerator Chips (658)
- Update on the whole PC rebooting issue. There was an extra standoff in the case, but now it's crashing even more (0)
Popular Reviews
- Finalmouse UltralightX Review
- ASRock NUC BOX-155H (Intel Core Ultra 7 155H) Review
- Meze Audio LIRIC 2nd Generation Closed-Back Headphones Review
- Cougar Hotrod Royal Gaming Chair Review
- Upcoming Hardware Launches 2023 (Updated Feb 2024)
- AMD Ryzen 7 7800X3D Review - The Best Gaming CPU
- Montech Sky Two GX Review
- ASUS Radeon RX 7900 GRE TUF OC Review
- HYTE THICC Q60 240 mm AIO Review
- Logitech G Pro X Superlight 2 Review - Updated with 4000 Hz Tested
Controversial News Posts
- Intel Statement on Stability Issues: "Motherboard Makers to Blame" (248)
- Windows 11 Now Officially Adware as Microsoft Embeds Ads in the Start Menu (167)
- AMD to Redesign Ray Tracing Hardware on RDNA 4 (165)
- Sony PlayStation 5 Pro Specifications Confirmed, Console Arrives Before Holidays (117)
- AMD's RDNA 4 GPUs Could Stick with 18 Gbps GDDR6 Memory (114)
- NVIDIA Points Intel Raptor Lake CPU Users to Get Help from Intel Amid System Instability Issues (106)
- AMD Ryzen 9 7900X3D Now at a Mouth-watering $329 (104)
- AMD "Strix Halo" Zen 5 Mobile Processor Pictured: Chiplet-based, Uses 256-bit LPDDR5X (103)