 2
2
Fractal Design CORE 1000 Review
Value & Conclusion »Assembly
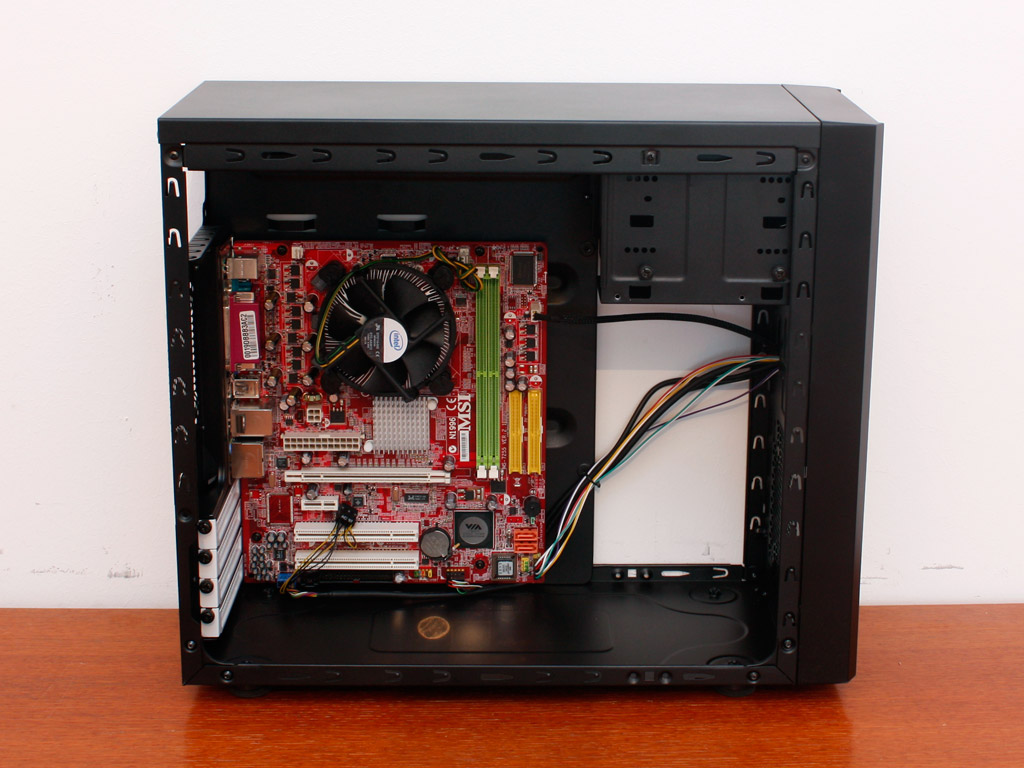

Installing the mainboard is an easy task, simply place it on the traditional spacers and screw it down. Due to the size of the chassis, you have to make sure that you will not be using a CPU cooler that is too large. A rule of thumb is, that the cooler should utilize the same fan size as the maximum rear fan in the chassis - in this case a 92 mm unit. So anything above that will not work. Due to the lack of front hard drive bays, any graphic card you install will have plenty of space, so feel free to use the biggest and baddest ones in the CORE 1000, but be aware of the maximum width. The card should not be wider than the standard with no fancy cooling units or heatpipe attachments which extend beyond the PCB size. On top of that you want to make sure that the power connectors of the graphic card lead out the back and not the side of the card. This is something you will not find on most high-end boards. In conclusion this means that even though you have the space for long cards, due to the design of these graphic cards to fit traditional cases, the power leads will get in the way of the hard drives, so the majority of high-end cards are out of the question - too bad.


As mentioned before, you are able to install up to three 2.5 inch or two 3.5 inch hard drives on the metal plate. As soon as one of these drives is of the larger variety this number drops to two. I have installed one of each kind to illustrate this. Once on the metal plate, just put it back in the chassis - that is it.

I mentioned the fact, that you have to make sure that your graphic card is not wider than the standard width. As you can see it will collide with the 3.5 inch drive otherwise. Using SSDs or 2.5 inch hard drives will give you some additional space though.


To install the optical drive, one has to pull the entire front off. Once the bay covers is removed, simply slide the drive into place and secure it with the provided thumb screws.

As the PSU is mounted on the top, you may want to do this as a first step. In this review, due to the OEM CPU cooler, there is plenty of space to place the unit in its spot. Feel free to use a long unit if required, as there is plenty of space to do so.


Once everything is installed you can see that the mainboard area is still rather clean, even though the chassis does not offer any cable management possibilities. Most of the mess is hidden behind the hard drive plate. This also means that most of the cables will obstruct the air flow of the front fans or that things may be a bit tight if you fill the case to the rim.
Finished Looks


Once everything is done and the side panels have been placed back on the side of the chassis, the CORE 1000 makes a good impression. For a mATX chassis it can hold quite the potent hardware, so I can see someone using this case for a compact LAN party rig. The blue power LED is located on the side of the chassis, right below the side I/O panel.


The installed optical drive fits perfectly in the chassis, while you have clear access to everything in the rear of the CORE 1000. If you look closely at the side, you can clearly see the graphic card is at the same height of the fan opening, thus installing a cooling unit here should benefit the internal temperatures.
May 3rd, 2024 15:21 EDT
change timezone
Latest GPU Drivers
New Forum Posts
- Anime Nation (12782)
- What's your latest tech purchase? (20422)
- Alphacool CORE 1 CPU block - bulging with danger of splitting? (74)
- DMAS Design [SPDIF-Optical] (76)
- SSD RAM CACHING (Especially Writing) (0)
- Announcement: VPN's no longer work right in Windows 10 or 11 or Servers (21)
- 7900 XTX Seriously lacking (113)
- Ryzen 7800x3d $196 with bundle at Microcenter (2)
- Old high quality PSU, or semi-old mid-quality PSU? (57)
- 7800x3d $216 in bundle at Microcenter (37)
Popular Reviews
- HYTE THICC Q60 240 mm AIO Review
- ASRock NUC BOX-155H (Intel Core Ultra 7 155H) Review
- Meze Audio LIRIC 2nd Generation Closed-Back Headphones Review
- Montech Sky Two GX Review
- Ugreen NASync DXP4800 Plus Review
- Upcoming Hardware Launches 2023 (Updated Feb 2024)
- Team Group T-Force Vulcan ECO DDR5-6000 32 GB CL38 Review
- MOONDROP x Crinacle DUSK In-Ear Monitors Review - The Last 5%
- AMD Ryzen 7 7800X3D Review - The Best Gaming CPU
- Logitech G Pro X Superlight 2 Review - Updated with 4000 Hz Tested
Controversial News Posts
- Intel Statement on Stability Issues: "Motherboard Makers to Blame" (235)
- Windows 11 Now Officially Adware as Microsoft Embeds Ads in the Start Menu (167)
- Sony PlayStation 5 Pro Specifications Confirmed, Console Arrives Before Holidays (117)
- AMD's RDNA 4 GPUs Could Stick with 18 Gbps GDDR6 Memory (114)
- AMD to Redesign Ray Tracing Hardware on RDNA 4 (111)
- NVIDIA Points Intel Raptor Lake CPU Users to Get Help from Intel Amid System Instability Issues (106)
- AMD "Strix Halo" Zen 5 Mobile Processor Pictured: Chiplet-based, Uses 256-bit LPDDR5X (103)
- AMD Ryzen 9 7900X3D Now at a Mouth-watering $329 (103)