 17
17
Kingston HyperX Genesis 10th Anniversary Special Edition 2400 MHz C11 4x 4 GB Kit Review
(17 Comments) »Introduction
Kingston has been around for over 25 years now. To me, they've always been a quality brand focusing on reliability and longevity. They've not always been at the forefront of performance with their memory products, but that changed 10 years ago with the introduction of their HyperX brand, which had Kingston commit a big part of its resources to producing high-end products that meet the discerning consumer's needs. Today, we have HyperX memory, SSDs, and USB drives, and the HyperX line has expanded to offer more than just high-performance goods in every segment.
After having been ranked numerous times as one of the top 500 private companies at Forbes, Kingston says this about HyperX and their recently launched products:
Since 2002, our HyperX products have been the memory of choice for gamers, computer enthusiasts, overclockers and system builders. The newly launched HyperX 10th Anniversary Edition Memory encompasses ultimate style and performance. As part of the Genesis family line, this stunning low-profile memory enhances the overall PC experience.To help commemorate those ten years, Kingston sent me one of their HyperX Genesis 10th Anniversary Special Edition DDR3 memory kits. The line features speeds ranging from 1600 MHz to 2400 MHz and comes in sizes of 8 to 32 GB, and its sets have either two or four sticks. The kit they sent me arrived unannounced on my doorstep the other day, and I popped the sticks into my test rig right away, before the surprise wore off. I received a couple other HyperX kits and will cover those in the coming weeks. Today, we are taking a look at the 16 GB 2400 MHz C11 kit, a top-level set built for AMD and Intel platforms.

Specifications
| SPECIFICATIONS | |
|---|---|
| MANUFACTURER: | Kingston |
| MODEL: | HyperX Genesis 10th Anniversary Special Edition |
| SPEED RATING: | DDR3-2400 (PC3-19200) |
| RATED TIMINGS: | 11-13-13-30 |
| CAPACITY: | 16GB (4 GB x4) |
| TESTED VOLTAGE: | 1.65 V |
| PCB TYPE: | 8 Layers |
| REGISTERED/UNBUFFERED: | Unbuffered |
| ERROR CHECKING: | Non-ECC |
| FORM FACTOR: | 240-pin DIMM |
| WARRANTY: | Lifetime |
Packaging
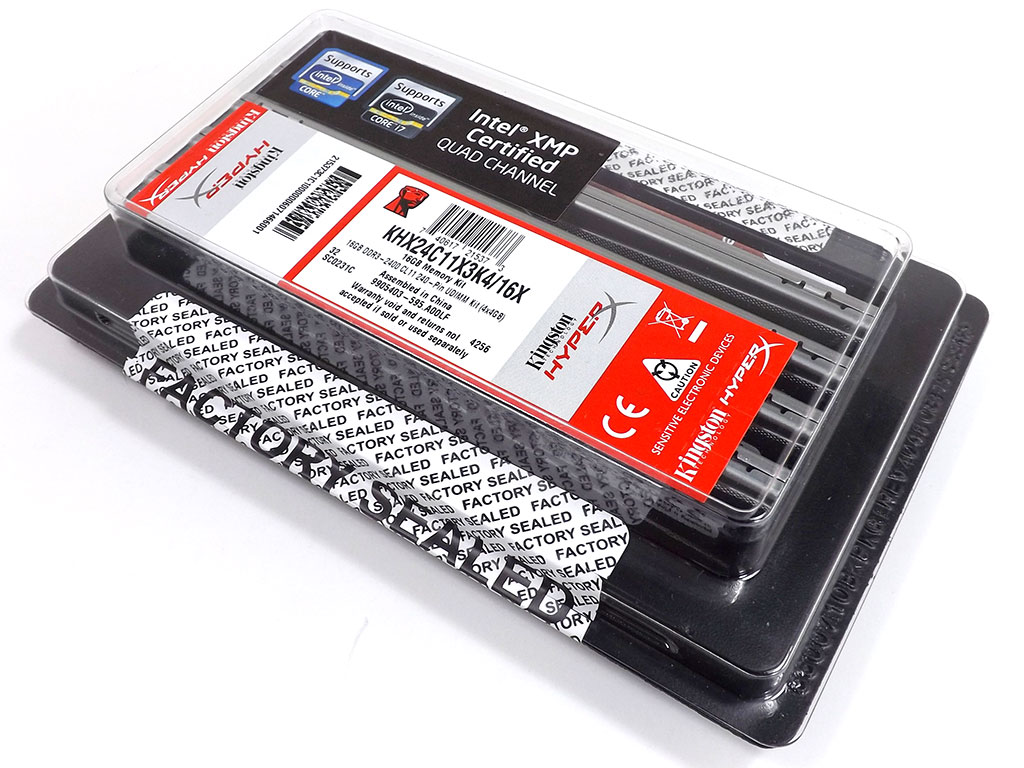


The Kingston HyperX Genesis 10th Anniversary Special Edition 2400 MHz kit showed up in a nice plastic tray that also serves as a static guard. Big enough to fit more than the four sticks it came with and capable of holding both full-size DDR3 DIMMs or DDR3 SODIMMs, I rather like its simple but re-usable packaging. The label found on the front of the box has the part number, size, and other such details. There isn't much else unless you have a part-number decoder handy. What's more interesting to me is that it states the kit to have been assembled in China, but only because I know Kingston also has facilities in Korea.


Cutting the factory seal and flipping up the top, I found the sticks standing nice and tall in the tray, with a small, folded installation guide tucked into the front. Removing it revealed the specially designed heatspeader.

Other than the four sticks and that paper leaflet, there's nothing else to be found, but nothing else is needed!
A Closer Look

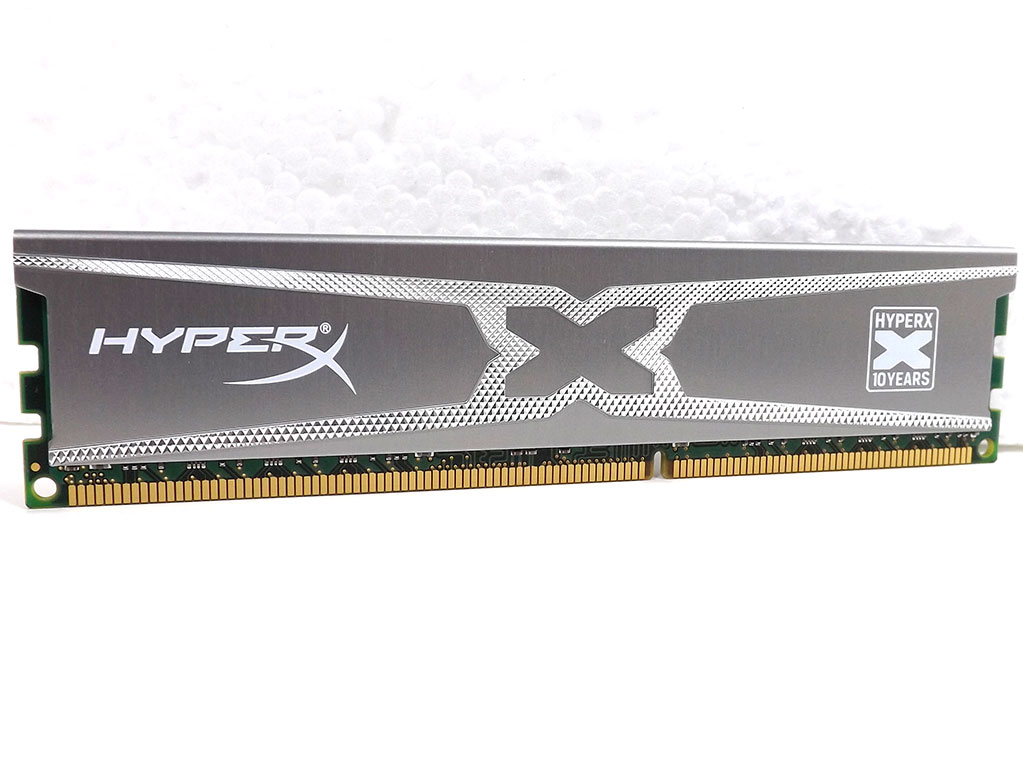
Looking at the Kingston HyperX Genesis 10th Anniversary Special Edition stick closely, I found that each side has a different design on it, although both sides have the big sliver "X" logo that starts in the middle and extends from end to end. The "X" is pretty fitting, both for the HyperX brand and the 10th anniversary. One side has a sticker, while the other has a HyperX logo on its left half and a 10th anniversary logo on the other.

The sticker denotes the memory type and such, while the other end has a Kingston logo silkscreened onto it, just like the logos on the opposite side.


The silver heatsink wraps closely around the stick on three sides. Only the copper fingers that plug into the motherboard and a tiny bit of PCB on either end stick out.


I checked those ends and the IC type under the heatspreaders for any characteristics that might help in identifying the type of PCB used, and I found some numbers on two parts, but nothing that gave any real information. The top of the stick is flat, with just a line across the top where both individual ends meet. A very basic but effective overall design.
Initial Setup
Our Patreon Silver Supporters can read articles in single-page format.
Apr 23rd, 2024 17:39 EDT
change timezone
Latest GPU Drivers
New Forum Posts
- What's your latest tech purchase? (20301)
- ThrottleStop 9.6 Voltage won't change (1)
- need help with motherboard/ ram compability certainty (9)
- FINAL FANTASY XIV: Dawntrail Official Benchmark (71)
- CPB Enabled Boot Loop (8)
- No POST, and no display (8)
- Aida64 cache mem OC (5)
- hacked (72)
- Meta Horizon OS (6)
- windows 11 (4)
Popular Reviews
- Horizon Forbidden West Performance Benchmark Review - 30 GPUs Tested
- Fractal Design Terra Review
- Corsair 2000D Airflow Review
- Thermalright Phantom Spirit 120 EVO Review
- Minisforum EliteMini UM780 XTX (AMD Ryzen 7 7840HS) Review
- ASUS GeForce RTX 4090 STRIX OC Review
- NVIDIA GeForce RTX 4090 Founders Edition Review - Impressive Performance
- ASUS GeForce RTX 4090 Matrix Platinum Review - The RTX 4090 Ti
- Creative Pebble X Plus Review
- MSI GeForce RTX 4090 Gaming X Trio Review
Controversial News Posts
- Sony PlayStation 5 Pro Specifications Confirmed, Console Arrives Before Holidays (116)
- NVIDIA Points Intel Raptor Lake CPU Users to Get Help from Intel Amid System Instability Issues (106)
- AMD "Strix Halo" Zen 5 Mobile Processor Pictured: Chiplet-based, Uses 256-bit LPDDR5X (101)
- US Government Wants Nuclear Plants to Offload AI Data Center Expansion (98)
- Windows 10 Security Updates to Cost $61 After 2025, $427 by 2028 (84)
- Developers of Outpost Infinity Siege Recommend Underclocking i9-13900K and i9-14900K for Stability on Machines with RTX 4090 (84)
- TechPowerUp Hiring: Reviewers Wanted for Motherboards, Laptops, Gaming Handhelds and Prebuilt Desktops (74)
- Intel Realizes the Only Way to Save x86 is to Democratize it, Reopens x86 IP Licensing (70)