 1
1
SteelSeries Apex M750 Keyboard Review
Driver »Disassembly


Disassembly of the SteelSeries Apex M750 is extremely simple due to the use of multiple Phillips head screws on the front and back. Do note that the ones in the front are usually underneath or between keycaps, so you have to take many of them off to access those screws, and there are also two sets of screws here - shorter ones that go in a brass/gold color thread and longer ones that are associated with a black thread. Once done, the aluminum alloy frame easily comes loose, and you can then disconnect the keyboard's cable from the internal USB connector to get the top piece off, which also has the PCB on it.


The two side pieces were held in place via these removed screws, so they come out now unless they are still in place on the cylindrical ABS plastic extensions that are used to temporarily lock them in. Once removed, two more screws per piece help reveal that there is nothing at all going on here, so it is not like some of the other keyboards we saw with side plates that light up as well. The aluminum alloy frame also acts as the plate here, such that the plate-mounted switches are all soldered through and into the PCB which is green in color. The solder quality is fairly good, with short solder peaks that terminate in the same direction and minimal pads or excess flux on the keyboard.


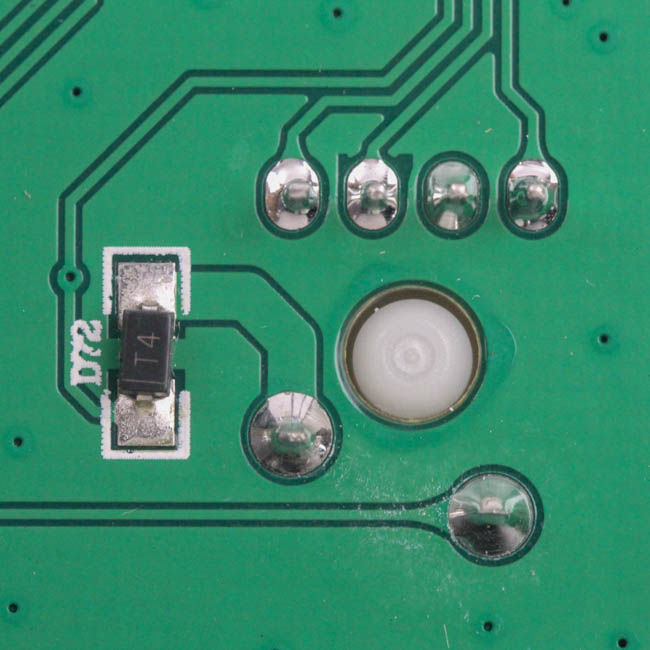

The keyboard has a STMicroelectronics STM32F072C8 32-bit ARM-based microcontroller with up to 128 KB of onboard flash memory and 16 KB of SRAM. Each key is associated with a QX2 switch and an LED, both of which are soldered through as seen, and all of these are on a multi-layered PCB.
Before we take a look at the driver, be advised that disassembly will void the warranty and that TechPowerUp is not liable for any damages incurred if you decided to go ahead and do so anyway.
May 14th, 2024 20:01 EDT
change timezone
Latest GPU Drivers
New Forum Posts
- Is It The 1080 TI The Best GPU Ever? (218)
- AMD RX 7000 series GPU Owners' Club (1103)
- LOWER SSD PRICES (25)
- Is it normal to hear this sound coming from the psu? (2)
- Purchased an AX1200i PSU as part of some forward planning, what tier is this PSU? (109)
- Free Games Thread (3805)
- 2024 and STILL no dark mode? (46)
- What are you playing? (20648)
- Ryzen Owners Zen Garden (7329)
- LOL ASUS says this is $200 in repair, Steve from gamers Nexus smokes ASUS, Steam Deck til I die boys!!!! (78)
Popular Reviews
- Homeworld 3 Performance Benchmark Review - 35 GPUs Tested
- ZMF Caldera Closed Planar Magnetic Headphones Review
- Enermax REVOLUTION D.F. X 1200 W Review
- Corsair MP700 Pro SE 4 TB Review
- Upcoming Hardware Launches 2023 (Updated Feb 2024)
- ThundeRobot ML903 NearLink Review
- AMD Ryzen 7 7800X3D Review - The Best Gaming CPU
- Bykski CPU-XPR-C-I CPU Water Block Review - Amazing Value!
- ASRock Radeon RX 7900 XT Phantom Gaming White Review
- CHERRY XTRFY M64 Pro Review
Controversial News Posts
- Intel Statement on Stability Issues: "Motherboard Makers to Blame" (266)
- AMD to Redesign Ray Tracing Hardware on RDNA 4 (227)
- Windows 11 Now Officially Adware as Microsoft Embeds Ads in the Start Menu (172)
- NVIDIA to Only Launch the Flagship GeForce RTX 5090 in 2024, Rest of the Series in 2025 (152)
- AMD Hits Highest-Ever x86 CPU Market Share in Q1 2024 Across Desktop and Server (132)
- Sony PlayStation 5 Pro Specifications Confirmed, Console Arrives Before Holidays (119)
- AMD's RDNA 4 GPUs Could Stick with 18 Gbps GDDR6 Memory (114)
- AMD Ryzen 9 7900X3D Now at a Mouth-watering $329 (104)