 15
15
SteelSeries Arctis Pro + GameDAC Review
Audio Performance »GameDAC Overview
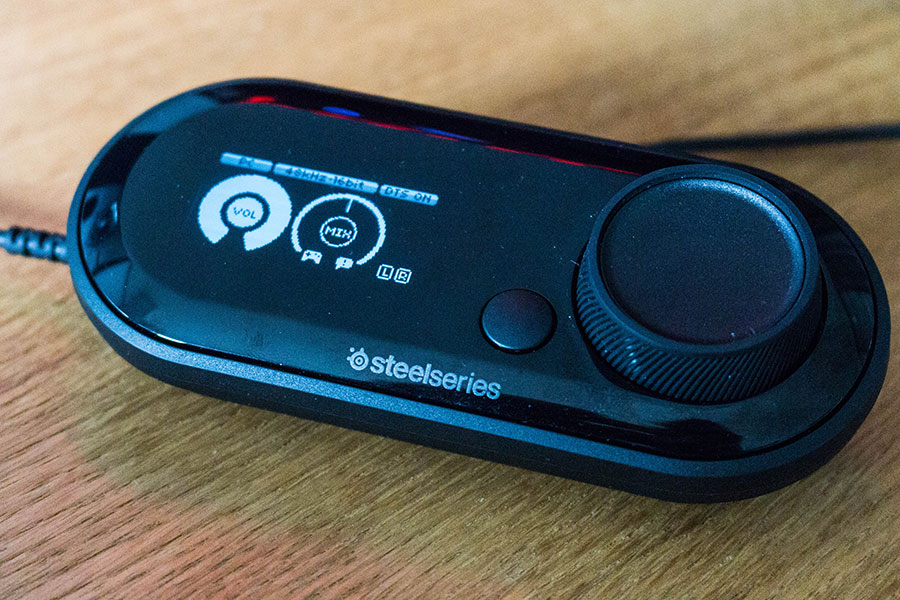
The GameDAC is an external sound card, an essential part of the Arctis Pro headset and one of the main reasons for its hefty price tag. It's equipped with the ESS Sabre 9018Q2C DAC chip usually found on various standalone external DACs/headphone amps and high-end motherboards. It also has an OLED display that displays the volume, active source, current mode of usage (standard or Hi-Res), and everything else that's relevant when it comes to using the headset. The display is also there to help us navigate through the options and set everything up in a desired way. There's no need to install any drivers—every single setting can be configured on the GameDAC by using its built-in display and the volume knob and "Back" buttons next to it.
The shiny top of the GameDAC is where the controls and OLED display are located. The big knob is a clicky volume dial that can also be pushed as a button. The flat button to the left of it quickly activates or deactivates DTS Headphone:X 2.0 surround sound, and it also has a "Back" function to help with navigating through the settings. The OLED display takes up the left half of the sound card.
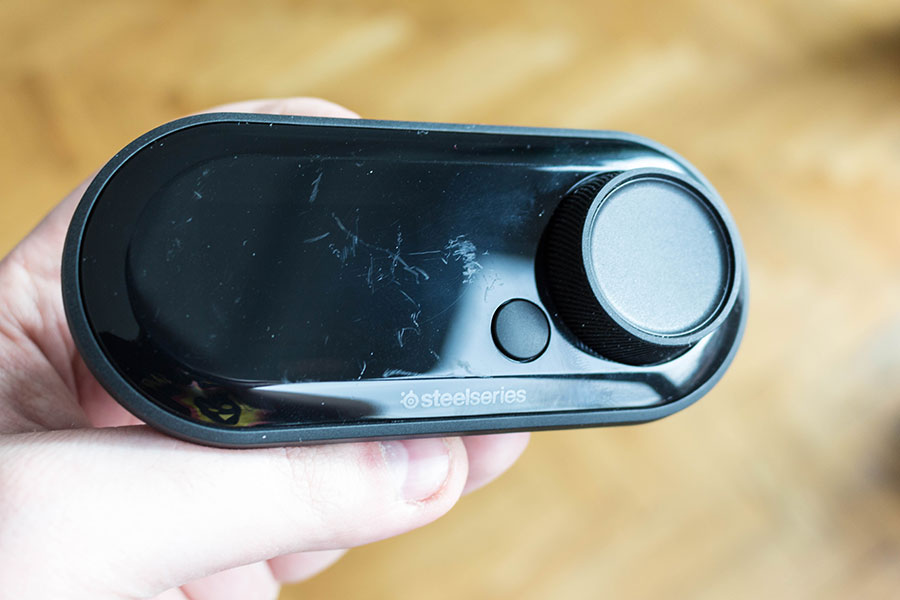
Unfortunately, the glossy cover of the OLED display gets scratched easily. This is what it looked like under direct sunlight after I had taken it with me in my backpack twice. These scratches can't be polished out—they're there to stay. On the upside, they're only visible at a certain angle and don't reduce the readability of the display in any way. That said, be careful not to touch the display too much as it will definitely get scratched in the process.
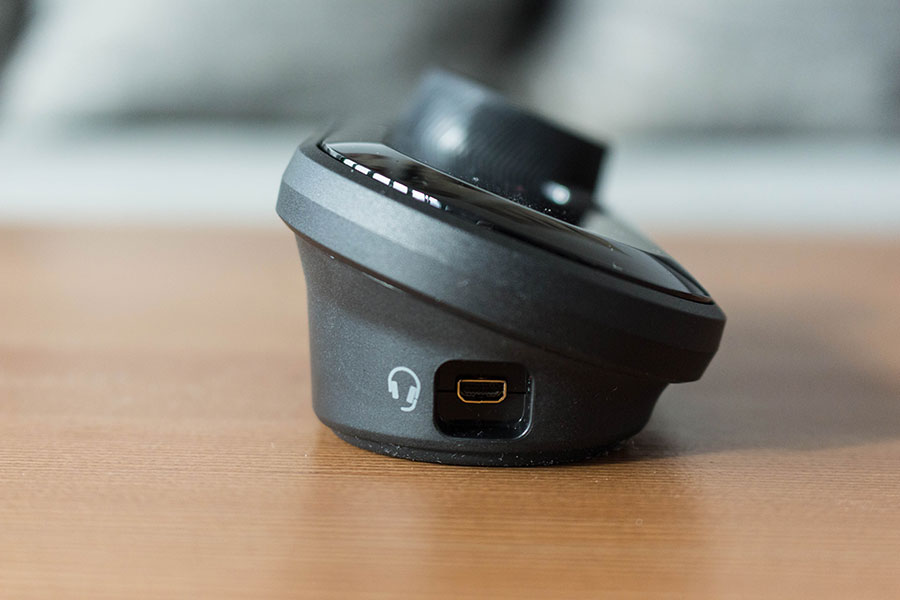
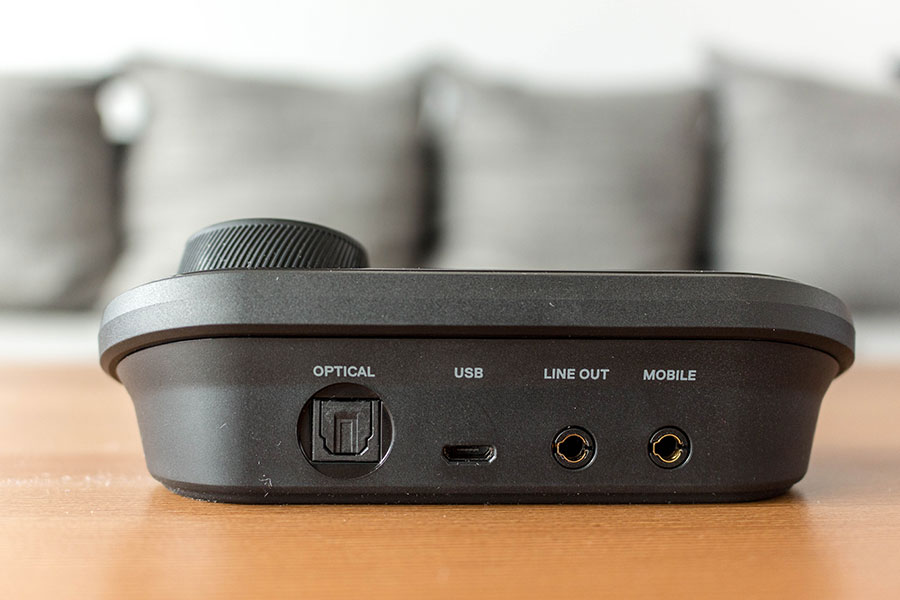
The connector on the left side of the sound card is the one you'll use to connect the Arctis Pro headset. Other ports are located on the back. Here, you'll find the optical input, which can be used to get the best-possible sound quality when using the Arctis Pro with the PlayStation 4, for example. Then, we have the Micro-USB port for connecting the sound card to the PC and to enable the microphone on the PS4. Next to it are two 3.5-mm ports. The first is a line-out port you'll use to connect your active speakers or an amplifier with passive speakers. You better hope that your active speakers have a good amplifier built into them, because the line-out signal is very quiet. I wasn't able to achieve acceptable volume levels when outputing audio to a pair of older Gigabyte and Logitech PC speakers. Sure, my NAD C326BEE power amplifier handled the line-out signal delivered from the GameDAC with ease, but does SteelSeries really expect an average user to have a dedicated power amp and a pair of passive speakers sitting around their PC, or is the line-out on the GameDAC simply too quiet? I'm leaning toward the latter. The final port is marked as "Mobile" and is a simple auxiliary input. If you want to play music from an external device that's connected to the GameDAC with a wire, that's the connector you'll use. What's missing? A way to use the GameDAC for any other headset that's not the Arctis Pro. SteelSeries didn't include a simple amplified headphone jack and a 3.5-mm microphone input, so you're out of luck should you ever want to get rid of the Arctis Pro headset but keep using its sound card. The only way to connect a headset to the GameDAC is to use the 8-pin Mini-USB port on its side, and it only connects to the Arctis Pro gaming headset. You can't even plug in a regular pair of headphones, which you'll definitely want to do if you own them, in order to enjoy the sound of that lovely ESS Sabre 9018 DAC chip. Sadly, there's simply no connector for them. SteelSeries tells me they'll offer an appropriate adapter soon (it will most likely be 8-pin Mini-USB to 3.5-mm audio), but there's really no excuse to not have it built into the sound card. Oh, you can't use the line-out port for headphones, if that's what's going through your mind. The signal going through that port isn't amplified or controlled via the volume knob.
GameDAC Settings


The GameDAC has two main modes of operation—a "regular" and "Hi-Res" one. You can switch between these by entering the settings (by pressing and holding the volume dial, which also works as a button), going to "Input", and selecting either "PC" or "Hi-Res". The third option in that menu, "PS4", is obviously the one you're going to switch to when connecting the GameDAC to your PlayStation 4.
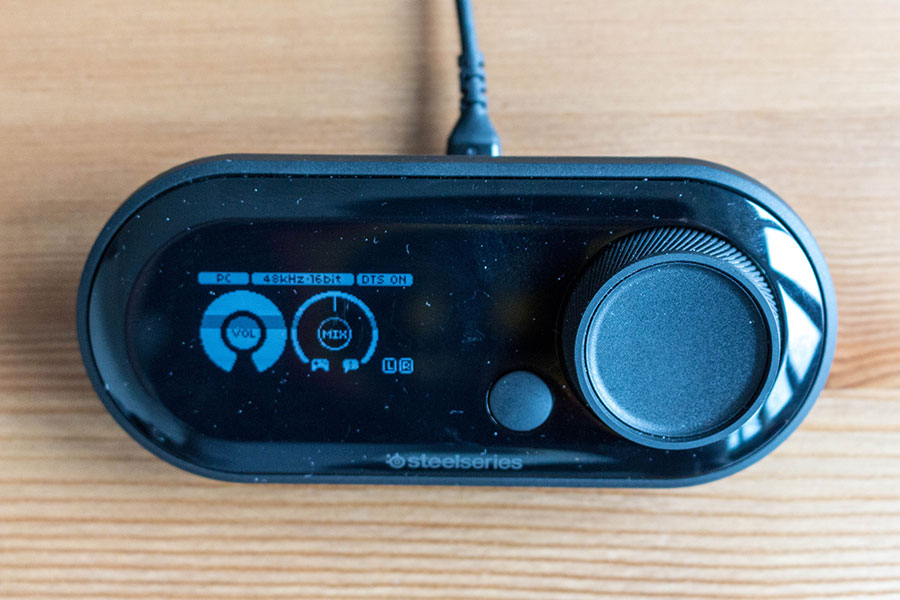
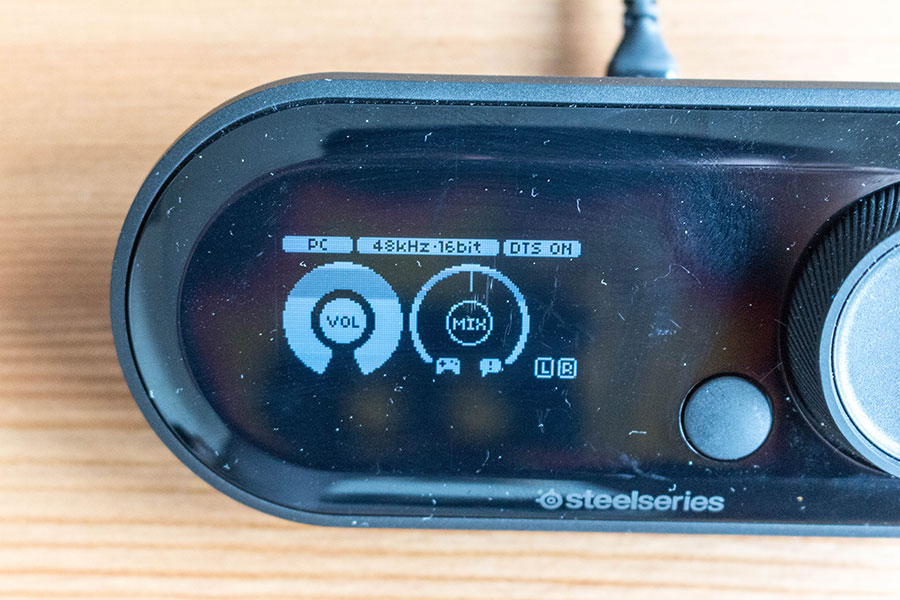
When you use it in PC or PS4 mode, every single setting offered by the GameDAC is unlocked, and its OLED display shows us the current volume, status of the so-called ChatMix, if DTS Headphone:X 2.0 surround sound is turned on or off, the resolution and bitrate (16-bit/48 kHz), and a simple and fairly useless stereo peak meter that serves no special purpose other than to make the OLED display seem a bit more dynamic whenever something is playing through the headphones. ChatMix is an extremely nice feature SteelSeries originally introduced with the Arctis 5 and 7. It adjusts the volume ratio between the game you are playing and the voice chat software you are using. I'll give you an example. Battlefield 1 is a loud game with an impressively detailed and rich soundstage and an epic music score. When I play it, the non-stop gunfire, massive explosions, roaring tanks, and screaming airplanes make it hard for me to hear what my teammates are saying on Discord. ChatMix allows me to make Discord louder and the game quieter without ever touching the audio settings in either BF1 or Discord itself. After switching to PUBG, where I want the game to be louder than Discord, I can simply rotate the ChatMix dial in the other direction, again without ever exiting the game or manually adjusting a single sound setting in Windows. I explained how this is achieved in our SteelSeries Arctis 5 review, so you can find out more about it there. The ChatMix Dial is one of those things you don't realize you need until you get it. It's fantastically useful, and I truly enjoyed the practicality it offered me in my everyday virtual warfare. To switch between the master volume and ChatMix on the GameDAC, you simply have to press the volume knob, which is the best, most practical implementation I can think of.

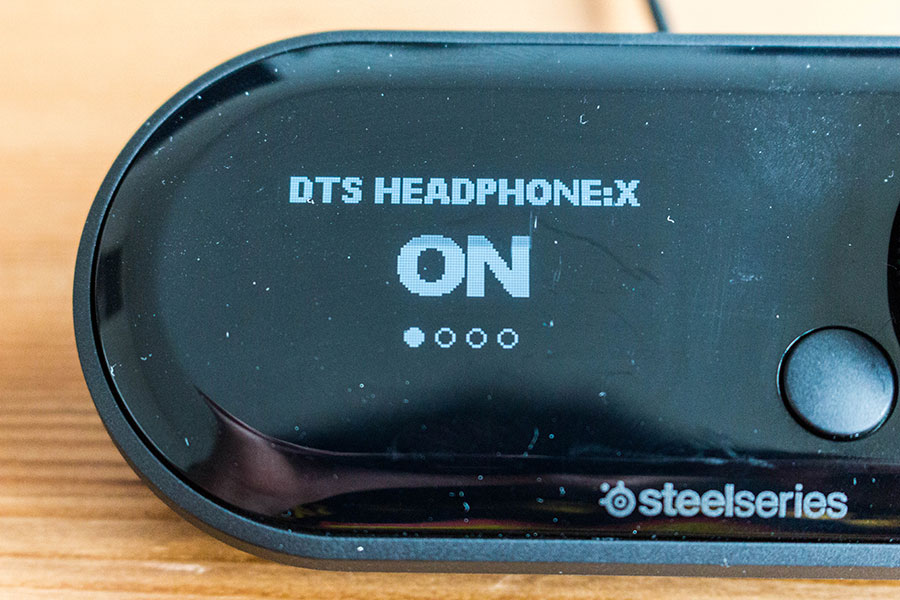
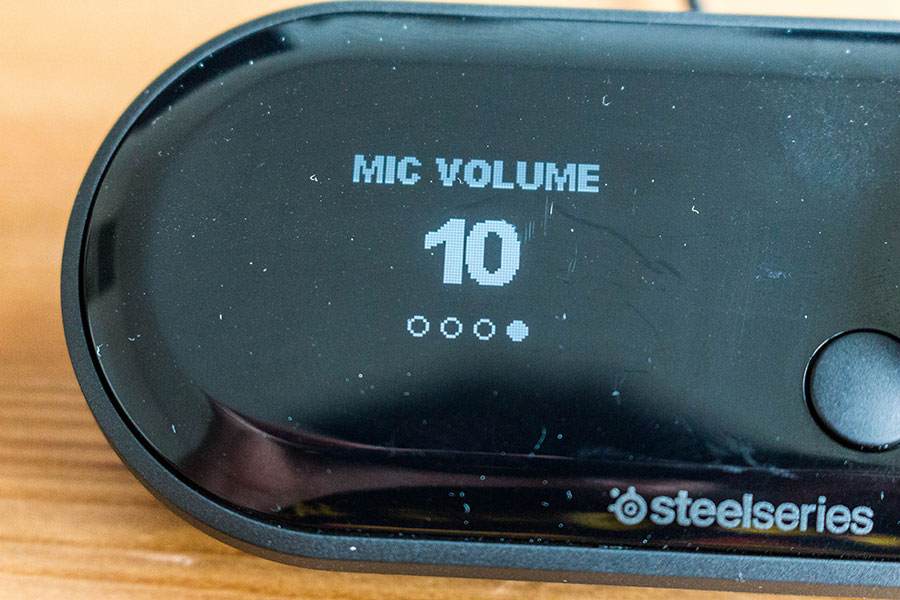
In the "Audio" menu on the GameDAC, you'll find a grand total of four settings. The "DTS Headphone:X" option turns the virtual surround sound (DTS Headphone:X 2.0) on and off. The "Mic Volume" adjusts the volume of the microphone, on a scale from 1 to 10.


Next, we have the "Equalizer". It's a 10-band system-wide equalizer that comes with four factory profiles (Flat, Bass Boost, Reference, and Smiley), as well as a custom one where you can adjust every frequency band manually. The adjustable frequencies are 32, 62, 125, 250, 500, 1,000, 2,000, 4,000, 8,000, and 16,000 Hz. You're welcome to play around with all of those and experiment, but it should be said that the Arctis Pro headset sounds best and most balanced when you simply pick the Flat profile, where you're essentially allowing it to sound exactly the way SteelSeries' audio engineers want it to sound.
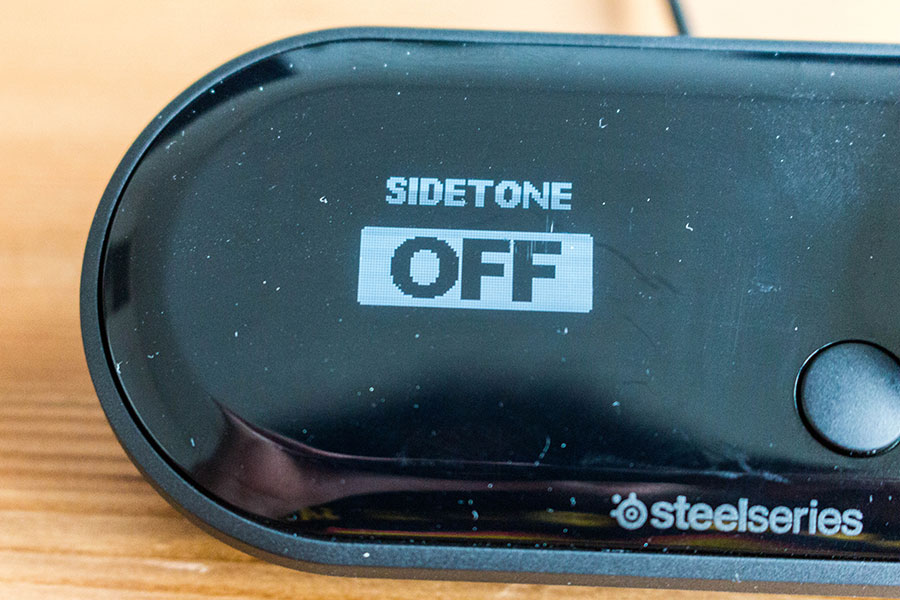

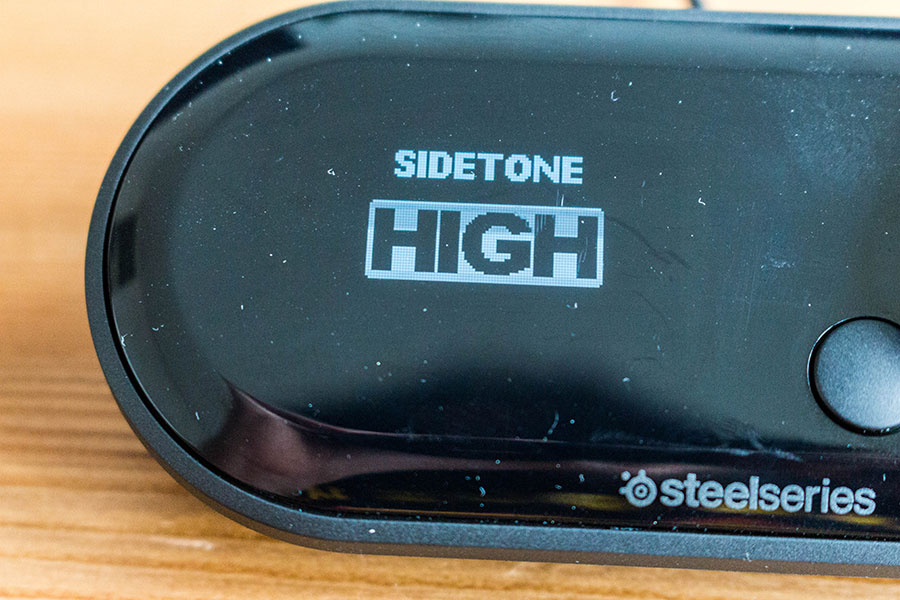
The "Sidetone" setting can be set to Off, Low, Medium, or High. What this setting does is to quietly play whatever is being picked up by the microphone through the headphones with no delay (think microphone monitoring), which can be extremely useful if you're one of those people who find it annoying to chat while wearing closed-back headphones. They make it harder for you to hear your own voice and can cause you to sound nasal and talk louder than necessary. By adjusting the Sidetone setting to anything but Off, you basically make the Arctis Pro behave like it was open-back in that you'll be able to hear your own voice, clicking of your mouse, mashing of your keyboard and everything else around you. There's no need to go beyond the Low setting since it is more than good enough to properly emulate an open-back headset. When switching to music or movies, you should turn Sidestone off since you don't want to hear the sounds picked up by the microphone. I only wish there was a way to toggle the Sidetone setting on and off without digging through the GameDAC menu, as I was often in a situation were I wanted to switch between "Low" and "Off".


The first option in the "Output" menu is called "Line Out Mode". Here, you can choose if the line-out port on the GameDAC will be used to connect a pair of active speakers (or an amplifier with passive speakers connected to it) or a PC used for streaming, in case you're using the GameDAC with your PlayStation 4.


If you go with the latter, you'll also be able to use the GameDAC to adjust the volume levels of your game, voice chat, or microphone, and an auxiliary device connected to the sound card.


Use the "Display" menu to adjust the brightness of the OLED display (1-10) and determine its idle timeout—set a time after which it will become dimmer if you don't interact with the GameDAC. The idle timeout feature can be set to 1, 5, 10, 15, 30, and 60 minutes, or "Never".


The "Illumination" menu lets us select the color of the RGB lighting system, as well as the color of the LED built into the head of the microphone for when the microphone is muted. The colors offered in both of those menus are the same—Rainbow, Heat Orange, Frost Blue, Orange, Red, Yellow, Blue, Green, Purple, and, of course, Off (no RGB LEDs).

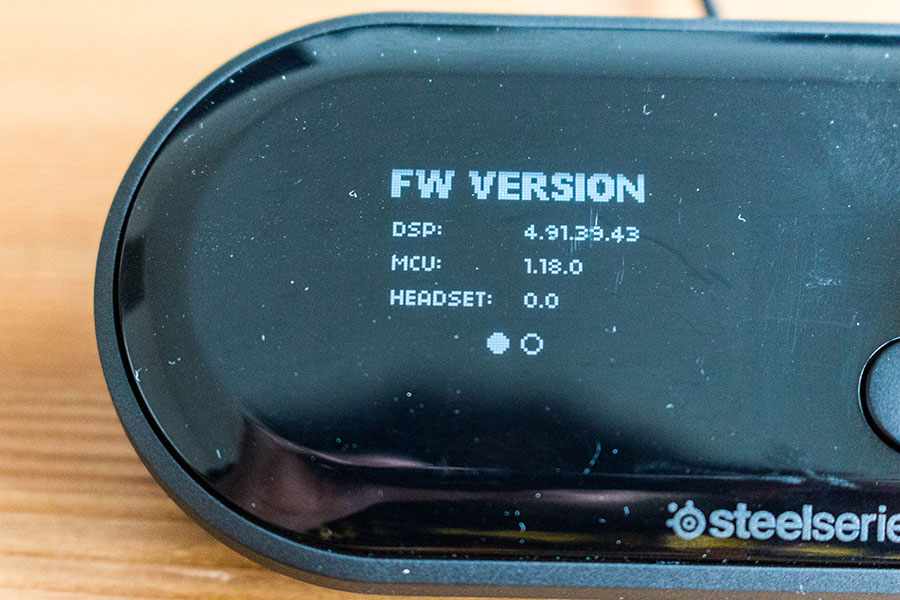

The "About" menu mentions the firmware versions of the GameDAC and Arctis Pro headset. This is also where you can perform a factory reset if something stops working properly. During my testing, there was no need to use this option at all—the entire system was perfectly stable.
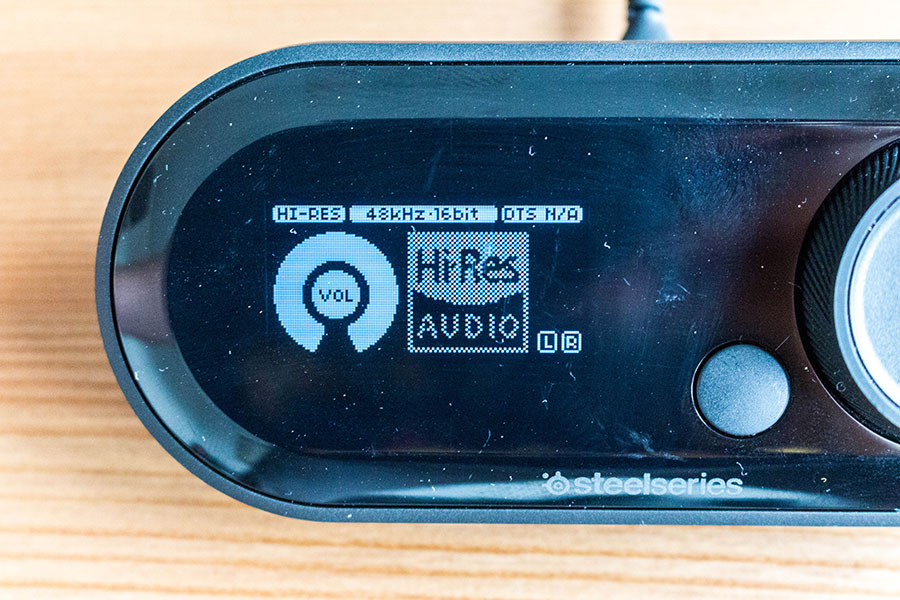
Here is what the OLED display of the GameDAC looks like when the sound card is set to Hi-Res mode in the Input menu. The ChatMix dial is gone since it cannot be used in this mode, and the same goes for the DTS Headphone:X surround sound. All other aforementioned features can be used normally, including the system-wide equalizer and Sidetone. When you set the GameDAC to Hi-Res mode, you'll also notice that the sound card got a new name in the Control Panel's sound settings, and that you can set the sample rate and bit depth to 24-bit/96 kHz.
Jun 5th, 2024 16:01 EDT
change timezone
Latest GPU Drivers
New Forum Posts
- Zen5 only 16 core. (138)
- RTX 3080 Lights up - No signal (0)
- Need help reaching Package C8 on Intel N100 (23)
- Can somebody help me figure out why my computer doesn't like to fall asleep? (7)
- RX580 2048SP or RX470? Help Please (0)
- XFX SPEEDSTER QICK319 AMD Radeon RX 6700XT ULTRA Gaming 12GB (0)
- [Help] Another Chinese RX580 8GB 2048SP Problem Thread (3)
- Let's Party Like It's 2006 and We Got $999 to Burn: Conroe-XE Rides Again. (41)
- What's your latest tech purchase? (20742)
- Project 2004, a retro time capsule (65)
Popular Reviews
- Intel Lunar Lake Technical Deep Dive - So many Revolutions in One Chip
- Kioxia Exceria Plus G3 2 TB Review
- NZXT H6 Flow RGB Review
- Corsair iCUE XC7 RGB Elite LCD CPU Water Block Review
- SilverStone KL07E Review
- Upcoming Hardware Launches 2024 (Updated May 2024)
- NuPhy Air96 V2 Low Profile Wireless Mechanical Keyboard Review
- AMD Ryzen 7 7800X3D Review - The Best Gaming CPU
- ASUS GeForce RTX 4060 Dual OC Review - The Best RTX 4060
- Ghost of Tsushima Performance Benchmark Review - 35 GPUs Tested
Controversial News Posts
- NVIDIA to Only Launch the Flagship GeForce RTX 5090 in 2024, Rest of the Series in 2025 (154)
- AMD Hits Highest-Ever x86 CPU Market Share in Q1 2024 Across Desktop and Server (140)
- AMD RDNA 5 a "Clean Sheet" Graphics Architecture, RDNA 4 Merely Corrects a Bug Over RDNA 3 (139)
- NVIDIA RTX 5090 "Blackwell" Founders Edition to Implement the "RTX 4090 Ti" Cinderblock Design (118)
- Core Configurations of Intel Core Ultra 200 "Arrow Lake-S" Desktop Processors Surface (101)
- Biden Administration to Revive Trump-Era Tariffs on China-made GPUs and Motherboards (95)
- ASRock Innovates First AMD Radeon RX 7000 Graphics Card with 12V-2x6 Power Connector (92)
- AMD Zen 5 Storms into Gaming Desktops with Ryzen 9000 "Granite Ridge" Processors (89)