 0
0
Thermaltake Armor A60 Review
Assembly & Finished Looks »A Closer Look - Inside


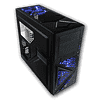
To gain access to the interior, one has to remove the two thumb screws holding each side panel in place. It looks like Thermaltake has spent some time retooling this case to its own specifications, as the hard drive bays are turned and spread further apart to hold the large plastic trays. Besides that, the chassis seems to feature a fairly standard interior. This becomes apparent by the lack of openings to route cables behind the mainboard tray. It seems like no time or effort was spent to add such a feature to the Armor A60 - something most other gaming cases do have. This is especially frustrating, as the hard drive connectors are found on this side of the case, so you have no easy way to hide any cables within the Armor A60. You can also see the very basic implementation of the USB 3.0 connectivity, with a cable simply routed through the opening for the mainboard.


The hard drive bays are much more interesting to look at, as Thermaltake has included separate plastic trays for each hard drive. Even though this chassis is smaller than the A90, you can still fit a total of six drives. The very top bay also has a simple SATA data and power connector, so that you may use this one as a hot swap bay in combination with the opening in the side panel. All the other bays do not have such a connector and there seems to be no possibility to add any further such adapters to each bay. Thermaltake has retained the same screw-less system for the optical drive bays as we have seen in its bigger counterpart. The past has shown that these work fairly well, but are still no viable replacement to traditional screws.


Turning our focus to the rear of the chassis, the bottom PSU bay still holds that very annoying support bar for the power supply. This unit comes preinstalled and only allows for the shortest unit to be installed without having to be moved back a bit. Since users generally install the power supply last, tipping the entire, filled chassis over to reach the screws on the underside of the case is fairly annoying. It would have been much simpler to place rubber bumps on the floor to keep the PSU from weighing down on the rear case wall and in turn would also act as an anti-vibration measure. I am being so harsh on this, as Thermaltake has been using the above method for quite some time, while other case manufacturers managed to design systems which are more functional and user friendly.


As you can see, the afore mentioned screws for the PSU support bar are located on the bottom of the chassis. There are various holes to move it back in case you are using a larger power supply. A simple metal mesh has been placed over the opening vent for the PSU bay, which should hold off most dust particles, but is not easily removable for cleaning.
May 8th, 2024 08:18 EDT
change timezone
Latest GPU Drivers
New Forum Posts
- Epic Games launcher's ridiculous CPU usage (1)
- Does anyone here overclock their video cards? Is it really worth it? (40)
- Urgent: PC wont turn on with PSU connected to MOBO (14)
- not impressed - nvme vs ssd (51)
- Share your AIDA 64 cache and memory benchmark here (2932)
- Any suggestion for hosting to test something ? (1)
- POLL: Can you see the difference past 60fps (gaming/other) (32)
- High c0% and system idle process (2)
- Battery swap for cyberpower UPS (64)
- Browser Bechmark scores (101)
Popular Reviews
- CHERRY XTRFY M64 Pro Review
- Corsair iCUE Link RX120 RGB 120 mm Fan Review
- Finalmouse UltralightX Review
- Upcoming Hardware Launches 2023 (Updated Feb 2024)
- Cougar Hotrod Royal Gaming Chair Review
- Meze Audio LIRIC 2nd Generation Closed-Back Headphones Review
- AMD Ryzen 7 7800X3D Review - The Best Gaming CPU
- ASRock NUC BOX-155H (Intel Core Ultra 7 155H) Review
- ASUS Radeon RX 7900 GRE TUF OC Review
- Sapphire Radeon RX 7900 GRE Pulse Review
Controversial News Posts
- Intel Statement on Stability Issues: "Motherboard Makers to Blame" (259)
- AMD to Redesign Ray Tracing Hardware on RDNA 4 (203)
- Windows 11 Now Officially Adware as Microsoft Embeds Ads in the Start Menu (167)
- NVIDIA to Only Launch the Flagship GeForce RTX 5090 in 2024, Rest of the Series in 2025 (138)
- Sony PlayStation 5 Pro Specifications Confirmed, Console Arrives Before Holidays (119)
- AMD's RDNA 4 GPUs Could Stick with 18 Gbps GDDR6 Memory (114)
- NVIDIA Points Intel Raptor Lake CPU Users to Get Help from Intel Amid System Instability Issues (106)
- AMD Ryzen 9 7900X3D Now at a Mouth-watering $329 (104)