 1
1
Truly Ergonomic CLEAVE Optical Mechanical Keyboard Review
Software & Performance »Disassembly
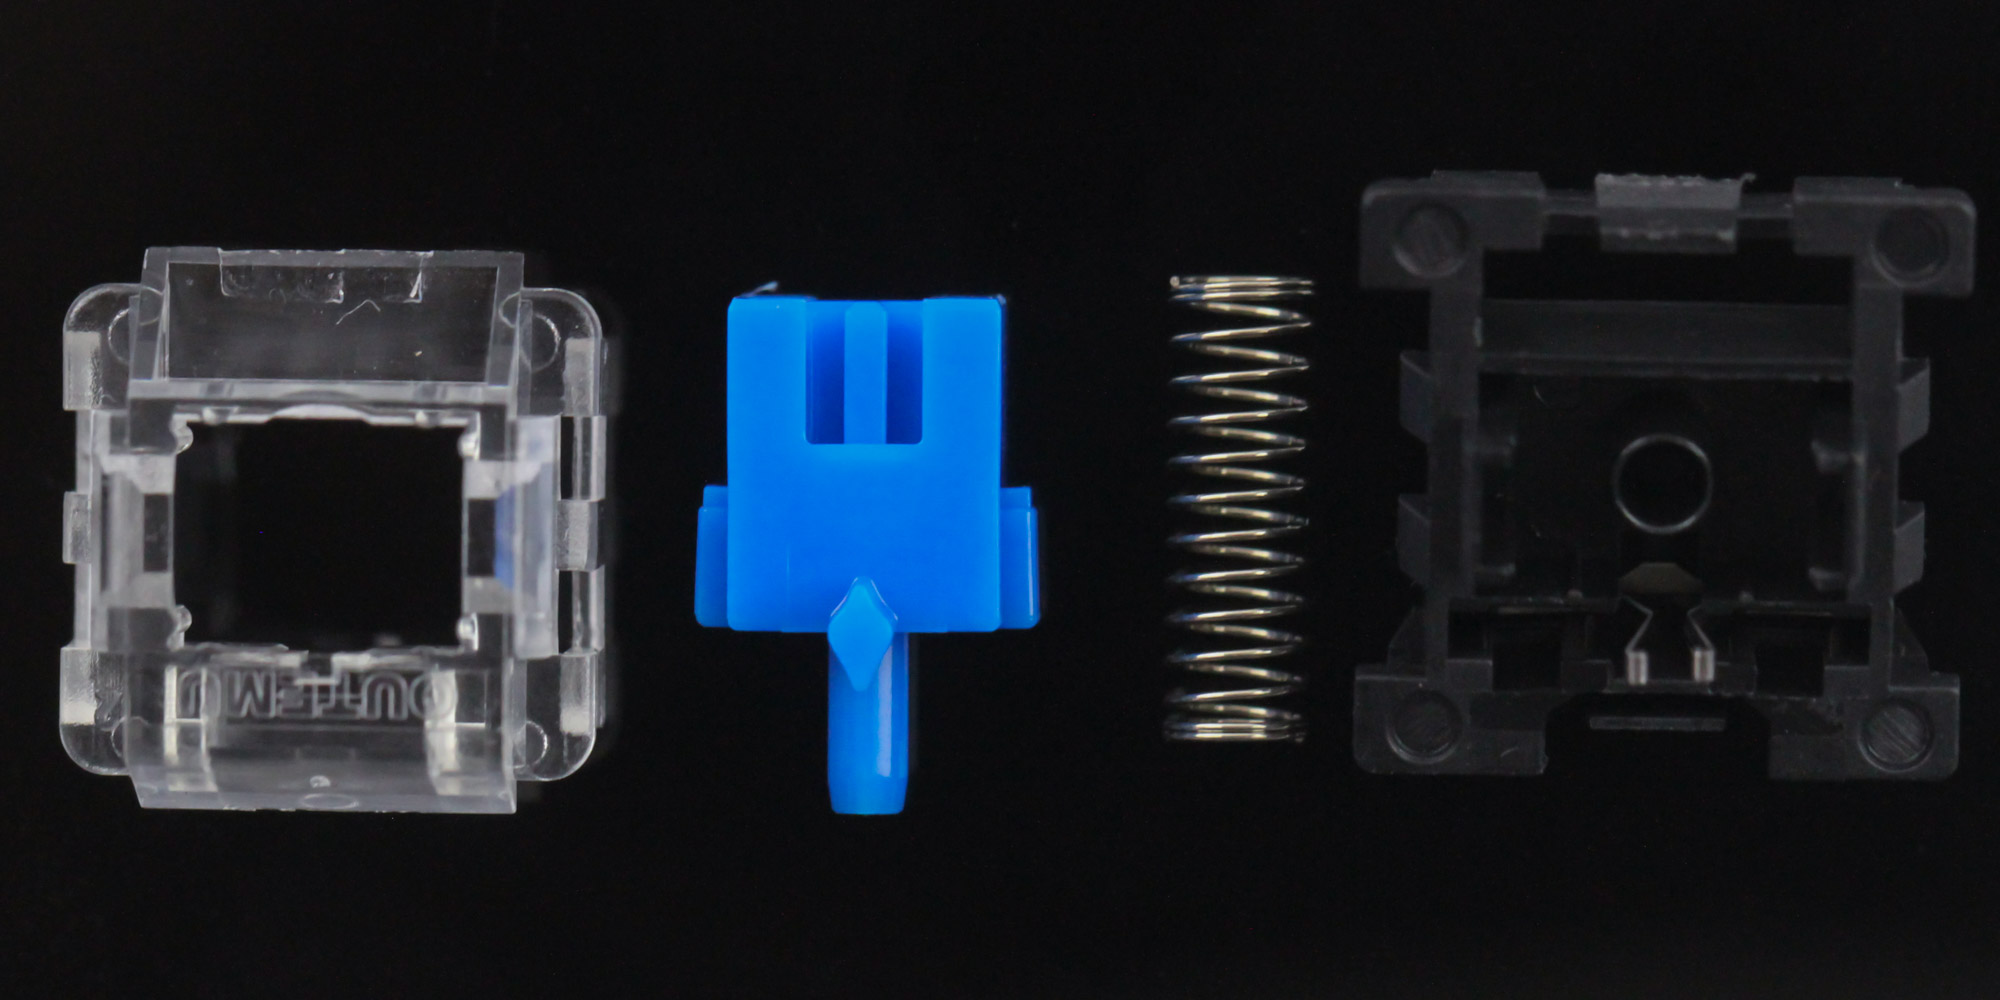


Given the hot-swappable switch feature on the Truly Ergonomic CLEAVE, I wanted to begin this section with a look inside the Outemu Optical Blue switches that came on this sample. The switch is held together with plastic clips on the top and bottom housing. Use a thin flat screwdriver to pry one side off before the other, but not by too much. The stem is typically long as with other optical switches since it has to travel down into the extension in the housing to interrupt the light signal generated in the switch socket we saw on the previous page. Seen above is a GIF demonstrating this process, and what intrigued me more was the clever tactile + clicky feedback implementation here. Outemu has a rhombus-shaped piece jutting out the side of the stem which travels between two metal wires that make contact on either side for the tactile bump and associated click. This is a take on the click-bar mechanism adopted by others, and works well enough if you believe the 100 million lifetime numbers reported for these switches. The external design is otherwise not that different from the usual Cherry MX-style cross-point stem mechanical switch, except with the aforementioned columns around for added dust/spill resistance. The top is see-through to help with backlighting support from the associated LED underneath the switch in the PCB.


Disassembly of the keyboard itself is a pain if you are not aware of the hidden screws at the corners underneath the rubber pads and then two more under the labels! The bottom screw here is under a tell-tale sticker that will show signs of disassembly and likely void your warranty too. After all six screws are removed using a precision Phillips screwdriver, use a thin and flat object to carefully pry apart the interlocking plastic tabs holding the ABS case panel in place around the aluminium alloy frame. The top piece now separates enough to provide access for you to dislodge the internal USB cable still connecting the two larger pieces. At this point we see Truly Ergonomic has gone with a thin plastic panel without any room for sound dampening foam in the middle, but there is modding opportunity at the top and bottom.


The PCB is unique in both shape and implementation clearly, and intended for the CLEAVE as marked. It also appears that GK91 is the code name for the keyboard although searching for it doesn't yield anything useful. You can also separate the PCB from the frame, which is also the plate here, by removing every single switch off the PCB. This can provide access to the stabilizers on the other side for replacement/lubing. There's otherwise not much to see here, given the optical nature of the keyboard with components clearly machine assembled. Powering the keyboard is a BYK816 USB microcontroller/LED controller with no datasheet available online. But I have seen it used in other keyboards reviewed on TechPowerUp in the past, to where it clearly will do what is advertised by Truly Ergonomic for the CLEAVE but might also hold it back in terms of more customization over function and form alike. All the components, including the switch sockets, SMD LEDs, and capacitors, are soldered to a multi-layered PCB. Note also the foam sheet placed between the frame and the PCB, which should help dampen keystrokes and minimize reverberations.
Before we move on, be advised that disassembly may void the warranty and that TechPowerUp is not liable for any damages incurred if you decide to go ahead and do so anyway.
Jun 5th, 2024 04:14 EDT
change timezone
Latest GPU Drivers
New Forum Posts
- X570 TUF User Profiles (3)
- Zen5 only 16 core. (55)
- Post your SilverBench multi-core result (11)
- The TPU Darkroom - Digital SLR and Photography Club (3959)
- AsRock Deskmeet X600 release date is close... (15)
- [Help] New (used) 10700 not working? (1)
- Decent, lightweight alternative to Windows Mail? (29)
- Insyde software announces AI BIOS! (12)
- Windows 11 laggy, Intel I7-10610u, Intel UHD graphics 620, asking for advice (1)
- PC Game Retro Reviews (32)
Popular Reviews
- Intel Lunar Lake Technical Deep Dive - So many Revolutions in One Chip
- Kioxia Exceria Plus G3 2 TB Review
- NZXT H6 Flow RGB Review
- Corsair iCUE XC7 RGB Elite LCD CPU Water Block Review
- SilverStone KL07E Review
- Upcoming Hardware Launches 2024 (Updated May 2024)
- NuPhy Air96 V2 Low Profile Wireless Mechanical Keyboard Review
- AMD Ryzen 7 7800X3D Review - The Best Gaming CPU
- Ghost of Tsushima Performance Benchmark Review - 35 GPUs Tested
- ASUS GeForce RTX 4060 Dual OC Review - The Best RTX 4060
Controversial News Posts
- NVIDIA to Only Launch the Flagship GeForce RTX 5090 in 2024, Rest of the Series in 2025 (154)
- AMD Hits Highest-Ever x86 CPU Market Share in Q1 2024 Across Desktop and Server (140)
- AMD RDNA 5 a "Clean Sheet" Graphics Architecture, RDNA 4 Merely Corrects a Bug Over RDNA 3 (139)
- NVIDIA RTX 5090 "Blackwell" Founders Edition to Implement the "RTX 4090 Ti" Cinderblock Design (118)
- Core Configurations of Intel Core Ultra 200 "Arrow Lake-S" Desktop Processors Surface (101)
- Biden Administration to Revive Trump-Era Tariffs on China-made GPUs and Motherboards (95)
- ASRock Innovates First AMD Radeon RX 7000 Graphics Card with 12V-2x6 Power Connector (90)
- AMD Ryzen 9000 Zen 5 Single Thread Performance at 5.80 GHz Found 19% Over Zen 4 (88)