 2
2
Zalman X3 Review
Thermal Stress Test »Review System
| System Parts for Case Reviews | |
|---|---|
| Processor: | Intel Core i5-9600K |
| Motherboards: | ATX: MSI Z390 GAMING EDGE AC MATX: Z370M GAMING EDGE AC Mini-ITX: MSI Z370I GAMING EDGE AC Provided by: MSI |
| Graphics Card: | ATX/mATX: Palit GeForce RTX 2080 Gaming Pro OC ITX: EVGA GTX 1650 SC Ultra Black 4 GB |
| Memory: | 16 GB XPG GAMMIX D20 DDR4 3200 MHz 16 GB XPG SPECTRIX D60G DDR4 3000 MHz CL16-18-18 1.35 V Provided by: ADATA |
| HDD: | Western Digital 320 GB 7200 RPM |
| SSD: | ITX: ADATA SX6000 Pro M.2 256 GB mATX: ADATA GAMMIX S11 Pro M.2 256 GB ATX: ADATA SPECTRIX S40G M.2 256 GB ADATA XPG SX850 256 GB ADATA Ultimate SU800 512 GB ADATA Ultimate SU720 500 GB Provided by: ADATA |
| Power Supply: | Fractal Design ION+ 750W 80 Plus Platinum Provided by: Fractal Design |
| Cooling: | be quiet! Pure Loop 120/240/280/360 Provided by: be quiet! |
Assembly
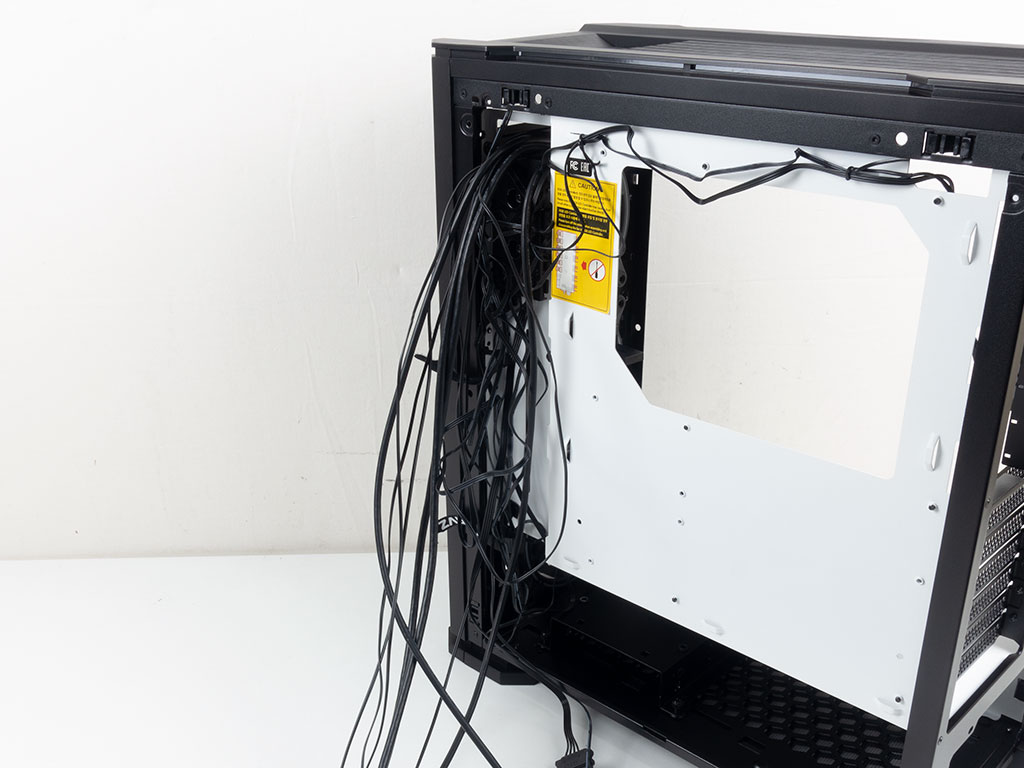


We expect every case to provide a certain degree of user-friendliness when it comes to cable routing and only mention pre-routed implementations to point them out. Thus, a bit of time is always spent to see to it that a fairly clean build comes together. However, with the Zalman X3, the sheer number of cables and lack of unique routing mean around 30 minutes were spent just trying to figure out the initial mess. We ended up with a creative approach which utilizes openings in the front to secure the fan leads, and then pulled the excess cables through another opening to steer them clear of the cable trench. We also removed the cover of the fan controller in the process. While there is no way to pass the RPM signal from the motherboard on to these fans, there is a fan-speed button on the PCB, but with it behind the screwed-down plastic cover, it isn't accessible.

Adding the motherboard with the CNPS17X is done by using spacers and screws. There is no space on the bottom edge of the board, but Zalman includes two well-situated cable-routing holes for clean cable management.


Inserting the GPU was straightforward as well. The GPU support bracket buckles a little bit under the weight of the cooler, and initially did not want to stay put properly. Turns out, the thumb screw here actually ends up squeezing into the metal cutout if you tighten it too much as it is too small. As you can see above, there are a few scuff marks where that happened. Luckily, simply replacing it with a classic PSU screw solved the issue.


To place an SSD inside your build, just take out a tray and screw the drive into it. Once filled, put the tray back from where you grabbed it and use the thumb screw to secure it.


For 3.5" drives, you have to take out the tray underneath the shroud. Rubber rings act as anti-vibration measures. If you are installing a drive on top of the cage, it needs to go on first. You may then fasten the other to the cage with screws. Once filled, simply slide it back in and use the two thumb screws to secure the cage.

Adding a PSU is straightforward: slide it into place and use classic screws to secure it from the rear of the case.


With everything installed, the interior of the Zalman X3 looks pretty clean overall. We even managed to clean up the backside of the motherboard tray nicely. As you can see, we initially used the cable hooks further from the trench to secure some I/O cables, just to keep the trench free for power supply or data cables you may want to get to easily. Unfortunately, trying to put the side panel was impossible. It would simply pop right off the chassis. So we moved the cables into the trench, which solved the issue. This means the cable hooks are not useful for anything other than the most slim cables, like ARGB or fan leads.
Finished Looks
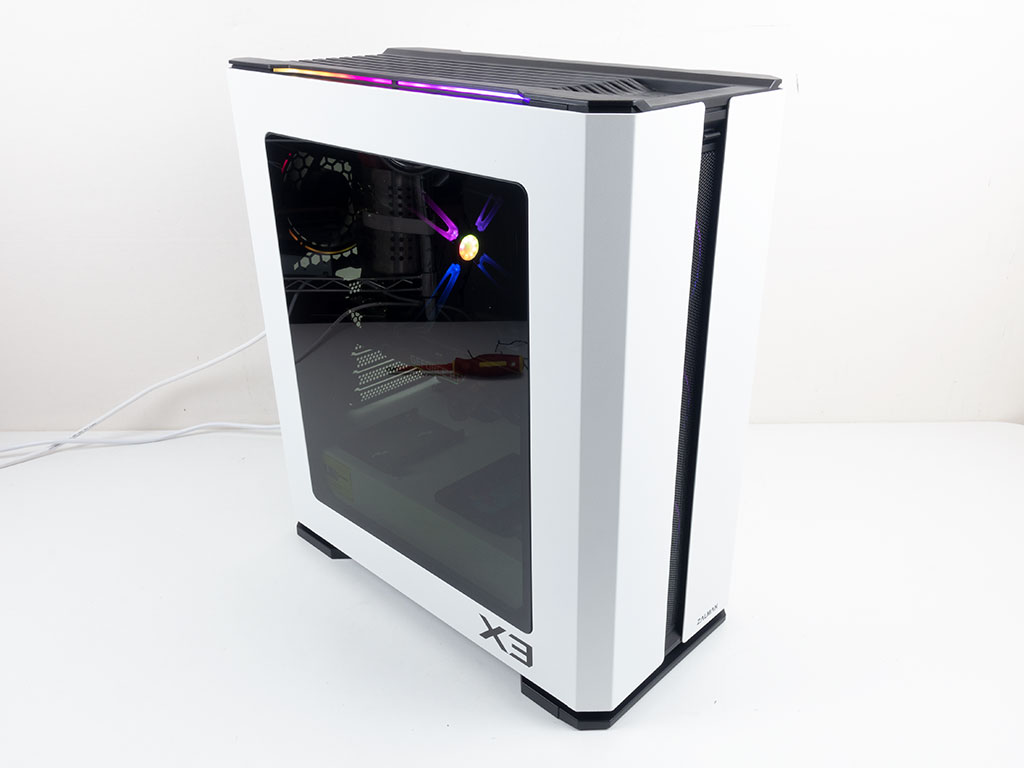

Turning on the system, the coolest visual element is clearly the top with its two built-in ARGB strips. You can see the glow of the center-mounted ARGB elements in the CNPS17X and the ring of the rear fan through the heavily tinted window. A blue power and red HDD activity LED light up in the top I/O when the PC is turned on as well. Unfortunately, the fan hub just blasts the fans at full speed, and while you could pull off the side panel and remove the two screws holding the cover and PCB in place just to push that undocumented button on the PCB, that button is clearly just a leftover of the OEM controller picked by Zalman.

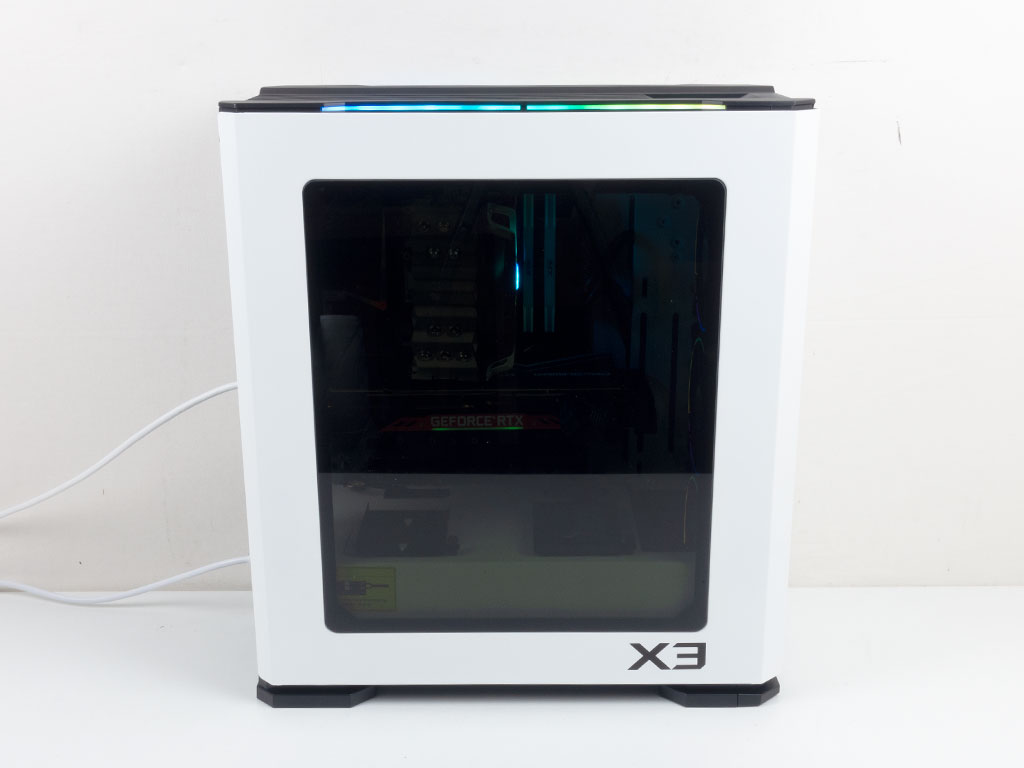

Looking at the front, you can also see the rings of the three fans through the gap between the panels. Viewing the side of the build directly, you should be able to make out your parts because of the white interior. Those opting for the black Zalman X3 probably won't be able to. In the rear, everything is where you would expect it based on the internal layout.
On top of the various single and multi-color modes and lighting animations you may toggle through with the Zalman X3, there are also the usual solid colors, which you can view below.


Jun 15th, 2024 02:41 EDT
change timezone
Latest GPU Drivers
New Forum Posts
- Official Board Game Discussion (24)
- RX 580 Sapphire Nitro 8gb | black screen when booting after disabling CSM and trying to turn on SecureBoot (12)
- Black screen in SOME games 6800xt Sapphire Pulse (5)
- Can you live with one monitor? ;) (98)
- A lot of issues with MOBO lights in a new PC build (0)
- The Official Thermal Interface Material thread (1239)
- What's your latest tech purchase? (20805)
- 5600X3D reviews (49)
- The Official Linux/Unix Desktop Screenshots Megathread (726)
- Steam Deck Owners Clubhouse (423)
Popular Reviews
- Aune AR5000 Headphones + S17 Pro Headphones Amplifier Review
- Pulsar Xlite V3 eS Review
- VAXEE Outset AX Wireless (4K) Review
- Upcoming Hardware Launches 2024 (Updated May 2024)
- Intel Lunar Lake Technical Deep Dive - So many Revolutions in One Chip
- AMD Ryzen 7 7800X3D Review - The Best Gaming CPU
- Team Group T-Force G70 Pro 2 TB Review
- NZXT H6 Flow RGB Review
- Quick Look: Final UX2000 Wireless Noise Canceling Headphones
- Thermal Grizzly KryoSheet Review - Tested on RX 7900 XTX with 475 W
Controversial News Posts
- Possible Specs of NVIDIA GeForce "Blackwell" GPU Lineup Leaked (131)
- NVIDIA RTX 5090 "Blackwell" Founders Edition to Implement the "RTX 4090 Ti" Cinderblock Design (118)
- Nightmare Fuel for Intel: Arm CEO Predicts Arm will Take Over 50% Windows PC Market-share by 2029 (105)
- AMD Zen 5 Storms into Gaming Desktops with Ryzen 9000 "Granite Ridge" Processors (100)
- AMD Says Ryzen 9000 Series Won't Beat 7000X3D Series at Gaming (100)
- Biden Administration to Revive Trump-Era Tariffs on China-made GPUs and Motherboards (95)
- ASRock Innovates First AMD Radeon RX 7000 Graphics Card with 12V-2x6 Power Connector (94)
- AMD Ryzen 9000 Zen 5 Single Thread Performance at 5.80 GHz Found 19% Over Zen 4 (92)