 37
37
Zotac GeForce GTX 295 1792 MB Review
(37 Comments) »Introduction
NVIDIA GeForce GTX 295 is based on two GT200b cores that are produced in a 55 nm process. With the "old" 65 nm GT200 it was not possible to create such a dual card because of the higher power requirements and heat output. The basic thermal design of the card follows the one introduced with the 9800 GX2 which uses a heatsink sandwiched in between two PCBs which each have their own GPU and memory.
In order to achieve the performance target, the GeForce GTX 295 uses SLI to make both GPUs work together. However, as end user you will not notice anything of that. You just install the GTX 295, install the driver and it works - without ever mentioning SLI.
| GeForce 9800 GT | Radeon HD 4850 | GeForce 9800 GTX | GeForce GTX 260 | Radeon HD 4870 | GeForce GTX 280 | Radeon HD 4870 X2 | GeForce GTX 285 | GeForce GTX 295 | |
| Shader units | 112 | 800 | 128 | 192 | 800 | 240 | 2x 800 | 240 | 2x 240 |
| ROPs | 16 | 16 | 16 | 28 | 16 | 32 | 2x 16 | 32 | 2x 28 |
| GPU | G92 | RV770 | G92 | GT200 | RV770 | GT200 | 2x RV770 | GT200b | 2x GT200b |
| Transistors | 754M | 956M | 754M | 1400M | 956M | 1400M | 2x 956M | 1400M | 2x 1400M |
| Memory Size | 512 MB | 512 MB | 512 MB | 896 MB | 512 MB | 1024 MB | 2x 1024 MB | 1024 MB | 2x 896 MB |
| Memory Bus Width | 256 bit | 256 bit | 256 bit | 448 bit | 256 bit | 512 bit | 2x 256 bit | 512 bit | 2x 448 bit |
| Core Clock | 600 MHz | 625 MHz | 675 MHz | 576 MHz | 750 MHz | 602 MHz | 750 MHz | 648 MHz | 576 MHz |
| Memory Clock | 900 MHz | 993 MHz | 1100 MHz | 999 MHz | 900 MHz | 1107 MHz | 900 MHz | 1242 MHz | 999 MHz |
| Price | $110 | $140 | $160 | $240 | $190 | $315 | $425 | $350 | $500 |
Packaging & Contents


The Zotac package comes in the well known orange theme, yet it looks a bit dull. On the front most of the product information is displayed, so it will be easy for a potential buyer to find out if this card is right for him. Further details can be found on the back, even in multiple languages.

You will receive:
- Graphics card
- Documentation + Driver CD + Racedriver: Grid full game + 3DMark Vantage full
- HDMI Cable
- 2x PCI-E power cables
- SPDIF audio cable
- DVI Adapter
The Card


Unlike the 9800 GX2, NVIDIA has chosen not to cover the back PCB with a metal cover. This is certainly to help reduce cost. As expected the card occupies two cooling slots in your system, so there should be enough space left for another one in case you plan to go SLI.

The card has two DVI ports and one HDMI output. The two DVIs come from one card and the HDMI comes from the other. In case you need an analog VGA output, you can use a DVI adapter (included). Zotac even includes an HDMI cable to make connecting of your big TV screen very easy. Just plug in the cable on both ends and turn on your equipment - done. The HDCP output features the usual HDCP+Audio, which allows easy setup of a media PC. For HDMI Audio, NVIDIA requires you to feed an external audio source, for example from your motherboard's on-board audio, to the card via SPDIF cable (also included). AMD on the other hand has integrated a sound device inside their GPUs which is the easier solution for most users.


Here are the front and the back of the cards, high-res versions are also available (front 1, front 2, back 1, back 2). If you choose to use these images for voltmods etc, please include a link back to this site or let us post your article.
Card Disassembly
Since the disassembly of this card is so complicated we decided to give you one extra page with step by step instructions. Assembly is done the same way in reverse.Compared to the 9800 GX2 the disassembly process is considerably easier. Especially those dreaded plastic tabs that like to break quickly are gone. Still, you should be extremely careful while disassembling this card.

You start by releasing the screws on both sides of the top cooler assembly.

With the screws gone you can lift the top off. This requires a bit of force since there is a nudge that has to be pulled over the cooler base. Look at this feature, try to understand how you need to move the cooler top to get it off and you should be fine.


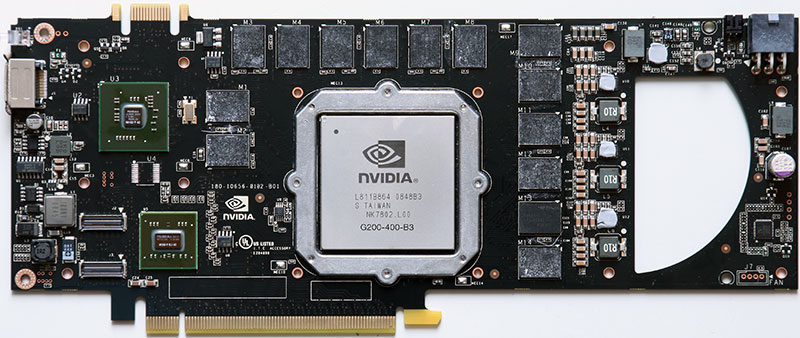
Now we can see how the GTX 295 is assembled. A central heatsink, cooling assembly is sandwiched between two PCBs which have their own GPU, memory and other components.
Both PCBs are interconnected by plastic flat wire cables (second picture) that act as an SLI bridge.


Now comes the hardest step unless you have the right tools. See all those screws with attached springs? On one side they are colored black and on the other side they are silver. They require a very small screwdriver and are screwed down very tight. If you can't find a screwdriver in that size the easiest way is to grab a pair of pliers and VERY CAREFULLY unlock the screws, then use a bigger screwdriver to get them out. Don't slip or you will end up with a nice NVIDIA Paperweight.


In the next step you have to remove the PCI slot cover. This is a two step procedure. Remove the two screws as shown in the pictures above.


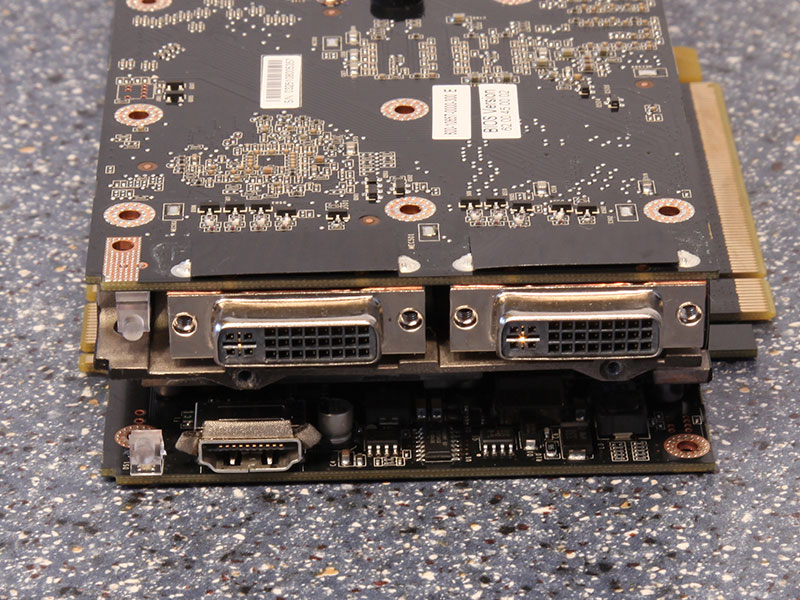
Next, remove the two black screws fixing the front plate and the four screws fixing the DVI outputs to the front plate.

Now you can pull the two PCBs off the central cooler assembly. Start by applying force near the edges and work your way towards the GPU. Once there you will need a considerable amount of force to get over the suction power of the thermal paste. Again, be careful and don't rush things - take your time. Mission accomplished!
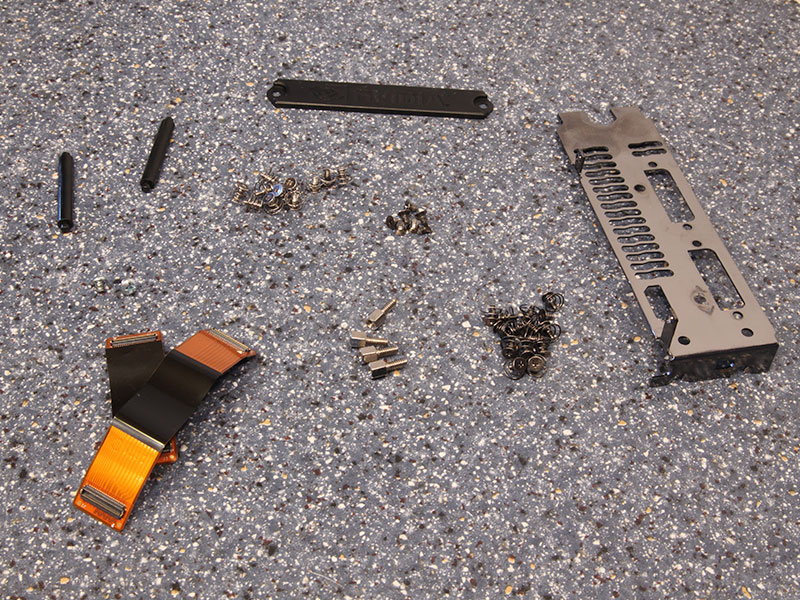
To give you an idea how complex the disassembly is, here is a photo of all the parts that were removed during the card disassembly.
Our Patreon Silver Supporters can read articles in single-page format.
Apr 24th, 2024 20:43 EDT
change timezone
Latest GPU Drivers
New Forum Posts
- The TPU UK Clubhouse (24783)
- (Anti) SFF fun house (346)
- Cinebench crashed my PC. My Wi-Fi stopped working, and I keep getting a "Please wait" screen when I boot up my PC. (28)
- Sharing experience with MSI RTX 3070 vBIOS update to enable Resizable Bar with MB Z490 (2)
- Share your AIDA 64 cache and memory benchmark here (2915)
- Will a RTX 4070 TI super bottleneck a Ryzen 9 7950X3D? (58)
- The best *budget* ATX PC case on the market? (24)
- GTX 1070 Ti - TDP Issues - Always Power Throttling (4)
- 2022-X58/1366 PIN Motherboards NVME M.2 SSD BIOS MOD Collection (656)
- Meta Horizon OS (15)
Popular Reviews
- Fractal Design Terra Review
- Thermalright Phantom Spirit 120 EVO Review
- Corsair 2000D Airflow Review
- Minisforum EliteMini UM780 XTX (AMD Ryzen 7 7840HS) Review
- ASUS GeForce RTX 4090 STRIX OC Review
- NVIDIA GeForce RTX 4090 Founders Edition Review - Impressive Performance
- ASUS GeForce RTX 4090 Matrix Platinum Review - The RTX 4090 Ti
- MSI GeForce RTX 4090 Suprim X Review
- MSI GeForce RTX 4090 Gaming X Trio Review
- Gigabyte GeForce RTX 4090 Gaming OC Review
Controversial News Posts
- Sony PlayStation 5 Pro Specifications Confirmed, Console Arrives Before Holidays (116)
- NVIDIA Points Intel Raptor Lake CPU Users to Get Help from Intel Amid System Instability Issues (106)
- AMD "Strix Halo" Zen 5 Mobile Processor Pictured: Chiplet-based, Uses 256-bit LPDDR5X (101)
- US Government Wants Nuclear Plants to Offload AI Data Center Expansion (98)
- Windows 10 Security Updates to Cost $61 After 2025, $427 by 2028 (84)
- Developers of Outpost Infinity Siege Recommend Underclocking i9-13900K and i9-14900K for Stability on Machines with RTX 4090 (84)
- TechPowerUp Hiring: Reviewers Wanted for Motherboards, Laptops, Gaming Handhelds and Prebuilt Desktops (78)
- AMD's RDNA 4 GPUs Could Stick with 18 Gbps GDDR6 Memory (71)