 51
51
Acer Predator XB271HU bmiprz 144-165 Hz Review
Gaming Performance »Picture Quality
The Acer Predator XB271HU features an AU Optronics M270DAN02.6 IPS panel. It's an 8-bit panel capable of displaying 16.7 million colors. The manufacturer doesn't specify whether it's a true 8-bit panel or if the 8-bit color depth is emulated by using a 6-bit panel with FRC (Frame Rate Control - a method of achieving a certain color tone by rapidly flashing two adjacent color tones), but after a bit of investigation, it would appear that we're dealing with a true 8-bit panel after all.The screen uses a White-LED (W-LED) backlight unit. Acer doesn't specify if Direct Current (DC) or Pulse Width Modulation (PWM) is used to control it. What I can tell you is that no flicker can be perceived by the naked eye at any of its brightness level; nor did I experience any discomfort during prolonged usage, which would lead me to believe that PWM is not being used to control backlight dimming. Besides, let's remember that the Predator XB271HU carries the "EyeProtect" badge, which Acer only puts on monitors that are capable of blue light filtering with DC to control the backlight.
The screen coating on the Predator XB271HU is light anti-glare (AG). The screen is quite resistant to reflecting its surroundings even when used in a room with a lot of natural or artificial light, and the picture isn't perceived as grainy or dirty from a normal sitting distance, which can be the case with heavier AG coatings.
The maximum brightness of the panel should be 350 nits, accompanied by a static contrast ratio of 1000:1. Let's fire up the Datacolor Spyder5ELITE, an excellent colorimeter I use to test and calibrate all of my screens, to find out what the Acer Predator XB271HU has on offer in terms of picture quality.
Picture Quality at Factory Settings
The picture quality of the Predator XB271HU at its factory defaults was tested right after plugging it in and allowing it to warm up for about an hour. At its default settings, the monitor uses the Standard picture profile, which sets the color temperature to Warm (6,500 K), gamma to 2.2, brightness to a high value of 80, contrast to 50, and saturation to 100. Settings like Blue Light, Dark Boost, Adaptive Contrast, and sRGB Mode are turned off. Changing any of these options in any way will immediately switch the profile from Standard to User.
As we can see by looking at the CIE diagram, we get a 100% coverage of the sRGB and 79% coverage of the Adobe RBG color space out of the box, which is completely in line with a standard-gamut IPS monitor. There's a certain amount of over-coverage in the greens and reds, which isn't much of a concern.

The chart clearly shows that even without calibration, the measured gamma hardly deviates from the set value of 2.2. That's good news for everyone who is not going to be calibrating the display because a more pronounced gamma deviation is hard to fix "manually".
These are the measured brightness and contrast values for various brightness settings:
| Brightness and Contrast - Pre-Calibration | ||||
|---|---|---|---|---|
| Setting | Brightness | Black | Contrast | White Point |
| 0 % | 53.1 | 0.01 | 3,540:1 | 6,400 (0, 313, 0, 338) |
| 25 % | 127.5 | 0.16 | 780:1 | 6,400 (0, 314, 0, 337) |
| 50 % | 197.0 | 0.25 | 780:1 | 6,400 (0, 313, 0, 335) |
| 75 % | 261.0 | 0.34 | 780:1 | 6,400 (0, 313, 0, 335) |
| 100 % | 323.1 | 0.40 | 820:1 | 6,500 (0, 313, 0, 334) |


Color and luminance uniformity are aspects where things do take a bit of a turn for the worse. Both vary quite a bit across the screen regardless of the set brightness level. Shown above are the values measured at 100% brightness.


Color uniformity actually improves a bit by lowering the brightness to 50%. The Delta-E goes from a maximum of 3.0 at 100% brightness to a more acceptable 2.5 at 50% brightness, but luminance uniformity gets worse with some parts of the screen being up to 20% brighter than others.

As for color accuracy, we can see that the average Delta-E is 1.04, which is a great score for an uncalibrated display. Remember, you want this value to be as low as possible because it indicates how much a certain color deviates from its perfect representation. I don't expect the average Delta-E to improve by a lot, if at all, after calibrating the display because the measured value is very low as it is. I do expect to see some improvements in the highest measured Delta-E value (4.55), though.
My overall impression of the uncalibrated picture quality is very positive. Even though there is some slight color banding present, especially between shades of black and white, the lackluster luminance uniformity isn't really visible in everyday usage. You'll mostly be aware of it while your PC is booting up (there's that nasty completely black Windows loading screen) and when playing a game or watching movies with a lot of dark tones. The picture has a yellowish hue to it out of the box, one I am hoping to get rid of by calibrating the Predator XB271HU.
Picture Quality After Calibration
I calibrated the display by using Datacolor's recommended settings. They suggest you set the gamma to 2.2, the color temperature to 6500 K, and the brightness to 120 nits. The Spyder5ELITE does allow you to do the calibration with more brightness (up to 180 nits) or a value you enter manually should you find that to be too dark. I was aiming for the recommended 120 nits, which turned out to be a brightness of 25 in the OSD. Let's take a look at the post-calibration report:| Post-Calibration Report | ||
|---|---|---|
| Brightness (Candelas) | Black | White |
| Uncalibrated | 0.35 | 127.2 |
| Target | 0.16 | 120.0 |
| Calibrated | 0.16 | 120.9 |
| White Point (CIE xy) | ||
| Uncalibrated | 0.313 | 0.336 |
| Target | 0.313 | 0.329 |
| Calibrated | 0.313 | 0.330 |
| Primaries (CIE xy) | ||
| Red | 0.660 | 0.338 |
| Green | 0.302 | 0.633 |
| Blue | 0.146 | 0.055 |
| Delta-E (Lab) | ||
| White Point | 0.6 | |
| 50% Gray | 0.3 | |
| Gamma | ||
| Uncalibrated | 2.09 | |
| Target | 2.20 | |
| Calibrated | 2.23 | |
Let me say that the aforementioned yellowish hue that was clearly visible regardless of the content being displayed on screen instantly disappeared. That alone makes it worth trying out one of the ICC profiles I have made.
The first ICC profile (download) was made by calibrating the monitor with the recommended settings (120 nits, achieved at 25% brightness in the OSD).
The second ICC profile (download) was created after manually setting the desired brightness and related calibration settings to 250 nits (75% brightness in the OSD). Setting the brightness so high isn't something you should really do as it can be uncomfortable to the eyes, but many users simply prefer using a very bright display.
After calibration, the Predator XB271HU's picture quality went from very good to great. I was extremely pleased to see that the yellowish hue was completely gone, which meant I could start truly enjoying everything this monitor has to offer. Some slight color banding remained even after the calibration, but it's realistically only visible in the darkest parts of the color spectrum - in deep shadows, for example.
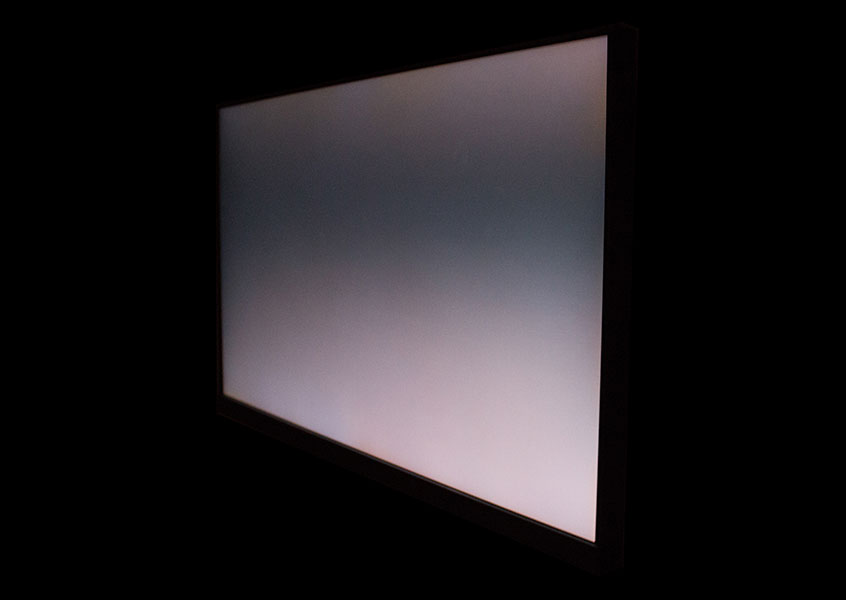
Backlight Uniformity
To give you an idea of the backlight's uniformity, brightness was set to 0%, 25%, 50%, and 100% before I took a couple photos in a completely dark room. I did my best to find a combination of the ISO value and shutter speed that would capture the screen in a way that has it look as close to what my eyes were seeing in real life, but do keep in mind that the photos still overexaggerate everything. However, they do nicely show us what we've already found out by looking at the colorimeter readings - put mildly, backlight uniformity isn't the greatest.


Viewing Angles
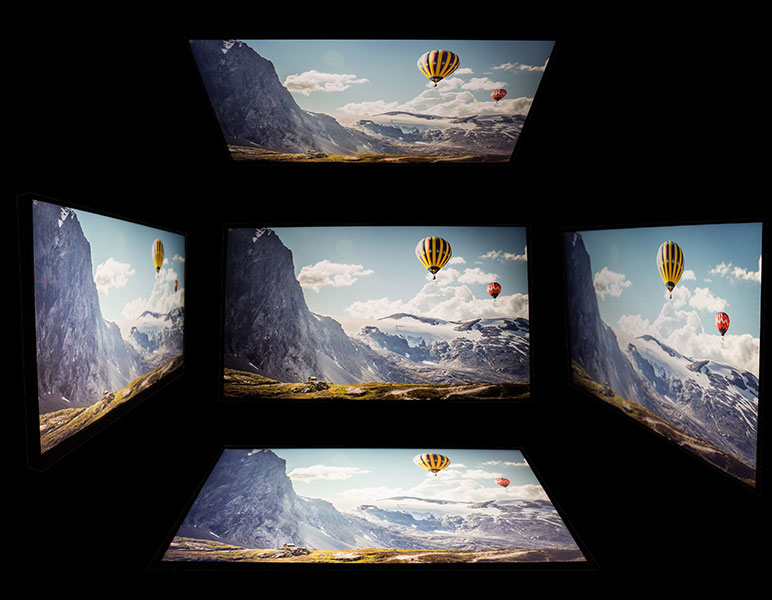
This being an IPS panel, the viewing angles are fantastic. There's no visible shift in colors when you change your sitting position. You'll have a lot of freedom to move your head any way you like.
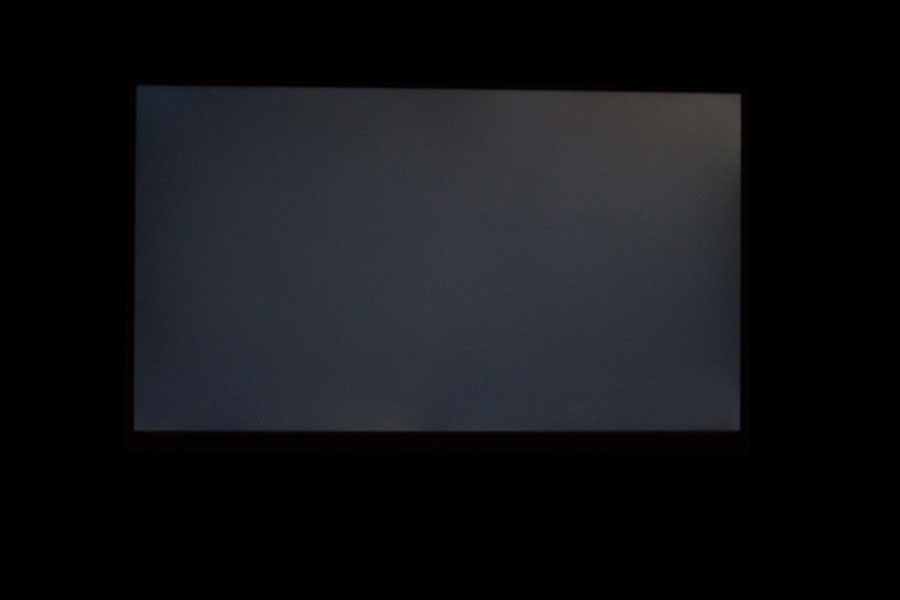
Here's a photo of a completely black screen taken at a wide angle. Don't confuse what you see with backlight bleed - it's IPS glow, an inherent feature of the technology. It looks nasty, but isn't an issue at all because you won't see it at a normal sitting distance if your eyes are roughly level with the center of the screen.
Factory Picture Profiles
As mentioned earlier, the Predator XB271HU comes with a few factory picture profiles - Standard, ECO, Graphics, and Movie. They simply represent a certain combination of the monitor's brightness and contrast settings. To get an idea of what they actually do, let's take a look at the measurements I took for each of the profiles.| Brightness and Contrast - Factory Picture Profiles | ||||
|---|---|---|---|---|
| Setting | Brightness | Black | Contrast | White Point |
| Standard | 273.6 | 0.35 | 780:1 | 6,500 (0, 313, 0, 334) |
| ECO | 180.1 | 0.23 | 780:1 | 6,400 (0, 313, 0, 335) |
| Graphics | 346.4 | 0.39 | 900:1 | 6,500 (0, 313, 0, 332) |
| Movie | 291.6 | 0.34 | 850:1 | 6,500 (0, 313, 0, 333) |
The numbers confirm my impressions - the Graphics and Movie presets are too bright. If you're not all too comfortable with manually fiddling with the settings, you're best off sticking with the Standard profile, which offers a good balance of brightness, contrast, and overall screen performance.
Apr 27th, 2024 12:07 EDT
change timezone
Latest GPU Drivers
New Forum Posts
- Should I install Windows 10 or 11 for my new device (31)
- What are you playing? (20545)
- Alphacool CORE 1 CPU block - bulging with danger of splitting? (39)
- Looking for recommendations to upgrade the GPU (11)
- looking to build a new system and im considering asrock brand but i have some doubts/concerns. (18)
- Lenovo Thinkpad issue- text overlapping (0)
- TPU's Nostalgic Hardware Club (18478)
- Flashed wrong Bios (1)
- Best SSD for system drive (105)
- Asus Crosshair X670E - CPU Package temps (12)
Popular Reviews
- Ugreen NASync DXP4800 Plus Review
- HYTE THICC Q60 240 mm AIO Review
- Upcoming Hardware Launches 2023 (Updated Feb 2024)
- MOONDROP x Crinacle DUSK In-Ear Monitors Review - The Last 5%
- Thermalright Phantom Spirit 120 EVO Review
- FiiO K19 Desktop DAC/Headphone Amplifier Review
- AMD Ryzen 7 7800X3D Review - The Best Gaming CPU
- Alienware Pro Wireless Gaming Keyboard Review
- Valkyrie Syn 360 ARGB LCD AIO Review
- ASUS Radeon RX 7900 GRE TUF OC Review
Controversial News Posts
- Windows 11 Now Officially Adware as Microsoft Embeds Ads in the Start Menu (139)
- Sony PlayStation 5 Pro Specifications Confirmed, Console Arrives Before Holidays (117)
- NVIDIA Points Intel Raptor Lake CPU Users to Get Help from Intel Amid System Instability Issues (106)
- AMD "Strix Halo" Zen 5 Mobile Processor Pictured: Chiplet-based, Uses 256-bit LPDDR5X (103)
- US Government Wants Nuclear Plants to Offload AI Data Center Expansion (98)
- AMD's RDNA 4 GPUs Could Stick with 18 Gbps GDDR6 Memory (95)
- Developers of Outpost Infinity Siege Recommend Underclocking i9-13900K and i9-14900K for Stability on Machines with RTX 4090 (85)
- Windows 10 Security Updates to Cost $61 After 2025, $427 by 2028 (84)