 3
3
BitFenix Shinobi XL Review
Assembly & Finished Looks »A Closer Look - Inside
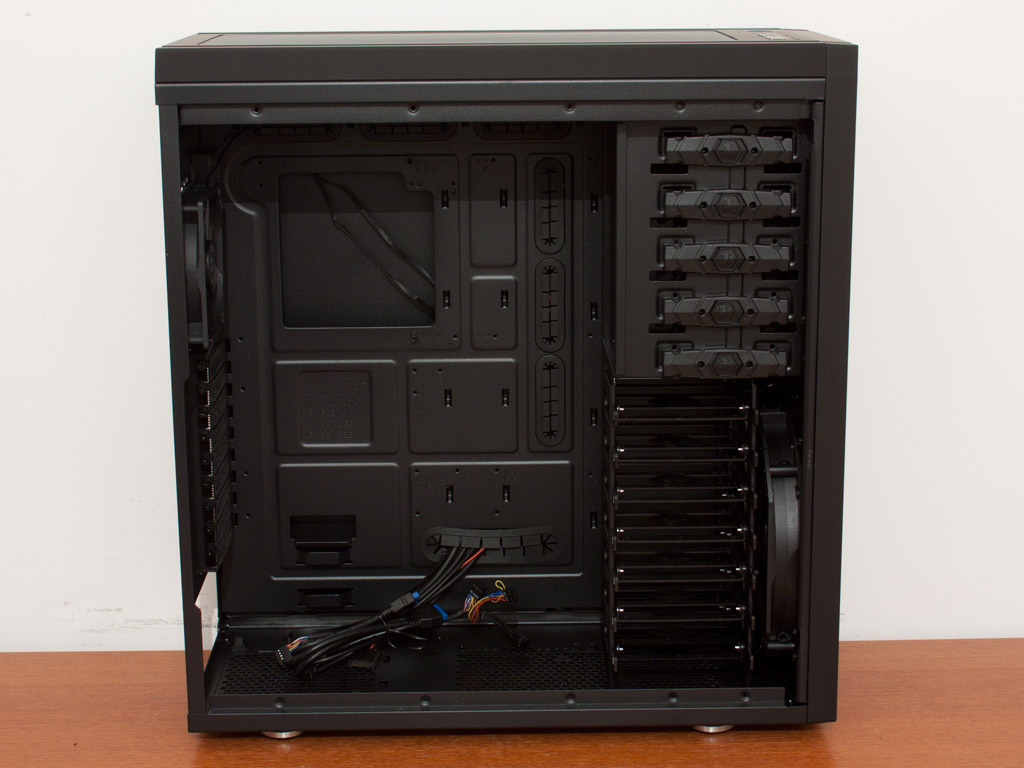


A pair of thumb screws holds each side panel in place. Simply removing these will allow you to flip the panels open and remove them completely. Upon first sight, the interior may remind of that found within the Colossus, but BitFenix has changed quite a few things as we will see later on. Turning the chassis around, there is a large opening for the CPU cooler backplate and many holes to route cables through. These have not only been placed to the side and bottom of the motherboard, but also above it, allowing you to easily route fan or power cables without having to run them across the board itself. Just like with the Colossus, there is more than enough space behind the tray, with more than 30 mm at your disposal. On top of that, with no LEDs embedded in the door, the entire space can be used freely.


You may install up to seven 3.5 or 2.5 inch drives within the BitFenix Shinobi XL. Each drive rests on one of their plastic trays. The entire contraption may be removed, to reveal the 230 mm fan. You may remove both the cage and fan for the ability to install a 360 mm radiator here if you really with to do so. Above are the five 5.25 inch bays, equipped with the same locking mechanism we have seen in the Colossus. These plastic locks have been placed on both sides of each bay.


In the rear, the PSU rests on four rubber mounts as an anti vibration measure. Above that are the afore mentioned nine motherboard expansion slots, each cover held in place by metal thumb screws. The 120 mm Spectre fan with its unique blade design and 3-pin motherboard connector can also clearly be seen from this angle.


Taking a quick look at the underside, there is a dust filter protecting the power supply from dirt and two 120 mm covers for the pair of fan spots in the floor of the Shinobi XL. It is really refreshing to see these and due to the fact, that these have no spacing in-between them means, that you may install a 240 mm radiator unto the floor of the case in this area. To do so, you just need to remove the hard drive cage. In the ceiling that 230 mm spectre fan can also clearly be seen. This one may be removed, too, to give way to enough mounting holes for another 360 mm radiator. This brings the total up to three separate radiators that may be installed within the Shinobi XL with a total capacity of eight 120 mm fans - pretty darn cool (please excuse the pun).


All the cabling within the BitFenix Shinobi is black, going extremely well with the rest of the chassis. Just like in the Raider, both USB 3.0 headers are also equipped with USB 2.0 ones, giving you total flexibility regardless of the motherboard used. A single SATA power plug (connected to a PSU's SATA power connector) delivers the juice for the SuperCharge port, while the rest of the connectivity is of the standard variety.
May 4th, 2024 15:31 EDT
change timezone
Latest GPU Drivers
New Forum Posts
- Only some humans can see refresh rates faster than others, I am one of those humans. (98)
- RX 6800 causing stuttering when typing text (Low 2D/IDLE Clocks?) (19)
- Battery swap for cyberpower UPS (43)
- X670 owners, what kind of PCH temps do you you see? (9)
- Everytime i plug something into my wall, it stutters, and it never goes away (2)
- SSD RAM CACHING (Especially Writing) (6)
- i9-12900K 16 Running Hot (3)
- Want to upgrade the network at home but need some advice/suggestions (0)
- Alphacool CORE 1 CPU block - bulging with danger of splitting? (93)
- Free Games Thread (3776)
Popular Reviews
- Finalmouse UltralightX Review
- Meze Audio LIRIC 2nd Generation Closed-Back Headphones Review
- ASRock NUC BOX-155H (Intel Core Ultra 7 155H) Review
- Montech Sky Two GX Review
- Gigabyte GeForce RTX 4070 Ti Super Gaming OC Review
- Upcoming Hardware Launches 2023 (Updated Feb 2024)
- Cougar Hotrod Royal Gaming Chair Review
- HYTE THICC Q60 240 mm AIO Review
- Alienware Pro Wireless Gaming Keyboard Review
- Ugreen NASync DXP4800 Plus Review
Controversial News Posts
- Intel Statement on Stability Issues: "Motherboard Makers to Blame" (236)
- Windows 11 Now Officially Adware as Microsoft Embeds Ads in the Start Menu (167)
- AMD to Redesign Ray Tracing Hardware on RDNA 4 (128)
- Sony PlayStation 5 Pro Specifications Confirmed, Console Arrives Before Holidays (117)
- AMD's RDNA 4 GPUs Could Stick with 18 Gbps GDDR6 Memory (114)
- NVIDIA Points Intel Raptor Lake CPU Users to Get Help from Intel Amid System Instability Issues (106)
- AMD "Strix Halo" Zen 5 Mobile Processor Pictured: Chiplet-based, Uses 256-bit LPDDR5X (103)
- AMD Ryzen 9 7900X3D Now at a Mouth-watering $329 (103)