 5
5
Ducky Shine 6 Keyboard Review
Value & Conclusion »Performance


There is full N-key rollover USB here out of the box, as Aqua's test confirms. If you needed 6KRO for some reason, say to debug a few things in your system or run a kernel-based virtual system, then toggle the fourth dip switch on the back from OFF (default position) to ON. Similarly, no key chatter was detected on all the keys using Switch Hitter.
When first connected and powered on, the Ducky Shine 6 lights up in a wave mode dynamic effect as seen in the video above. The transitions between colors and regions are smooth here, and the choice of a medium speed works well to better illustrate the lighting mode as well as the brightness of the SMD LEDs used.


Both on-board controls and the software driver allow quick changing of the keyboard's lighting, and I used the driver to first set all the keys to white (255/255/255) to test for color fidelity. As with nearly every RGB keyboard, it is not a true white in person, and here, we see a light blue/green hue to the color instead. I then set the keyboard to color palette mode to demonstrate the various colors available to choose from with the on-board lighting controls, and also test for light bleed. With the new standard-height keycaps, the Shine 6 no longer has a floating keycap effect, and there is minimal color bleeding throughout, but the common edges shared between keys were, as expected, lit in different colors.
Here are a few more lighting modes demonstrated to give you an idea of what to expect with the Shine 6 if RGB backlighting and lighting effects are a priority for you. Overall brightness is on the higher side, which meets Ducky's promises, and the smooth transition effects help as well.


Onboard functionality is quite strong here, and the presence of RGB backlighting means that is more so the case here than with what we saw with the One 2 Skyline. Indeed, we have separate controls over the side lightning and the keyboard lighting, which means you can choose to match them up or go with something else entirely. If you prefer to turn off the keyboard's lighting and only have some accent lighting on the side, you can do so as well. There are ten brightness levels for the R/G/B channels to choose from with either set, and you can also quickly go into palette mode and select one of the preset colors if you prefer that. Cycling through Fn + F9/F10 also allows one to choose from among some of the preset lighting modes, though the driver does enable more to be set up and is quicker about it as well, including for the two customization modes. You can also set up a demo mode to show off the lighting, and also ensure the keyboard is in USB 3.0 power mode (enabled by default) for maximum brightness at the expense of a slightly higher power draw than in USB 2.0 power mode.


Seen above is how the four dip switches affect the behavior of the keyboard—be it to switch from NKRO to 6KRO or changing the bottom-row functions if you so desire it. Ducky also states in the manual that it is recommended to unplug the keyboard for at least 15 seconds after changing functionality via a dip switch before connecting it to the computer. There are a total of six profiles saved onboard, with the LED profiles associated with it being activated when the profile is selected. The default profile is locked down, which is probably for the best too, but you are free to do as you wish with the other five that can be accessed via Fn + number key (alphanumeric section), which has the Caps Lock key flashing a number of times based on which profile is chosen. The manual does a good job of describing the process, be it for selecting a key to assign the macro to, recording said macro, or doing the actual macro playback. For what is onboard functionality, things could have gone complicated and confusing in a real hurry, and in some ways they still do, but this is possibly the best such implementation I have used thus far. Some macro functions are already pre-programmed, and these end up providing multimedia and specific program task controls as well as a mouse function seen in the last image above. The ability to reassign keys, coupled with the provided keycap puller, means that you can choose to go with a different layout instead of QWERTY; say, Dvorak or Colemak for a more efficient typing experience.

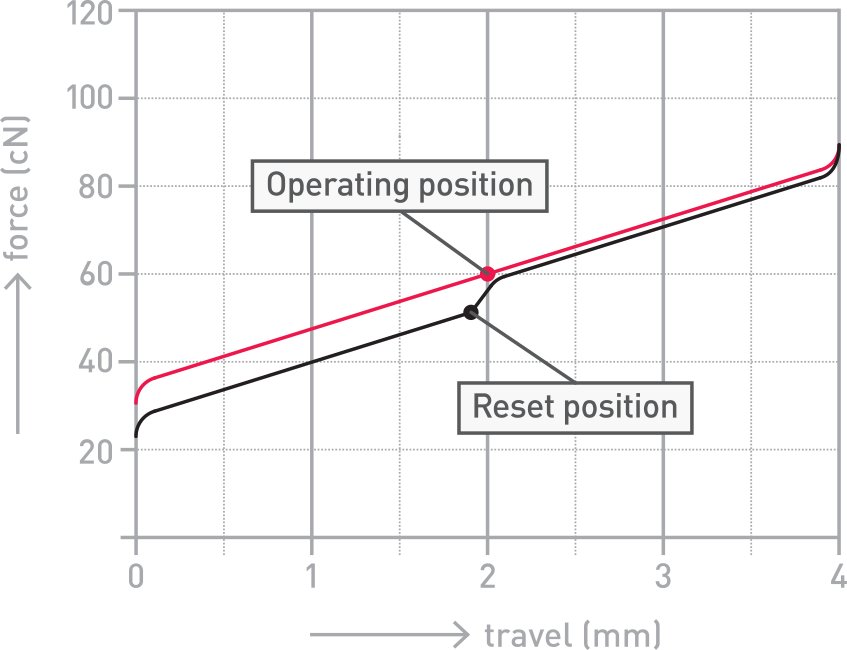
As always, the sound of a keyboard is based on more than just the switch type. So when comparing sound clips, consider the keyboard as a whole. In this case, I have provided above an example sound clip of me typing on the Ducky Shine 6 sample at ~95 WPM. For context, you can find sound clips from other keyboards here, including those with linear switches. Believe it or not, this was my first keyboard with Cherry MX Black switches—RGB or otherwise—with the closest experience coming from Cherry's own MX Board Silent with the MX Silent Black switches. The heavier linear switches here take some getting used to if you have only been using the more popular MX Red as far as linear switches go, and these are definitely not for everyone. The thick PBT plastic keycaps feel great to type on, and the plastic case helps dampen noise as well when compared to, say, a metal frame keyboard with floating keycaps. Bottoming out can be avoided fairly easily here as well due to the ~80 gf peak force, which also means you can get a quieter typing experience here.
May 9th, 2024 18:56 EDT
change timezone
Latest GPU Drivers
New Forum Posts
- AM5 boot times improve RADICALLY with memory context restore enabled (15)
- GTX 1650 Bios disappears after installing driver (0)
- looking to optimize (performance+cooling) a ryzen 7800x3d system with x670e aorus pro x (11)
- Last game you purchased? (277)
- Keysfan (25)
- Microsoft butchering Xbox Studios (41)
- Flash VBIOS to turn RX 580 2048SP into RX 570 (25)
- not impressed - nvme vs ssd (75)
- Only some humans can see refresh rates faster than others, I am one of those humans. (237)
- Why does my PC shut down even though it's connected to a UPS? (85)
Popular Reviews
- CHERRY XTRFY M64 Pro Review
- Corsair iCUE Link RX120 RGB 120 mm Fan Review
- Bykski CPU-XPR-C-I CPU Water Block Review - Amazing Value!
- Finalmouse UltralightX Review
- Upcoming Hardware Launches 2023 (Updated Feb 2024)
- Corsair MP700 Pro SE 4 TB Review
- AMD Ryzen 7 7800X3D Review - The Best Gaming CPU
- Cougar Hotrod Royal Gaming Chair Review
- ASUS Radeon RX 7900 GRE TUF OC Review
- Meze Audio LIRIC 2nd Generation Closed-Back Headphones Review
Controversial News Posts
- Intel Statement on Stability Issues: "Motherboard Makers to Blame" (264)
- AMD to Redesign Ray Tracing Hardware on RDNA 4 (206)
- Windows 11 Now Officially Adware as Microsoft Embeds Ads in the Start Menu (169)
- NVIDIA to Only Launch the Flagship GeForce RTX 5090 in 2024, Rest of the Series in 2025 (144)
- Sony PlayStation 5 Pro Specifications Confirmed, Console Arrives Before Holidays (119)
- AMD's RDNA 4 GPUs Could Stick with 18 Gbps GDDR6 Memory (114)
- NVIDIA Points Intel Raptor Lake CPU Users to Get Help from Intel Amid System Instability Issues (106)
- AMD Ryzen 9 7900X3D Now at a Mouth-watering $329 (104)