 88
88
Aqua Computer and Rockit Delidding Tools tested on Core i7-7700K
Rockit Cool Rockit 88 »Aqua Computer Dr. Delid Tool
Aqua Computer as a company is well established in the PC DIY watercooling industry and introduced its new Dr. Delid tool in February 2017. The company contacted me to see if I would be interested in covering it here, which tied in well with my interest in the topic, and so here we are!Packaging and Accessories


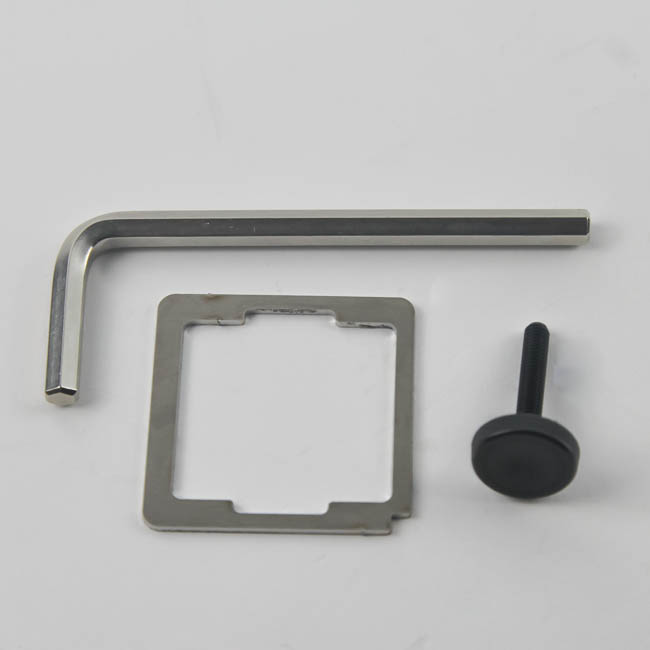
Dr. Delid is a corny name, but I will admit it is catchy and unique enough to where it will not be forgotten. Everything you need for both de-lidding and re-lidding is included here, which is a must in my opinion. A large plastic pouch reveals a very simple manual when opened, one Aqua Computer can definitely improve upon, as well as some of the tools needed for the job - a hex key, centering tool, and plastic tightening screw.


The main tool itself is fairly small in size and can be stored away easily. It is compact enough to where the de-lid and re-lid pieces can both be placed into the main body, which prevents them from being misplaced. The tool is made out of machined Delrin, and some lettering on the front mentions the company and product name and reassures you that this is indeed painless and easy. Aside from the metal re-lid press tool, there are two more metal pieces here - a metal screw in the top-left corner when seen from the front - with a hex head - and a de-lid disc that goes around the CPU IHS and locks it in place.
De-lidding


To use the Dr. Delid tool, slide the re-lid press tool out through the bottom-left corner. You will notice that the main body has a machined body to accept it in the other corner, which holds it in place, so loosening it away allows you to take it out. Once done, loosen the screw to where you can rotate the de-lid disc counterclockwise and remove it outward as well. There is a small extension in the top of disc - it goes inward, into the tool's body, which is what holds it in place.
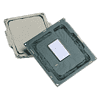
Once done, you will see a square space that fits the i7 7700K perfectly. There are two notch guides in the top to fit around the notches cut into the die PCB, so there is only one way to fit the CPU in here, which minimizes user error. A quick way to ascertain if you have it right is to imagine how you would fit this into a CPU socket with the arrow in the PCB pointing toward the bottom-left corner as seen above.
Now, align the de-lid disc around the IHS and rotate it clockwise by hand so it does not come loose. Take the provided hex key and tighten the screw inward to further rotate the disc. The disc applies a constant torque on the CPU IHS, which is an elegant way to go about de-lidding without worrying about chipping the PCB. Keep going until you feel a drop in resistance to the disc's rotation, at which point the de-lidding process is complete. Reverse these steps - loosen the screw, rotate the de-lid disc, remove the disc, and take the IHS and die out, which will no longer be one piece. No complaints from me as far as de-lidding goes with the Aqua Computer Dr. Delid tool.
Re-lidding
This step assumes you have completed everything you wanted to gain from de-lidding, such as a TIM swap, and have applied some form of glue to the IHS and CPU (more on this later), but now want to make the two pieces whole again to use in your build. If you intend to go "naked" and use the CPU die/PCB without the IHS, feel free to skip this section and move on to the next page.


You have with you a CPU IHS you have placed over the CPU die to where you feel it is centered, and have applied glue to hold it in place. The glue has not yet set, so you want to place the two back in place inside the Dr. Delid tool as before, but with the de-lid disc gone. Instead of placing the disc, you will now just place the centering tool Aqua Computer provides over the IHS. Here too, the centering tool has notches and cutouts shaped to fit around the IHS in its correct orientation, which is nice to see. In theory, this will now align the IHS over the PCB exactly to where it should be, and it should also stay in place. In practice, however, there is a small amount of give on all sides to where you can move the centering tool laterally and along with it the IHS. We are talking about a few tenths of a millimeter at most, but I still felt this should not have been the case, and I had to fiddle around to get the IHS into the middle while the glue was setting.
Once done, slide the re-lid press tool back into place and use the plastic tightening screw in the middle such that you clamp the IHS and CPU die/PCB together. Do not apply a lot of pressure, let the glue do its job. I would recommend going until the screw hits the IHS before applying another half a turn. This depends on the type of glue you are using, however, as thicker/more viscous glue might benefit from more contact pressure as compared to the Loctite brand liquid super glue I used.
Overall, de-lidding was indeed painless and easy, but re-lidding could be improved upon here.
Edit (April 27, 2017): I was informed by Aqua Computer that I had orientated the centering tool incorrectly. Another look at the manual did confirm that it was off by 90°, and using it correctly removed any of the give I had experienced. So please rotate the tool by 90° relative to the pictures above.
Apr 26th, 2024 15:10 EDT
change timezone
Latest GPU Drivers
New Forum Posts
- Best SSD for system drive (88)
- Xeon Owners Club (8698)
- What's an inexpensive AIO product line with a strong pump and low price? (81)
- What phone you use as your daily driver? And, a discussion of them. (1486)
- Windows 11 General Discussion (5024)
- hacked (75)
- XFX RX470 8GB no video and error 43 (30)
- looking to build a new system and im considering asrock brand but i have some doubts/concerns. (0)
- DTS:X APO4 + DTS Interactive for Most Devices [USB Supported] (305)
- The Official Linux/Unix Desktop Screenshots Megathread (702)
Popular Reviews
- HYTE THICC Q60 240 mm AIO Review
- MOONDROP x Crinacle DUSK In-Ear Monitors Review - The Last 5%
- Alienware Pro Wireless Gaming Keyboard Review
- Upcoming Hardware Launches 2023 (Updated Feb 2024)
- Thermalright Phantom Spirit 120 EVO Review
- FiiO K19 Desktop DAC/Headphone Amplifier Review
- ASUS Radeon RX 7900 GRE TUF OC Review
- AMD Ryzen 7 7800X3D Review - The Best Gaming CPU
- RTX 4090 & 53 Games: Ryzen 7 5800X vs Ryzen 7 5800X3D Review
- NVIDIA RTX 4090: 450 W vs 600 W 12VHPWR - Is there any notable performance difference?
Controversial News Posts
- Windows 11 Now Officially Adware as Microsoft Embeds Ads in the Start Menu (129)
- Sony PlayStation 5 Pro Specifications Confirmed, Console Arrives Before Holidays (117)
- NVIDIA Points Intel Raptor Lake CPU Users to Get Help from Intel Amid System Instability Issues (106)
- AMD "Strix Halo" Zen 5 Mobile Processor Pictured: Chiplet-based, Uses 256-bit LPDDR5X (103)
- US Government Wants Nuclear Plants to Offload AI Data Center Expansion (98)
- AMD's RDNA 4 GPUs Could Stick with 18 Gbps GDDR6 Memory (95)
- Developers of Outpost Infinity Siege Recommend Underclocking i9-13900K and i9-14900K for Stability on Machines with RTX 4090 (85)
- Windows 10 Security Updates to Cost $61 After 2025, $427 by 2028 (84)