 11
11
Silverstone SUGO SG08 Review
Assembly & Finished Looks »A Closer Look - Inside
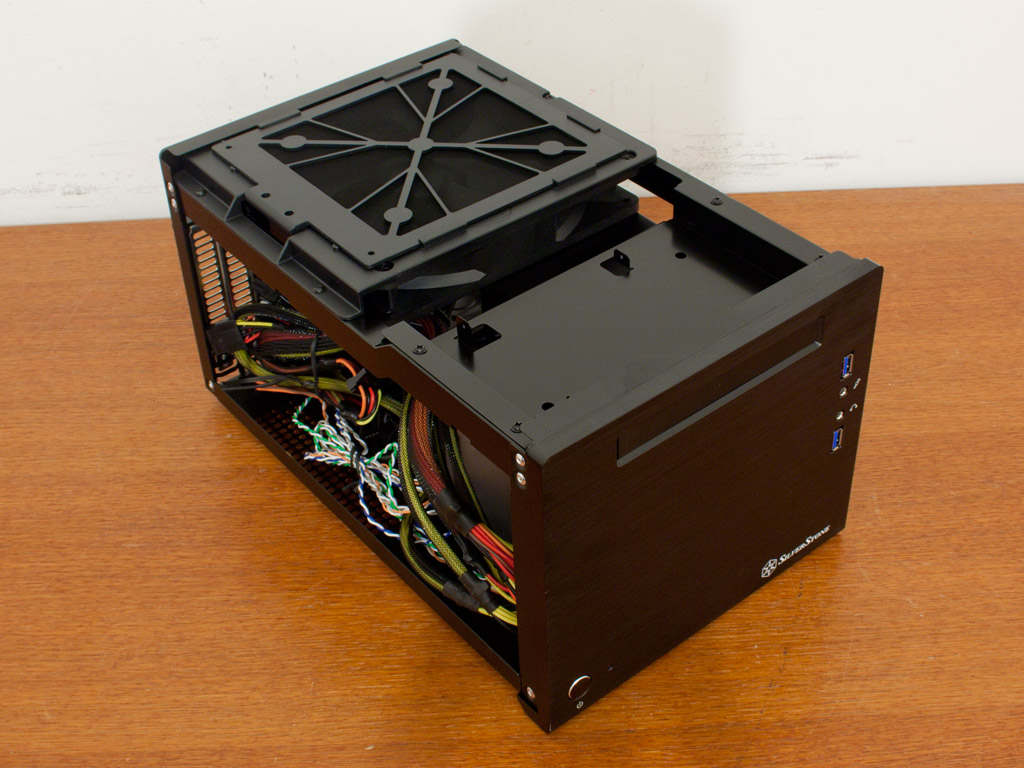
Simply remove the thumb screws holding the cover in place to gain access to the interior. Once removed, you have access to three sides of the chassis, which should help in getting everything assembled.


The slimline ODD bay is in the very top of the chassis. It consists of a tray that you need to remove to place the optical drive within. The rear of the top is taken up by the massive 180 mm Air Penetrator fan. It is actually covered by a dust filter which I removed to show you the cooling unit properly. You will have to remove both the ODD tray and the fan to gain proper access to the interior of the SG08 chassis. Silverstone has firmly attached the speed switch to the installed Air Penetrator which means that you will lose its functionality if you replace the fan.

Below the optical drive bay is the quite elaborate hard-drive cage. It uses neon rubber rings as anti-vibration measures. They are great, but a bit frail. I managed to rip one apart completely without much issue. The friction of the cage-pin that goes into the ring is enough to pull things apart. Silverstone should use better quality ones, or at supply a couple spares. The hard-drive cage can hold one 3.5" and two 2.5" drives thanks to, as we will see later, a pretty smart way of placing the drives.


The short PSU has been placed on the floor of the chassis. It is a special one that fits within the SG08 perfectly; it features a single rail with 46A and 80Plus Bronze certification. It comes with a 120 mm fan despite its compact size. It would have been nice to see a fully modular approach, but this is simply not possible as such an attribute would get in the way of long GPUs.
Apr 26th, 2024 14:04 EDT
change timezone
Latest GPU Drivers
New Forum Posts
- XFX RX470 8GB no video and error 43 (29)
- DTS:X APO4 + DTS Interactive for Most Devices [USB Supported] (305)
- The Official Linux/Unix Desktop Screenshots Megathread (702)
- What's your latest tech purchase? (20352)
- hacked (73)
- im new to throttelstop and i think i messed it up by copying others any hints would be very much aprreciated (5)
- 2022-X58/1366 PIN Motherboards NVME M.2 SSD BIOS MOD Collection (657)
- DTS DCH Driver for Realtek HDA [DTS:X APO4 + DTS Interactive] (1909)
- checkup (1)
- Help me to OC my 5700X (10)
Popular Reviews
- HYTE THICC Q60 240 mm AIO Review
- MOONDROP x Crinacle DUSK In-Ear Monitors Review - The Last 5%
- Alienware Pro Wireless Gaming Keyboard Review
- Upcoming Hardware Launches 2023 (Updated Feb 2024)
- Thermalright Phantom Spirit 120 EVO Review
- FiiO K19 Desktop DAC/Headphone Amplifier Review
- ASUS Radeon RX 7900 GRE TUF OC Review
- AMD Ryzen 7 7800X3D Review - The Best Gaming CPU
- RTX 4090 & 53 Games: Ryzen 7 5800X vs Ryzen 7 5800X3D Review
- NVIDIA RTX 4090: 450 W vs 600 W 12VHPWR - Is there any notable performance difference?
Controversial News Posts
- Windows 11 Now Officially Adware as Microsoft Embeds Ads in the Start Menu (129)
- Sony PlayStation 5 Pro Specifications Confirmed, Console Arrives Before Holidays (117)
- NVIDIA Points Intel Raptor Lake CPU Users to Get Help from Intel Amid System Instability Issues (106)
- AMD "Strix Halo" Zen 5 Mobile Processor Pictured: Chiplet-based, Uses 256-bit LPDDR5X (102)
- US Government Wants Nuclear Plants to Offload AI Data Center Expansion (98)
- AMD's RDNA 4 GPUs Could Stick with 18 Gbps GDDR6 Memory (92)
- Developers of Outpost Infinity Siege Recommend Underclocking i9-13900K and i9-14900K for Stability on Machines with RTX 4090 (85)
- Windows 10 Security Updates to Cost $61 After 2025, $427 by 2028 (84)