 0
0
Vantec NexStar 3i HDD Enclosure Review
Use & Performance »A Closer Look

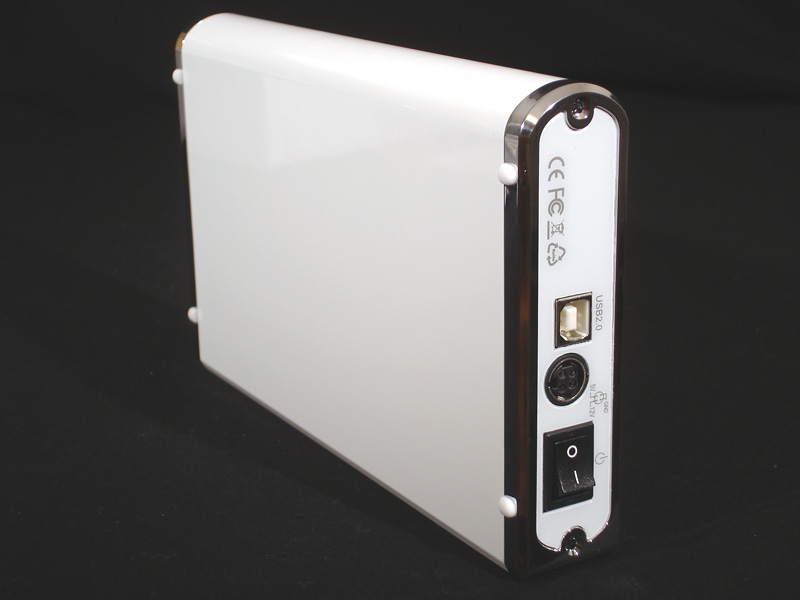


The Vantec NexStar 3i is a very good looking enclosure with a white, high-gloss finish. The main casing is made of aluminum, while the ends are made of plastic and feature chrome trim. On the left side of the enclosure there are three LED light indicators for power down, standby, and the Vantec logo on the front of the unit glows blue with HDD activity. The enclosure can be used with or without the included plastic stand as it will sit upright on its own or it can lay flat on the white rubber pads located on four corners of the right side of the unit. The back of the unit features a USB 2.0 connector, a four pin power connector, and an off/on switch.

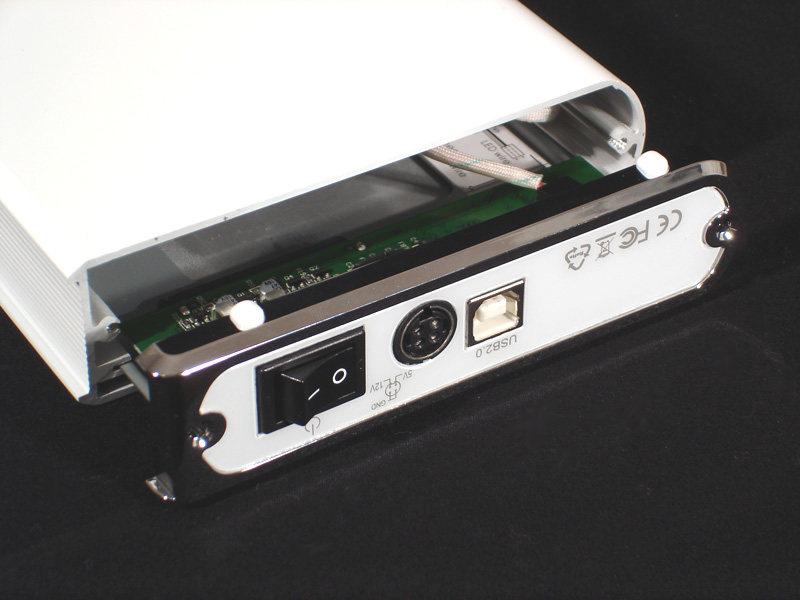


In order to install a hard disk into the NexStar 3i, two screws need to be removed from the back of the unit and the screws are easily removed using a phillips screwdriver. With a slight pull the tray comes out of the casing without too much of a struggle revealing the inside of the unit. There is a three-pin wire which leads from the front of the unit's HDD indicator to the rear three-pin header on the circuit board that needs to be unplugged and glides on and off the header easily. Once disconnected, the tray is safe for complete removal from the casing.


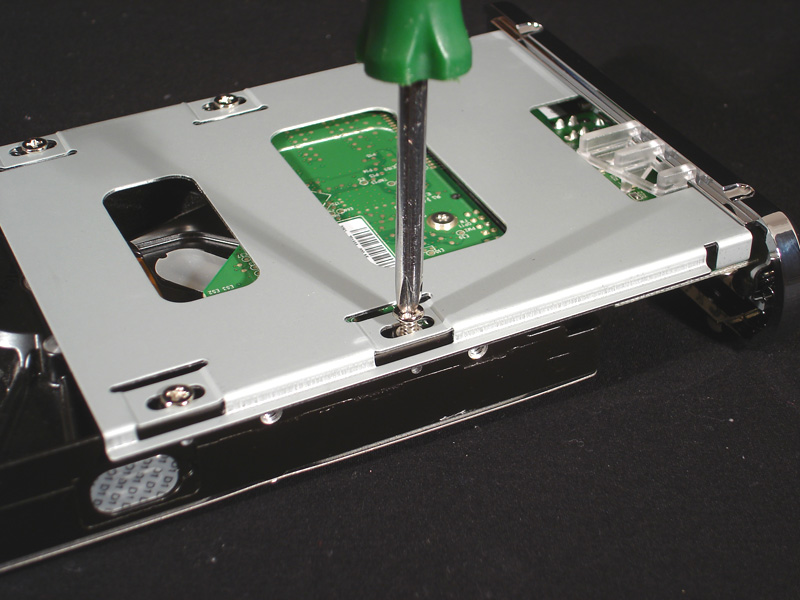
The HDD tray is made from steel and the PCB that makes the Vantec Nextar 3i operational is mounted to it. As you can see the SATA data and power connections are connected to the PCB. Though, not necessary for the normal end-user the PCB was dismounted from the tray and turned over revealing the Opti OP-7210 processor. There is absolutely no documented information on this processor, however it takes care of processing data from SATA to USB 2.0 and handles the enclosure's power management functions.


To mount the hard disk to the tray, all that is required is sliding the HDD into the SATA connector. Once connected, flip the HDD and tray over and mount the four included screws. The now tray mounted hard disk can be inserted back into the enclosure, the front LED indicator is re-connected and the two screws are put back into place. All that is left is connecting the USB and power cables and the enclosure is ready to go!
Software
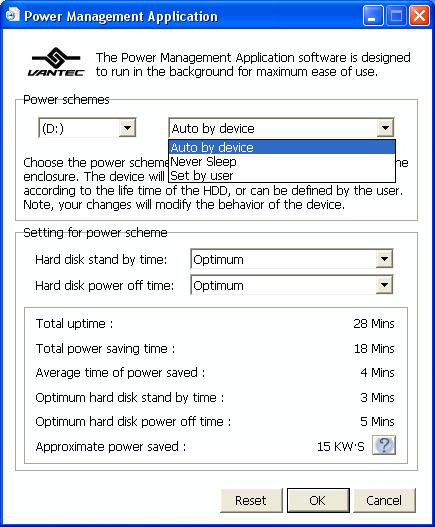

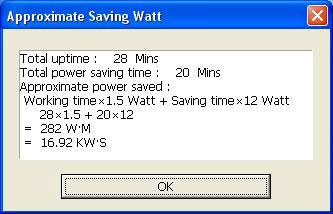
The included power management software is very easy to use. The settings for the application are "Auto, Never Sleep, and Set by User." With the "Auto" setting stand-by time is at three minutes and power off time is set at five minutes. "Never Sleep" basically turns power management off, and "Set by User" will allow you to set the stand-by and power off times to what you want. For testing the settings were left on default "Auto" settings. During both stand-by and power off modes the hard disk immediately powered up to operational status while accessed with no stuttering or data lag and worked very well. Another nice feature of this program is that it keeps a total of power saved in time and wattage.
Apr 26th, 2024 15:29 EDT
change timezone
Latest GPU Drivers
New Forum Posts
- looking to build a new system and im considering asrock brand but i have some doubts/concerns. (1)
- Xeon Owners Club (8699)
- Dell Workstation Owners Club (3057)
- GTX 1070 Ti - TDP Issues - Always Power Throttling (6)
- Best SSD for system drive (88)
- What's an inexpensive AIO product line with a strong pump and low price? (81)
- What phone you use as your daily driver? And, a discussion of them. (1486)
- hacked (75)
- XFX RX470 8GB no video and error 43 (30)
- DTS:X APO4 + DTS Interactive for Most Devices [USB Supported] (305)
Popular Reviews
- HYTE THICC Q60 240 mm AIO Review
- MOONDROP x Crinacle DUSK In-Ear Monitors Review - The Last 5%
- Alienware Pro Wireless Gaming Keyboard Review
- Upcoming Hardware Launches 2023 (Updated Feb 2024)
- Thermalright Phantom Spirit 120 EVO Review
- FiiO K19 Desktop DAC/Headphone Amplifier Review
- ASUS Radeon RX 7900 GRE TUF OC Review
- AMD Ryzen 7 7800X3D Review - The Best Gaming CPU
- RTX 4090 & 53 Games: Ryzen 7 5800X vs Ryzen 7 5800X3D Review
- NVIDIA RTX 4090: 450 W vs 600 W 12VHPWR - Is there any notable performance difference?
Controversial News Posts
- Windows 11 Now Officially Adware as Microsoft Embeds Ads in the Start Menu (129)
- Sony PlayStation 5 Pro Specifications Confirmed, Console Arrives Before Holidays (117)
- NVIDIA Points Intel Raptor Lake CPU Users to Get Help from Intel Amid System Instability Issues (106)
- AMD "Strix Halo" Zen 5 Mobile Processor Pictured: Chiplet-based, Uses 256-bit LPDDR5X (103)
- US Government Wants Nuclear Plants to Offload AI Data Center Expansion (98)
- AMD's RDNA 4 GPUs Could Stick with 18 Gbps GDDR6 Memory (95)
- Developers of Outpost Infinity Siege Recommend Underclocking i9-13900K and i9-14900K for Stability on Machines with RTX 4090 (85)
- Windows 10 Security Updates to Cost $61 After 2025, $427 by 2028 (84)