Adding Fan Control to the 9800 Pro with XT PCB |
|
|
Author: W1zzard
Date: 2004-10-14 17:58:00
|
|
Introduction
For many users video card fan noise has been a necessary evil when using high-end video cards. On ATI's X800 and 9800XT the fan's speed is decreased when the temperature is low, to keep noise at a minimum. This is done by using an additional hardware monitoring chip on the board (LM63 page at National Semiconductor).With ATITool it is even possible to set your own values for temperature and speed.
For an unknown reason this much wanted feature is not enabled on the 9800 Pro with XT PCB. In this guide we will show you how to enable it with a little bit of soldering and one part which is less than $1.
Requirements
First of all, your card MUST have the 9800 XT PCB with an LM63 monitoring chip - see this article: Does my ATI card support temperature monitoring? (picture 3).Another prerequisite is that your card is flashed with a real XT bios (Bios Collection here). This is because only the XT bios has support for controlling the fan output of the LM63.
Make sure you flash to an XT and verify that it is working at this point - BEFORE soldering. As soon as the resistor is removed, the fan will not spin if the bios does not support fan control. If that happens to you, read "Problems?" further down.
The Mod


This is the area we will be working in. Of particular interest are R1573 and Q209.
The needed transistor is a MMBT2222A in SOT-23 packaging which is one of the most common transistors and should be fairly easy to get. You can also use the 2N2222A in TO-18 metal package if you have problems finding the MMBT2222A, it'll work fine but won't be as convenient to solder in.
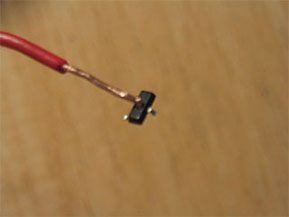
A little trick for easier handling of the transistor: Grab a toothpick/pin/solid wire and glue one end to the middle of the transistor package. Makes it much easier to place the transistor on the PCB and keep it there while soldering.

Unsolder resistor R1573.

Solder your 2N2222A into spot Q209. Finished.
Some cards have both R1573 and Q209 installed, on these cards all you have to do is remove R1573.
The following pictures from nanobug show that his card has both R1573 and Q209 in place, after removing R1573 fan control worked.


Problems?
First of all don't panic if the fan is not moving. As long as you stay away from 3D applications, you have at least several minutes (if not more) before the card overheats. I tried about five minutes and the card was really really hot but still works fine.- Shut down the computer
- Solder a wire to each pad of R1573. When those wires are tied together, the fan will always be running at 100%, no matter if the bios supports fan control.
- Tie those wires together and try another bios.
- Untie them after rebooting with the new bios and see if the fan works. Boot fully into Windows and check the fan again. It is possible for the fan to stop moving when loading Windows.
- If the fan does not move, try another bios until you find one. Our large Bios Collection can be found here.
Un-Doing the Mod
If you want the "old" always-100% fan back, just connect the two solder points of R1573, Q209 can stay in place. It is not needed to solder a 0 Ohm resistor into R1573, just a wire or solder blob will do, both has 0 Ohms resistance and is completely equal to the resistor.Disclaimer: All modifications are done at your own risk. Soldering on your video card will void your warranty.
Apr 18th, 2024 11:19 EDT
change timezone
Latest GPU Drivers
New Forum Posts
- What are you playing? (20458)
- What's your latest tech purchase? (20257)
- Do you use Linux? (225)
- DDR5 RAM Speeds and the future (27)
- The TPU UK Clubhouse (24727)
- Your PC ATM (34486)
- What phone you use as your daily driver? And, a discussion of them. (1444)
- Sold my a working PSU that I have been using, but buyer says it sparked at the outlet when he plugged it in and asking for a possible refund (11)
- Realtek Modded Audio Driver for Windows 10/11 - Only for HDAUDIO (5679)
- XFX RX580 stock Bios (0)
Popular Reviews
- Horizon Forbidden West Performance Benchmark Review - 30 GPUs Tested
- PowerColor Radeon RX 7900 GRE Hellhound Review
- Fractal Design Terra Review
- Corsair 2000D Airflow Review
- Minisforum EliteMini UM780 XTX (AMD Ryzen 7 7840HS) Review
- Creative Pebble X Plus Review
- FiiO KB3 HiFi Mechanical Keyboard Review - Integrated DAC/Amp!
- ASUS GeForce RTX 4090 STRIX OC Review
- NVIDIA GeForce RTX 4090 Founders Edition Review - Impressive Performance
- ASUS GeForce RTX 4090 Matrix Platinum Review - The RTX 4090 Ti
Controversial News Posts
- Sony PlayStation 5 Pro Specifications Confirmed, Console Arrives Before Holidays (108)
- NVIDIA Points Intel Raptor Lake CPU Users to Get Help from Intel Amid System Instability Issues (102)
- US Government Wants Nuclear Plants to Offload AI Data Center Expansion (98)
- Windows 10 Security Updates to Cost $61 After 2025, $427 by 2028 (82)
- Developers of Outpost Infinity Siege Recommend Underclocking i9-13900K and i9-14900K for Stability on Machines with RTX 4090 (82)
- TechPowerUp Hiring: Reviewers Wanted for Motherboards, Laptops, Gaming Handhelds and Prebuilt Desktops (71)
- Intel Realizes the Only Way to Save x86 is to Democratize it, Reopens x86 IP Licensing (70)
- AMD Zen 5 Execution Engine Leaked, Features True 512-bit FPU (63)