 2
2
Cooler Master Centurion 6 Review
Assembly & Finished Looks »A Closer Look - Inside


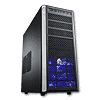
To gain access to the interior of the Centurion 6, simply remove the thumb screws holding each side panel in place. Cooler Master has chosen to keep the interior of the chassis all black. Numerous large openings in the motherboard tray are meant for cable routing, while a large cutout behind the CPU area of the motherboard should allow for quick and easy swaps of coolers. You have around 20 mm worth of space behind the motherboard tray to route and hide cables.


The hard drive cage is divided into two parts that can hold a total of seven drives. Cooler Master has made the side piece of the top compartment removable, so you have the flexibility of installing long graphics cards or placing a water-cooling reservoir there. By doing so, you are left with four bays, which should be sufficient for most users. Above these HDD bays are three 5.25" ones that are accessible externally. Plastic locks are used for securing installed drive. It is not the first time that I have seen these as Cooler Master has been using them in the recent HAF XB, for example.


Turning the focus to the rear of the case, the bottom PSU bay is of the usual kind with a large opening for the power supply fan. You may also install the unit with the fan facing upward if you like, as there is a second set of mounting holes. Above that are the seven expansion slots—each protected by an individual cover held in place by thumb screws. In the very top, you will find a 120 mm fan to push hot air out of the chassis, but it does not come equipped with an LED.


Another such fan may be mounted on the floor of the chassis, as long as you decide not to use a PSU that is extremely long. Taking a quick look at the ceiling, the large vent for two 120 or 140 mm units has numerous sets of holes to guarantee the best possible compatibility with various liquid cooling units or radiators. A crude dust filter consisting of a metal mesh sheet has been placed on the underside of the chassis to protect the PSU from dust and grime. While this will work, using a finer filter—ideally a framed one—would have been better.


Before we dive into the assembly portion of things, let us take a quick look at the cables. Cooler Master has taken it upon themselves to offer these sleeved, black cables to go with the rest of the chassis, which is a nice touch. They are, besides that, of the standard variety and should work flawlessly with modern motherboards.
Jun 7th, 2024 00:37 EDT
change timezone
Latest GPU Drivers
New Forum Posts
- What are you playing? (20782)
- my computer hit a wall and cant move data (4)
- RX 580 8GB 2048SP problem, I need help, please. (9)
- Soyo RX 580 2048SP problem. (5)
- LOL ASUS says this is $200 in repair, Steve from gamers Nexus smokes ASUS, Steam Deck til I die boys!!!! (133)
- RX580 2048SP or RX470? Help Please (5)
- MSI Aero RX560 ITX 4GB (14)
- Game Saved Files (3)
- 980 Ti Crashing issue (27)
- Post your Cinebench 2024 score (468)
Popular Reviews
- Intel Lunar Lake Technical Deep Dive - So many Revolutions in One Chip
- NZXT H6 Flow RGB Review
- Kioxia Exceria Plus G3 2 TB Review
- Corsair iCUE XC7 RGB Elite LCD CPU Water Block Review
- Upcoming Hardware Launches 2024 (Updated May 2024)
- AQIRYS HYDRA 360 AIO Review
- AMD Ryzen 7 7800X3D Review - The Best Gaming CPU
- SilverStone KL07E Review
- Ghost of Tsushima Performance Benchmark Review - 35 GPUs Tested
- Senua's Saga: Hellblade II Performance Benchmark Review
Controversial News Posts
- AMD RDNA 5 a "Clean Sheet" Graphics Architecture, RDNA 4 Merely Corrects a Bug Over RDNA 3 (142)
- AMD Hits Highest-Ever x86 CPU Market Share in Q1 2024 Across Desktop and Server (140)
- NVIDIA RTX 5090 "Blackwell" Founders Edition to Implement the "RTX 4090 Ti" Cinderblock Design (118)
- Core Configurations of Intel Core Ultra 200 "Arrow Lake-S" Desktop Processors Surface (101)
- Biden Administration to Revive Trump-Era Tariffs on China-made GPUs and Motherboards (95)
- ASRock Innovates First AMD Radeon RX 7000 Graphics Card with 12V-2x6 Power Connector (94)
- AMD Zen 5 Storms into Gaming Desktops with Ryzen 9000 "Granite Ridge" Processors (93)
- AMD Ryzen 9000 Zen 5 Single Thread Performance at 5.80 GHz Found 19% Over Zen 4 (88)