 2
2
Aerocool DS Cube Review
Value & Conclusion »Assembly


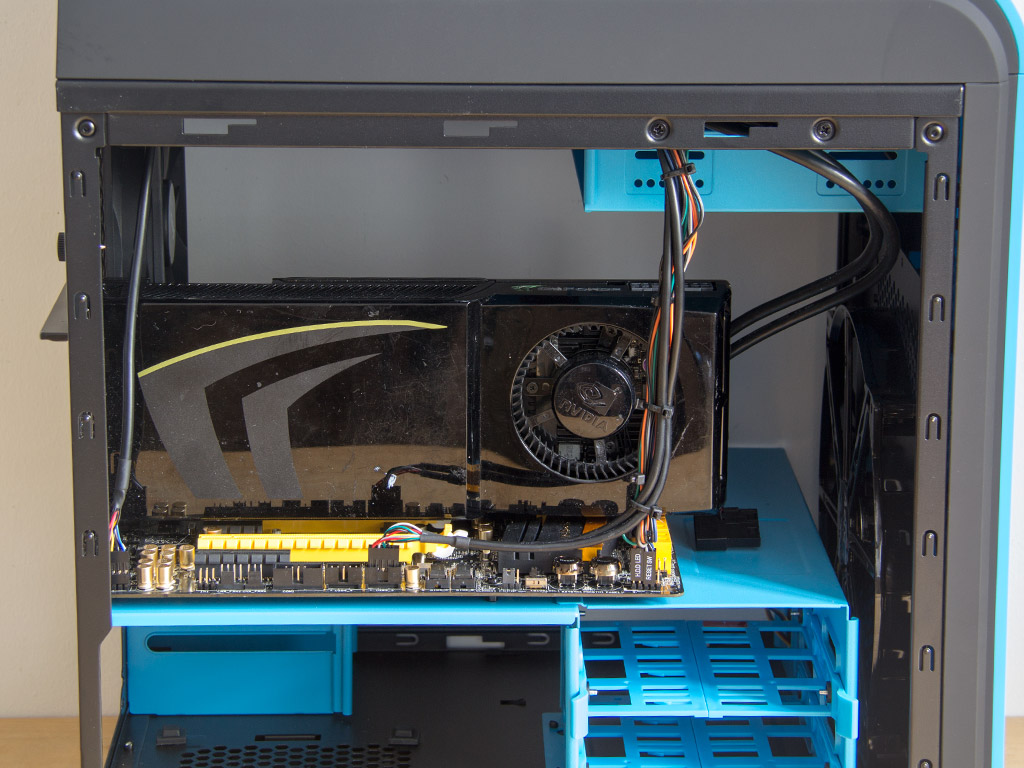
Installing the motherboard is done by traditional means, with the use of spacers and screws. You may need to reach in through the top of the chassis if you don't have a screwdrivers that is compact enough. Installing a 140 mm top-blow cooler is easily done, and you should also easily be able to fit 140 mm tower variants within the chassis. As you can see, I have fed all chassis, USB 2.0, and Audio cables down one line, like an umbilical cord to the motherboard, which seemed to be the cleanest solution without potentially blocking off the 5.25" bay. Large graphics cards will also easily fit, but you will have to sacrifice the 3.5" slot as you won't be able to access the PCIe power plug(s) of such cards otherwise.


Installing a 3.5" drive within requires no tools or screws. Simply pull the tray of your choice out. It may be pulled apart for the storage device's insertion. Once in place, slide it in and you are done.


While you may install SSDs and traditional 2.5" drives into the larger trays, the ideal solution would be to equip them with rubber rings and screws and slide them into the special bays on the floor of the chassis. Preparing these drives is supposed to take a screwdriver, but you may also use your fingers because of the rubber rings.

However, installing an optical drive definitely takes a screwdriver. Inserting an optical drive, however, is done the normal way. You have to free the bay first, before sliding the drive in and securing it with the supplied screws.

The chassis is pretty compact, so you will have to watch the length of your power supply. We used a compact Seasonic unit in our review, and there is plenty of space left, but those using modular units may have to pre-connect all leads as there is no way to reach them otherwise.


With everything installed, the DS Cube's top compartment makes a very nice and clean impression, which is achieved by hiding the cable mess inside the enclosure's lower half.
Finished Looks


To let you know your computer is up and running, a blue LED within the power button starts glow once the side panels have been re-applied and the DS Cube has been turned on. The black optical drive is in stark contrast to the bright blue color of the chassis itself, but it does not look bad. In terms of noise, well, there is very little. The Aerocool DS Cube's solid panels do a great job of encapsulating sound.


Every connector in the rear is easily accessible, as they are flush with the chassis' frame. Looking through the window, you don't see any of the cables below, which leaves you to stare at all of the glorious hardware instead. As the graphics card is rather large and odds are users will install gaming gear inside the DS Cube, most builds will only allow for the GPU to be fully visible. This is fine and a nice show of what graphics power you have under the hood.
May 10th, 2024 03:52 EDT
change timezone
Latest GPU Drivers
New Forum Posts
- Is hard drive sentinel trustworthy (7)
- Ghost of Tsushima PC Port !!!! (23)
- Flash VBIOS to turn RX 580 2048SP into RX 570 (28)
- AM5 boot times improve RADICALLY with memory context restore enabled (28)
- looking to optimize (performance+cooling) a ryzen 7800x3d system with x670e aorus pro x (16)
- Any suggestion for hosting to test something ? (4)
- Last game you purchased? (279)
- The TPU UK Clubhouse (24791)
- RTX40x0 VBIOS viewer: Kepler-Ada NVIDIA VBIOS Visualizer - opensource pattern for ImHex (0)
- Graphics card running at 8x 4.0 not 16x 4.0 (15)
Popular Reviews
- CHERRY XTRFY M64 Pro Review
- Bykski CPU-XPR-C-I CPU Water Block Review - Amazing Value!
- Corsair iCUE Link RX120 RGB 120 mm Fan Review
- Corsair MP700 Pro SE 4 TB Review
- ThundeRobot ML903 NearLink Review
- Upcoming Hardware Launches 2023 (Updated Feb 2024)
- Finalmouse UltralightX Review
- AMD Ryzen 7 7800X3D Review - The Best Gaming CPU
- Sapphire Radeon RX 7700 XT Pure Review
- ASUS Radeon RX 7900 GRE TUF OC Review
Controversial News Posts
- Intel Statement on Stability Issues: "Motherboard Makers to Blame" (264)
- AMD to Redesign Ray Tracing Hardware on RDNA 4 (206)
- Windows 11 Now Officially Adware as Microsoft Embeds Ads in the Start Menu (169)
- NVIDIA to Only Launch the Flagship GeForce RTX 5090 in 2024, Rest of the Series in 2025 (144)
- Sony PlayStation 5 Pro Specifications Confirmed, Console Arrives Before Holidays (119)
- AMD's RDNA 4 GPUs Could Stick with 18 Gbps GDDR6 Memory (114)
- NVIDIA Points Intel Raptor Lake CPU Users to Get Help from Intel Amid System Instability Issues (106)
- AMD Ryzen 9 7900X3D Now at a Mouth-watering $329 (104)