 16
16
Danger Den Torture Rack Review
Value & Conclusion »Installing your hardware
I chose to test the case with two setups – water cooled and air cooled.Water cooled
First, I installed the rig I normally use for water-block testing.


Here, I was aiming for a fully internal setup. Everything fit OK, but in some cases, it was truly a tight squeeze. Here, I noticed that the PSU does not align with the holes on the case, and also, the socket on the PSU hits the edge of the case. It is also important to note that if you want to mount your radiator vertically on the disc-drive side, you will need a short disc drive, otherwise, it will overlap with one of the barb holes.
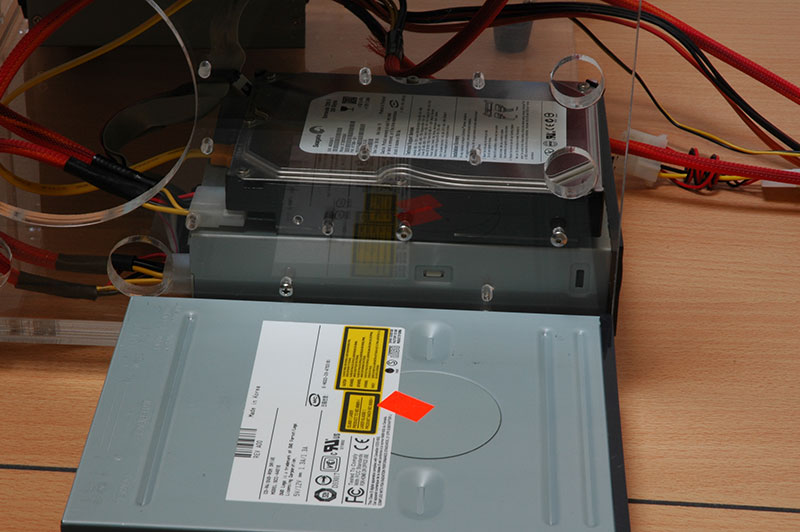
Air cooled

With the air cooled setup, I tried to do things a little differently. The first step was to house the hard drives externally – I used the cage from my CM Stacker. The PSU still didn’t fit though – this time, the holes did align, but I couldn’t screw the PSU down, as the socket on the PSU hit the edge, preventing me from fully inserting the PSU, rendering the screws provided too short.
Overall impressions

I installed two systems in the Torture rack, and I must say that installing both was a breeze. Coming from a CM Stacker 810 (the worst case in existence in my opinion) I use(d) daily, this case is a revolution. At first the case might seem small, but unlike the Stacker, it has room in all the right places. Take a look at the motherboard tray, for example – you have about 1” of space between the edge of the motherboard and the case wall. This makes case fan and radiator installation super easy, as you can insert the screws without having to remove the motherboard. Also, routing cables around and behind the motherboard tray is easy due to its construction. I was also impressed by our techPowerUp! logo engraved into the side panel. It was of very high quality, with fine detail.

The case is not perfect though – I think that Danger Den should offer a HDD rack or something similar as an optional item when purchasing the case. If you plan to run one hard drive then everything is OK, but as soon as you have two, I would propose you get an external enclosure. PSU mounting could also be refined. I would suggest a separate plate to which you mount the PSU, and then you mount the plate with the PSU to the case – this would also allow users to choose which way they want their PSU to be oriented – since there is a 120mm fan hole right at the PSU, it might be good idea to use it and allow the PSU to suck in cold air from there (that is, if the PSU has a fan at its bottom). Another thing I missed with the case is the fact that it has no USB ports upfront, yet there are 4 holes for the switch. Here, I think the problem could be solved by offering two USB ports in a switch enclosure. You could then choose where to place the ports yourself, which would allow for versatility.
May 14th, 2024 01:33 EDT
change timezone
Latest GPU Drivers
New Forum Posts
- The sands of time have run out, Son of Durotan. (Warcraft III Fan Club/Memories Thread) (1)
- Air makes its way from the reservoir into the radiator. (46)
- Ryzen Owners Zen Garden (7317)
- Rare GPUs / Unreleased GPUs (1885)
- Free Games Thread (3797)
- What are you playing? (20635)
- The Filthy, Rotten, Nasty, Helpdesk-Nightmare picture clubhouse (2633)
- Which Audio System Would you Choose and Why? (25)
- PNY 4070 Ti Super XLR8 (1)
- Ubuntu 24.04 LTS released (21)
Popular Reviews
- Homeworld 3 Performance Benchmark Review - 35 GPUs Tested
- ZMF Caldera Closed Planar Magnetic Headphones Review
- Corsair MP700 Pro SE 4 TB Review
- ThundeRobot ML903 NearLink Review
- Upcoming Hardware Launches 2023 (Updated Feb 2024)
- AMD Ryzen 7 7800X3D Review - The Best Gaming CPU
- Bykski CPU-XPR-C-I CPU Water Block Review - Amazing Value!
- CHERRY XTRFY M64 Pro Review
- ASUS Radeon RX 7900 GRE TUF OC Review
- ASRock Radeon RX 7900 XT Phantom Gaming White Review
Controversial News Posts
- Intel Statement on Stability Issues: "Motherboard Makers to Blame" (266)
- AMD to Redesign Ray Tracing Hardware on RDNA 4 (227)
- Windows 11 Now Officially Adware as Microsoft Embeds Ads in the Start Menu (172)
- NVIDIA to Only Launch the Flagship GeForce RTX 5090 in 2024, Rest of the Series in 2025 (152)
- Sony PlayStation 5 Pro Specifications Confirmed, Console Arrives Before Holidays (119)
- AMD Hits Highest-Ever x86 CPU Market Share in Q1 2024 Across Desktop and Server (115)
- AMD's RDNA 4 GPUs Could Stick with 18 Gbps GDDR6 Memory (114)
- AMD Ryzen 9 7900X3D Now at a Mouth-watering $329 (104)