• Welcome to TechPowerUp Forums, Guest! Please check out our forum guidelines for info related to our community.

The Utterly Imbalanced CaseLabs TX10-D build(s)!

I feel that if you go with a non-color paint (grey black etc) then you might as well keep the stock black color.

One thing I haven't mentioned yet is that some of the exterior has scratches on it. Not necessarily noticeable, but definitely there. I agree in that I will likely go in a color noticeable different than black. That Bisque Speckle, for example, is what I personally am leaving towards at this point.
 
One thing I haven't mentioned yet is that some of the exterior has scratches on it. Not necessarily noticeable, but definitely there. I agree in that I will likely go in a color noticeable different than black. That Bisque Speckle, for example, is what I personally am leaving towards at this point.
You seem dead set on it but your likely to get scratches no matter eventually, not to mention if the powder coat isn't done quite perfect. I think the bisque speckle isn't bad of the colors you can do, but I still like that red :).
 
You seem dead set on it but your likely to get scratches no matter eventually, not to mention if the powder coat isn't done quite perfect. I think the bisque speckle isn't bad of the colors you can do, but I still like that red :).

Nothing is dead set, I still haven't measured everything and received a quote based on it :)
 
Nothing is dead set, I still haven't measured everything and received a quote based on it :)
first finish with cutting (if you going to cut anything) and then send it for painting. this way you wont risk to damage painting when you are cutting.
also dont forget to ask em with how much coating change dimensions so you can drill/cut holes with accurate dimension a bit bigger.
 
  • Like
Reactions: VSG
first finish with cutting (if you going to cut anything) and then send it for painting. this way you wont risk to damage painting when you are cutting.
also dont forget to ask em with how much coating change dimensions so you can drill/cut holes with accurate dimension a bit bigger.

Great advice! I don't have anymore cutting to do, and I did ask them about dimension changes. Since the powdercoating involves removing the existing coat first and then applying the new one, they assured me that the dimensions won't change more than 0.1mm on average. I will still be sure to check before and after to be sure.
 
Great advice! I don't have anymore cutting to do, and I did ask them about dimension changes. Since the powdercoating involves removing the existing coat first and then applying the new one, they assured me that the dimensions won't change more than 0.1mm on average. I will still be sure to check before and after to be sure.
i was referring custom cuts (if you made any).
paint thickness is calculated already for factory made cuts. you only need to be sure you can get new coating with same thickness as factory coating.
 
i was referring custom cuts (if you made any).
paint thickness is calculated already for factory made cuts. you only need to be sure you can get new coating with same thickness as factory coating.

Yup, will make sure to account for it. I don't have any custom cuts for the exterior panels, every mod on the case is inside.
 
Yup, will make sure to account for it. I don't have any custom cuts for the exterior panels, every mod on the case is inside.
where are photos then ;)
 
where are photos then ;)

Lol I should have meant every mod necessary will be on the inside. So far the only changes done are drilling a few 1" and 1/4" holes into the Mo.Ra mount and removing the divider between the bottom compartment and pedestal. I am sure there will be more necessary (already know a few things I need to do) but they will all be inside.
 
Lol I should have meant every mod necessary will be on the inside. So far the only changes done are drilling a few 1" and 1/4" holes into the Mo.Ra mount and removing the divider between the bottom compartment and pedestal. I am sure there will be more necessary (already know a few things I need to do) but they will all be inside.
no matter where are mod. problem is photos are missing.
you wont pass it so easy
this isnt work log if there isnt any pictures insde (color table cant go into account)
:)
 
I did post a picture of the Mo.Ra mounted on top of the mount with holes:

766iHq7l.jpg


I am not sure what you mean otherwise, I got pictures of everything I am doing- not just the powdercoating colors.
 
  • Like
Reactions: xvi
While I am waiting for the powdercoating company to get back to me with a quote, I am very happy to announce my 3rd sponsor: FrozenQ PC Mods

logo.jpg


Some of you may have recognized the reservoir I was using so far in these pictures:

EqaUID5l.jpg


DSDyFwll.jpg


These were great after I went through with customer support regarding a few things that arrived broken. The issue with these reservoirs was that the end caps were compressed on and the helices inside could be rotated. So a lazy delivery person could end up creating some serious issues as it was in my case. Also, leaks were a risk with the compression type caps. So after a lot of feedback they went back to square one and redesigned everything- new equipment, new streamlined manufacturing and this is the new result:

FrozenQ Liquid Fusion Reaction Cylinder Reservoir

EtTVED4l.png


284h3brl.png


hyFnMFQl.png


The 250mm version is already available for pre-order now, with the 150mm and 400mm versions coming out soon. They can make a custom length reservoir also. Do check out the various color options available for the end caps, helices and cathode (way too many to list out here).

FrozenQ Meteor Light Reaction Cylinder Reservoir

78Lsiq9l.jpg


i6pYLJjl.png


K0STQ74l.png


Here the accent rails will be available in Blue, Green, Red and Orange as stock options with any color of your choice available as custom order.

So I will be getting 2-3 of the new LF Reaction reservoirs I think. I will likely sell the existing 400mm reservoirs I have since they are a bit too long for the motherboard compartment with the pumps in there as well.
 
I got the quote which was pretty reasonable so I am dropping off the pieces on Monday. Used some epic MS Paint skills and 5 minutes of my time for this:

wdPFlL8l.jpg
 
It looks like the powdercoating will only be done next Mon-Tuesday :(

In the meantime, I got my hands on an mcp35x2 top which meant I could finally see if 2 mcp35x pumps would be enough for the Mo.Ra. It chewed up a single pump when I hooked up a simple loop with reservoir, pump, compression fittings, angle adapters and the Mo.Ra- nothing else. At 50% max power as controlled by the Aquaero 6, I barely got 0.9 GPM. When I tuned it lower to 35% so the pump was at a noise level more conducive to what I would like in the final build, I got 0.6 GPM. Adding in 4 QDCs got me into laminar flow and once I add in the GPU blocks and 2 more QDCs I can only imagine how low it would go!

So anyway, I got another mcp35x pump (from a forum marketplace) which was pretty much new:

DqrXI2ml.jpg


The older one on the left has a different logo. Turning one pump to the side, we see the good ol' warranty void sticker:

ERKhkkpl.jpg


Speaking to Bryan over at Swiftech, I learnt it was completely fine to remove the stock tops IF adding on the Swiftech mcp35x2 top. But the guys at Swiftech are generally understanding of other tops and will help out with RMA once they have established the 3rd party top was not the cause of any error- your mileage may definitely vary here.

sg7mgb9l.jpg


So taking off that sticker leaves behind a nice trail of evidence that is hard to remove but not impossible. To remove the top, one simply has to unscrew the 4 screws at the bottom:

SPvQdngl.jpg


d38jwA4l.jpg


EG4C7fKl.jpg


The new pump actually came with hex head screws, and not a very common size either. Good thing I have a multi bit driver!

p1q9TRsl.jpg


FE4M0VFl.jpg


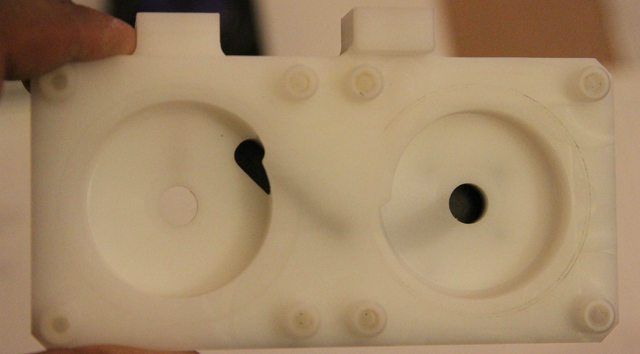
Make sure the O-rings are in place before putting on the new top. Speaking of which:

lf0BWeHl.jpg


9ktCRgpl.jpg


I am not set on this color yet- especially with the black interior. But that won't matter for testing here and so I put on the top, being careful to screw each pump in with the included screws and making sure there is no discernible gap between the top and the pump bodies.

Qf6QuY1l.jpg


qSkdBNMl.jpg


This thing is a powerhouse for most loops. It is also pretty loud at full speed and caused a cyclonic noise when sucking in water from the reservoir even at 50% max power. This should not be confused with 50% duty cycle as seen from the below PWM response chart from Swiftech:

MCP35X2-PWM-Response.png


At the same kind of noise levels as before (35% power, ~50% duty cycle), I got 1.2 GPM with the Mo.Ra alone in the loop and about 0.9-1 GPM with 4 QDCs. When the mcp50x comes out, I will hopefully get 1-2 to test against these for performance and noise. Depending on what I go with for Side 2, I may have a D5 pump also for testing.

One last thing- before putting on the top, I connected both pumps in series to see how the top affects things. At lower flow rates (0.60-1 GPM), there was no discernible difference in flow rates. I will be getting an inline pressure sensor soon to see if head pressure is affected. At higher flow rates (1.2+ GPM), the top increased flow rates about about 0.1 GPM compared to having two pumps in series hooked up by fittings- at least in my case. So I can definitely vouch for going with a dual pump top each time. It also looks better in my opinion.
 
  • Like
Reactions: xvi
Powdercoating done! I am currently at the place waiting for the parts to cool down, they literally just removed it out of a massive oven and it is ridiculously hot in here with ovens all around:

fN82xDal.jpg


IWhCKDdl.jpg


OJWWqsPl.jpg


aYVe9Iil.jpg


Those pictures (from my phone) do it no justice. These look absolutely great :D
 
I found some time to work on the pedestal. The poor thing had been left as a frame only for over a week:

AoFDJF3l.jpg


First up- base added:

ClLSOj5l.jpg


That leaves these bare spaces where the casters go (what a shocker!):

ZUHBQWTl.jpg


For some reason I had the standard casters on the case even though the TX10 comes with HD casters as default. Much as I would have liked the SD caster platform, I couldn't justify $180 on it when even the SD casters were working ok. But I went ahead and got a set of HD casters:

COKLLyRl.jpg


That's better. Now it is much easier to roll around in place and makes putting on things way easier too:

jqtHbzzl.jpg


Now it's time to put on the powdercoated pieces. First up, the side panels:

WLRNPlAl.jpg


I was set to save money and just have the outer sides powdercoated at first. But when I realized this wasn't going to cost as much as I though, I went with double side coating. Definitely made the right choice here I believe! Now let's add in the back and front panels and fit in a flexbay cover as well:

AGanRdQl.jpg


Hmmm.. I am glad I made that mock up in paint before. The black flexbay cover looks so out of place here:

CuSBwJal.jpg


Let's fix that up quick:

yNzaEQrl.jpg


Much better. Now I know I promised close ups to better represent the powdercoat accurately, but without better lighting the camera just can't see what I can with my naked eyes. I went over to the local camera store and even they admitted that a table top "studio" was going to be my best bet instead of going big with studio lights and backdrops. So I am going to place an order for it and it should be here pretty soon. That will allow for a lot more freedom in taking component pictures, including a little something red from EVGA for benching.
 
Thanks!

I have found even this looks different in different light like the Blue Speckle earlier. When direct light hits it, the Speckle part is much more obvious and it looks more white in color with spots of black. When diffused light hits, it is more of a white-pale yellow. Under typical fluorescent bulb lighting, it looks more caramel. I am pretty sure the all the speckles do this.
 
I wish I could show better how it looks in person, the texture is also very unique and makes it very dist/moisture resistant. Here are the promised close-up shots:

0KR2ue6l.jpg


815rlTRl.jpg


Q6N6D3yl.jpg


Also worked on the doors and got them done:

ZEP9zpql.jpg


2j88hyIl.jpg


I realized later than I had the handles put in the wrong way. No biggie though, took all of 10 seconds to correct. The powdercoaters did a great job masking all the threads and screws. The plexi went in no problem:

6ygISxcl.jpg


Time to screw it in!

mP0BfgHl.jpg


I really like the implementation here, this way one can just buy the plexi window instead of buying the whole door. It looks great the other way round as seen here with the other door:

wRW6Tzdl.jpg


Now on to the main case. First up, the poor frame:

HPYvXzOl.jpg


Let's screw in the pedestal and add in the back panels:

Uuv0bcxl.jpg


Before anything else get's done, something came up that brought back memories of 2011: A Space Odyssey:

hJbzMfWl.jpg


If these were bigger and shone at night, it would be nightmare worthy. Good thing they are just 2 of the 4 vandal switches going in here:

VNqq4wyl.jpg


Each switch is held in place by a O-ring and a screw nut:

UKRoT9Zl.jpg


SsljHixl.jpg


3e7Abd5l.jpg


All done! Now time to mount this in the case:

8kAF8Ocl.jpg


That fit in perfectly. A few minutes later, everything is in place. Here's the money shot (or at least as good of a money shot as I can get with this lighting anyway):

wdPFlL8l.jpg


No, that's not it.. Let's try again:

HjalNvWl.jpg


Ah much better. The speckle is quite prominent in person, just nowhere as much as that mock up above. Let's see it from the side now. First up, Side 1:

BicquIXl.jpg


Don't worry about the components in there, everything other than the GPUs is going on Side 2. Speaking of which:

6Fvbuxnl.jpg


The GF doesn't care at all about XXL window vs XL window so I decided to go ahead with the stock door as I got it. Finally the back:

IukR2hxl.jpg


None of this will really be seen so I didn't bother getting the motherboard tray done. I was also a bit paranoid about possible shorting issues- likely an unjustified paranoia. Anyway, the case exterior is done and now I can begin putting in other components!
 
  • Like
Reactions: xvi
Amazing work, can't wait to see what the end result will be!
 
The way the pictures make it look beige/old school, I should find a few floppy drives and throw them in there for a troll build. Nah, just kidding :)
 
Late to the party, but I'm subbing to this pornography. Nice to see a build that's not just a money-throwing fest, but is actually purposeful and well thought-out - despite possibly costing more than I earn in a year.
 
Well a lot of things are not needed as much as I wanted to do- the powdercoating for example and the upcoming Intel octacore. But I will be keeping this case and build for a while and budgeted it well so I am ok with the expenses.
 
So about those new Frozen-Q reservoirs:

iVuhGunl.png


Alex has also made a side port adapter for the new reservoirs in case people don't wish to use angled adapters:

WxPmPRNl.jpg


Tbljo5Jl.jpg


On the note of sponsors, Mundi from IceModz is sending me some of his really long RGB LEDs with controllers to try out and use in the motherboard compartments here. He is also sending some acrylic tubing (10/12mm) as well. So I am pleased to have IceModz as a sponsor of this build:

s4RoqOEl.png


BCMFu4Kl.png


The guy is really nice and down to earth. He has great prices and shipping is way cheaper than one expects it to be from Iceland. I have heard only good things about his lighting solutions so I will gladly test them out.
 
Ok I finally set up the "studio":

G8XbRHJl.jpg


m6EbjF9l.jpg


Definitely still a work in progress, I need to iron out the wrinkles in the backdrop sheets (that come in white, black, red and blue) and fix those lights better. I underestimated how much space this would take- my dining table downstairs barely fits it. The lights (bought separate) are really nice- maybe too bright actually. The softboxes don't diffuse them enough. This is what the light looks like compared to an ordinary CFL:

HY2unCGl.jpg


Perhaps the black back drop would have suited this better, but you get the idea. These lights get hot quickly, so I wouldn't recommend leaving them on for extended periods of time. Luckily each softbox comes with a rocker switch. I am also thinking of having a flash behind the box and controlling it wirelessly if needed. Anyone have suggestions that may be useful here?

On the same lighting note, BitFenix sent along some of their products to check out and use if I want:

XlYCwhVl.jpg


I am going to make a lighting overview comprising a bunch of products and then go with the ones I like best. Anyone have specific requests with the BitFenix Fury 750G as far as pictures or tests go?

Thanks to BitFenix for sponsoring this build also:

lztYNTvl.png
[/QUOTE]
 
Back
Top