MIKA - Relax, Take It Easy
RISING SUN
Relax, Take It Easy,
The Doc is in the house and YOU will be made great again. Better than new! Where does it hurt?
This is how the restoring procedure underwent in regard to this emblematic graphic card. Looking at my "small" collection, this card stands out, like a superb blonde, just the kind I like.
Fire engine RED, some gold sparkle and a little bit of silver glitter. Fireworks Inc. all the way.
Even if in the end, this blonde turned out not to be a natural one, let me tell you, in my book, real or not
I'm still digging THIS blonde!  Now that we got this out of the way let's find out how I got this drop dead gorgeous babe of a card.
There is no secret that these last years, most of my heavy hitters came from
the flea market of my home town, my eternal hunting ground. In the past,
the national OLX site has also helped me to get a few unicorns of which I can proudly enumerate: Socket 4 motherboards and CPUs, Slot A motherboards and CPUs, Slot 1 CPUs, Socket A motherboards, 3dfx cards, etc. Lately, the OLX site hasn't been great for me as many more people like myself keep an eye out for vintage HW and to make matters worse, the sellers have started asking stupid money for parts that have an uncertain condition not to mention value. Also I can't forget to mention my retro HW suppliers. They aren't too many but they are what you need if you are in the field or collecting PC HW.
To my surprise, on a day from the month of June, this year, on a morning, I decided to open the OLX app on my phone and make a quick search. Immediately I was greeted by a RED card that had a huge GOLDEN cooler.
The hell is this? WOW! I NEED IT NOW!
I quickly wrote to the seller and starting from the asking price, that was for a bunch of stuff besides this card, I made an offer he couldn't refuse. My offer was quickly accepted and I anxiously waited for the card to arrive.
From the pictures presented in the add I saw that at least two ceramic caps were missing and also a couple of ICs near the DVI/VGA looked a little strange.
I didn't ask if the card worked or has been tested I just put my paws on it and that was it. My gut was saying to me:
This is THE ONE!
The card was presented to be an MSI nVIDIA Geforce FX 5900 Ultra. As to that date my collection didn't have an ULTRA card I was very happy with my decision to buy it.
After I shook hands with the seller, I started looking at pictures and I gathered more information regarding this card. The more I searched the more confused I got and I wasn't sure if it really was an ULTRA or not. Anyway I must underline the fact that no matter the model it would turn out to be I wasn't going to give up on it. The sticker that was supposed to be on the back of card and could've cleared the mystery, was missing.
At the end of this story you will see that I got something that I didn't bargain for.
An OLETRA (Arnold Schwarzenegger accent) alright.
I like to think that I found this card on the OLX site just by pure luck, even if I know that she found me as a result of algorithms running in the background of an app, which based on my previous searches, have dumped this beauty into my welcoming arms.
So, fate made it that I found my blonde and the rest is history!
Meet the MSI FX5900-VTD128 MS-8929 VER:100 / nVIDIA Geforce FX 5900 AGP 8x 128MB / GPU @400MHz, MEM @425MHz.


Looking at the pictures, some of you might have already seen that this card doesn't seem to be an
ULTRA as it has a lower GPU frequency 400MHz vs 450MHz and it has just 128MB instead of the more common 256MB, a fact pointed by the missing memory chips on the back. There are some FX 5900 Ultra cards with 128MB but this card being an MS-8929 VER:100 doesn't fit the bill that qualifies it to be an ULTRA.
Why did the seller advertise this card as an illusive ULTRA? Maybe it was from the way it looked or maybe he knew something that I didn't know at that point in time? Food for thought ...
Well, regardless of what I was thinking at the time, one fact was certain. This card was nothing like I remembered from the reviews I read back in the day.
FIRE ENGINE RED, shining and making me lust for it.
So this was were I stepped in.
First things always come first. Elementary my dear readers. The repairs are always a priority. Never power up any part that has missing components.
A small IC, probably an inductor, as on PCB it has designated near him the letter "L", was missing a tiny black plastic cover. A second one lost the piece as soon as I touched it. From the pictures I didn't know if these inductors are still in one piece or they were missing just these tiny covers and I bought the card hoping for the best. After I got the card I was relieved that the damage was just cosmetic.
Phew I dodged a bullet there!
Of course that I already had a fix for this predicament. One missing cover was taken from a damaged Quadro FX 1000 card, (it takes an FX to repair another FX,
) and the other was glued back.
To keep in place these tiny pieces of plastic I used tiny amounts of transparent POXIPOL.
All in all a very fiddly affair.
I soldered the two missing ceramic caps.


 After I performed the repairs I looked at the card and I asked myself: Should I power you up now or should I wait for The Grand Finale?
Hmmm ... ? NO BRAINER!
TAKE ME FOR A SPIN NOW! She whispered to me.
I looked into my stash and I had nothing that was ready to go on a moment's notice and that was also capable of letting this card stretch its legs, so I had to use my trusty workhorse, the PIII 800MHz Slot 1 AGP 2x PC just to see if the card was still alive and kicking.
I know, not an ideal setup and something miles away from what the card wanted. A power up that came after who knows how much time and just from a life support kind of system.
This was as good as it was going to get, so I took a deep breath and I pressed the power button.
3 ... 2 ... 1 ... We Have Lift Off!


Even from the first POST I was greeted by a clear image and in Windows I received news that made me jump for joy. I'm not going to spill the beans just yet. You must wait a little longer.
The most important fact was that the card was @100!


Drunken with success, and not to mention so early in the game, I rolled up my sleeves and I got to work.
This card will be a stunner by the time I'm done with it! ALL OR NOTHING!


The card was in great shape, with minimal blemishes, and I was quick to assess its potential. I already saw the finished "product" but at the same time I knew what it would take to get there. The restoration of
THE GOLDEN COOLER la piece de resistance of this card will be a challenge. Une casse tete probleme!


I was expecting thermal pads on the video memory. Surprise! Just regular thermal paste. Hmm ... if it gets the job done ...
Pfffft, good thing that I have a solution for this predicament.


As soon as I removed the heatsink I was amazed to find that it was kind of light. You might've been led to believe that it was made entirely from copper but I'm pretty sure that it is just aluminium plated with copper. It is way to light to be copper. Besides you can see areas where the plating has gone south. So my blonde isn't a natural blonde at all but I don't care as I'm still head over heels in love with it!
I wasn't put off by this small shortcoming and I was already looking for solutions for the problems of the heatsink. Without this cooler the card wasn't complete no matter what. This cooler is the heart and soul of the card.
Something must be done to restore it!
The heatsink from the GPU has some scratches on the back. I don't know who made them but they are superficial.
The cooling fans were also kind of meh. They were full of scratches and dust build up. Being transparent doesn't help one bit. The only upside was that they were still silent and complete. No cracks, missing bits or other problems.


The cooler from the back of the card is attached with a thick soft thermal pad that was cleaned and reused.

Also it was in a better shape than the one from the front of the card but it still was in need of some TLC.


 Any disassembly procedure must be done in an orderly fashion. All the components must be accounted for and stored accordingly. I know from experience how it is not to know what goes where or what are the steps of putting back something that has been turned into bits. Some restoring procedures can have stages that can take place days, weeks or even months apart. Also take as many pictures as you think are necessary. In more cases than not you will need them. Nothing is unimportant. Details are always relevant. Even if you are 100% sure that when you remove a screw you will remember where to put it back you might forget or get confused by other type of screws and you will be forced to backtrack.

What's the story with this tiny spring?
 This spring has nothing to do with this episode.
In the
Slot 1 "trash" fresh from the gutter episode, I was telling you that I lost this spring from a Delta AFB0512 MA fan and I couldn't find it no matter how hard I searched.
Most probably that it got stuck to something and it came back when I cleaned this card.
Now you see why you must be organized?
Besides being organized you also have to be calm. If you are sometimes working like a hurricane, (as I sometimes am) in more cases than not you will register some MIA components.
All is well that ends well. Got my spring back. No loose ends here!
Let me take a moment to remove from the stage the little spring that photobombed my GF FX pics and get back to the task at hand.
No matter the angle, both of you look like $hit! And this is no compliment!
 HEAR YE, HEAR YE! NO ULTRA IN HERE!
 No matter, I still have hope!
I know something that you don't!
 On your marks! Get Set! GO!


Based on my previous experience I was sure that I would have to polish both of the heatsinks but I also knew that their shape will give me headaches that no painkiller can keep in check.
A small scale test gave me hope. This is what I am looking for!

As I really didn't want to hand polish the damned heatsinks I searched for alternatives. I knew what I was in for and I simply refused to do it.
In the past I used vinegar to restore some copper heatsinks and I got decent results but what I wanted to do with these heatsinks couldn't be achieved just with vinegar.
I searched the internet for solutions and I found this recipe: Boil a cup of vinegar, a tablespoon of salt, and three cups of water in a large pot and add the copper item. Let it boil until the tarnish begins to come off, then remove the item, let it cool, polish, rinse, and dry. In the "recipe" it is stated that you must boil the object until the tarnish comes off but as I knew that the heatsinks are aluminium plated with copper I decided to keep them in the boiled solution and not boil them to kingdom come. I judged by eye the quantity of water, vinegar and salt.
Said and done. I kept the heatsinks in the solution for one hour but I think that 30 de minutes would've been enough.


 Looking good. This is way to easy. Something is not right!

The results were a clear improvement but I still wasn't satisfied.


As the "recipe" stated that after "boiling" I must cover the parts with some kind of wax to preserve the new look, I did as suggested.
I used a Carnauba Wax solution designed for cars as I didn't have anything better at the time.


The lets say final results were kind of ok.


I still wasn't satisfied with the results so I did another polishing test ... The elephant in the room said to me: He, He, you ain't out of the polishing woods yet!

 There's no replacement for displacement
, ops ... wrong forum,
. When you want something be ready to do whatever it is necessary, so, in the end I had to polish by hand every millimeter of the heatsinks.
A tall order let me tell you. There is no magic solution other than electroplating the heatsink and that's not possible at the moment.
As I was out of the metal polishing paste I usually use and I couldn't find the same brand, I bought some polishing paste used for car paints that I deemed it was up for the task and that was it.

 Upward and onward! Don't look back!


The water, vinegar and salt solution helped to remove much of the black tarnish that was present on the heatsink and I wasn't sure that another try would yield better results.
To polish all the nooks and crannies of the heatsink I used all kinds of tools: credit cards wrapped in rags, cotton sticks, bamboo sticks, tooth brushes. A messy job.


When it became obvious that I was in
the diminishing returns territory I put an end to the polishing and I called it a day.
This is as good as it will ever going to get.
Let's see what I got in the end.


Not too shabby, if I may say so myself.
THIS IS HOW I remember this card!
The bracket was also polished by hand.


I washed the card with IPA 99% and I let it dry.
Man I like this RED!


After the work put in with the heatsinks
I had another mountain to climb until I would get the maximum in regard to the cooling system of this card.
The cooling fans. Another piece of the puzzle.
Their transparence doesn't help one bit. Scratches are visible from a mile away and the dust make them look awful.
Because they were still silent I didn't want to take them apart but things didn't go according to plan. So,
I had another thing on my already full plate, to deal with.
No biggie. When the going gets tough you toughen the F..K UP!

After so much polishing of the heatsinks when I looked at the cooling fans and I saw all the blemishes one thing popped in my head. What if I polish the plastics too? I knew that there are some super fine polishing pastes for plastics but I wasn't going to search for something like this in various shops or pay some ridiculous price for them. I mean who is polishing plastic on a regular basis?
After I conducted tests with two car paint polishing pastes, I decided that I already had what I needed, so I got to work.
I hand polished just the frame of the front fan and the cover of the back fan. The propeller and the body of the fans have been cleaned with hot water and dish soap or IPA 99%.
Uncharted territory. I didn't know if this operation will make things worse or better but I was ready to give it a go. What have I got to lose? Nothing! Instead I have everything to gain.
Let's go go go!
 The first stage of fine polishing.
 I was gentle when I polished the plastic and I was careful not to apply too much pressure. Also I didn't insist too much on one area. In a way this operation was like a superficial mechanical peeling.
I used microfiber cloths and cotton sticks. After polishing, the excess paste was removed with a soft cloth. This operation has been repeated as much as necessary.


 I WANT MORE!


As expected, I was aware that I couldn't remove all of the deep scratches and at the same time I was aware that I will induce more fine scratches via the polishing stage.
These surfaces will never be like new but I was sure that I can make things better.
When you believe in something, just do it, don't ask for permission!
Totally worth it!

Fresh light grease and a drop of oil. New 0.2 mm double sided tape for the sticker and
MY JOB IS COMPLETED!!!


 Without bragging I'm a friggin' WIZARD!!!


I also polished the cover of the back fan. Again, I got good results.


I couldn't take apart the fan from the back without damaging it so I was forced to perform a "a peephole" cleaning with IPA 99% and cotton sticks. This was an easy task as the fan is small and has blades that have a simple design.


The screws that keep in place the cover were a little rusty so I hand polished them too. Man! This job has involved a lot of touching.


Told you I'm a friggin' wizard!

After so much work I finally was able to see the light at the end of the tunnel and
restoring this gem didn't seem just a pipe dream anymore.
The push pins are an exotic model. The spring is already compressed and it stretches only when it is inserted into the tiny black tube that has an inside collar onto which the spring rests. Better not to loose these bespoke babies!

 Shazzam! Just the way I remember it!

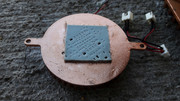
I conducted an inspection of the PCB and I wanted to finish cleaning it.


The PCB was looking well but a trained eye can spot
all kinds of spots and shadows. These were very hard to remove and sometimes impossible as there are many small components that get in the way and you simply can't get between them.
You know what came next.
Good Ol' hot water and Fairy dish soap.
 More IPA 99% and hanged to dry.
 Final results
 after more fine detailing with cotton sticks and IPA 99%.


 Warriors of the night, ASSEMBLE!
 ... ahem wrong game!
Some assemblies required.

As the thermal pad from the back of the card, had deep indentations and I feared that at some point the big ceramic caps might make contact with the heatsink I decided to add a layer of
0.5 mm Arctic thermal pad just for peace of mind.
The added thickness of 0.5 mm is negligible and I had zero difficulties attaching the push pins.
The original thermal pad was placed into the same exact position it came.


I applied a thin layer of
Arctic MX-4. The good stuff!

After I cleaned to perfection the PCB, applying thermal paste on the memory chips seemed like sacrilege.
For a short time I wanted to make some custom thermal pads by thinning the 0.5 mm Arctic thermal pad but soon I dismissed the idea as the probability of them to affect the contact of the heatsink with the GPU was too great.
If the card came from factory with thermal paste that is what I also used.
I had no idea if the amount of thermal paste I applied on the memory chips was enough and I didn't want to do a trial run. This would've been quite a messy proposition. I did my best and hoped for success.
The card was @ 99.99%. Why 99.99%? The card was still missing something. A tiny plastic clip to keep in place the wires of the two cooling fans.
The solution presented itself in the form of a repurposed push pin.

After I finished restoring the card and I put it in a box I had an unexpected surprise.
I managed to recover my old PC with an Athlon XP 2800+ CPU and an Abit NF7-S V2.0 motherboard. Now I had the machine to really test this card. This PC will be presented in another episode.
The stars were aligned and I felt a great satisfaction. It took a while to get here but it was worth it!
I kept my composure and I removed the Segotep junk and I fitted some ENERMAX power inside. I really didn't want to fry something. I'm amazed that my PC ran for 7 years with that firecracker.
 Some preliminary glamour shots.
 I judged correctly the amount of TIM that was needed on the memory chips and I registered no spillage. Lucky me!


 In the PC you go and let's find out what's all the hubbub with the ULTRA naming scheme.
A tight fit! In more ways than one. Memory slots, motherboard capacitors and other neighbouring components. LIKE A GLOVE!


 RISING SUN!
 Camera! Lights! Action!


Now you will find out why this card is
an illusive ULTRA.
Back in the day it was common to overclock FX 5900 cards to FX 5900 ULTRA levels because the difference between was minimal. The video memory size aside, 128MB vs 256MB, as there are FX 5900 ULTRA cards with 128MB or 256MB, which ran at 425MHz, the only difference was that of the frequency at which the GPU ran. A 50MHz difference, 400MHz vs 450MHz. 50 MHz might seem insignificant but at that time these were cutting edge components and squeezing out more from them wasn't so easy. In practice though these 50MHz weren't something unattainable.
The video memory chips are
HY5DU28322 AF-22, rated for 450MHz. This card was begging to be OC'ed.
https://datasheetspdf.com/pdf-file/909306/HynixSemiconductor/HY5DU283222BF/1
Taking into account the fact presented above you can assess the impact this screenshot had on me when the card was identified as a
GEFORCE FX 5950 ULTRA running at
475MHz GPU and 475MHz MEM. That is quite a speed increase. And all of this using the stock cooling! Whoever had this card knew what he was doing. I say RESPECT for him!
 EPIC STUFF!!!
Initially I thought that there is a problem with the drivers but no matter what I tried I still got FX 5950 ULTRA.
I started digging deeper into the Internet and I found out about modified BIOS files that can turn FX 5900 cards into FX 5950 ULTRA cards. This wasn't something recommended to everybody and not many cards could sustain the speed increase.
So, this card is in a way some kind of a unicorn. I wonder if I can clock it higher?
From FX 5900 ULTRA to FX 5900 and then to FX 5950 ULTRA. Who would've thought..
A GPU-Z screen shoot means nothing without a thorough test.
Said and done.


Now you understand why I like blondes. They sure have more fun!
A maximum GPU temperature of 58C and a maximum PCB temperature of 41C at a room temperature of around 20C, with a healthy overclock, stock cooling, even if we are talking of a test with an open case, it is something out of the ordinary. Maximum fan speed of 27%? My work is done! (Drops the mic and walks away.)
The card is very silent. WIN all around!
Feeling Christmassy.
 Awesome card is awesome.


The story of the
RISING SUN is the story of how I got my first
ULTRA card. Sure, some might not agree with my opinion, given the memory size difference and the fact that this card isn't a pure ULTRA but I don't care. If it looks like an ULTRA, runs like an ULTRA therefore it must be an ULTRA.
I consider this card an
OLETRA through and through.
If you pause and think about the fact that there aren't so many FX cards still running in the wild not to mention the fact that it runs way above specs, you should be able to appreciate the value of this card. If not, then we agree to disagree.
Looking back at the moment when this retro HW adventure has started, back in February 2015 and looking at what I was able to save and restore, without any hint of bragging , I can say that I feel a great satisfaction. Also I am aware from where I have started, where I am and where I want to go. For now I enjoy the present.
I must mention that my satisfaction would not have been the same if I would not have been able to tell you about my adventures.
Thank You TPU and Thank You readers of this forum regardless if you are registered users or just guests. ")
I wish you Happy Holidays and I hope that I'll be able to post another episode before or close after The New Year.
The RISING SUN bombshell will be hard to topple though. Regardless, what will always remain constant are the attention to detail and the passion taken to the extreme.
gallery:
https://postimg.cc/gallery/Znf2H9S
Ahmet KILIC - Deephouse (summer mix 2)
More later.


