 1
1
1STPLAYER LANG MK8 Keyboard Review
Disassembly »Closer Examination


As we saw before, the 1stplayer LANG MK8 keyboard comes inside a plastic wrap to keep it pristine and free of dust out of the box. Removing it, we get our first good look at the keyboard, and it is on the smaller side of average owing primarily to the employed TKL form factor. The bezels are also tiny throughout, making for a fairly portable keyboard considering the weight savings from the plastic chassis and the detachable cable. The LANG MK8 is only available in black and the US ANSI layout for now, with white legends and a logo on the front adding to the monochromatic color scheme here. The logo is on the larger side, but not really visible in use, which has it get a pass from me.
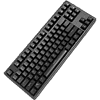
No numpad here, as with the TKL design, and we see a mix of legend applications on the keycaps. Primary legends are all located in the top center, with secondary legends alongside as applicable. The keyboard-specific legends are seen underneath, so backlighting will be affected even if they are translucent. The chosen typeface and size is fairly good even with the more typically doubleshot-injected, seamed legends employed for the primary legends.


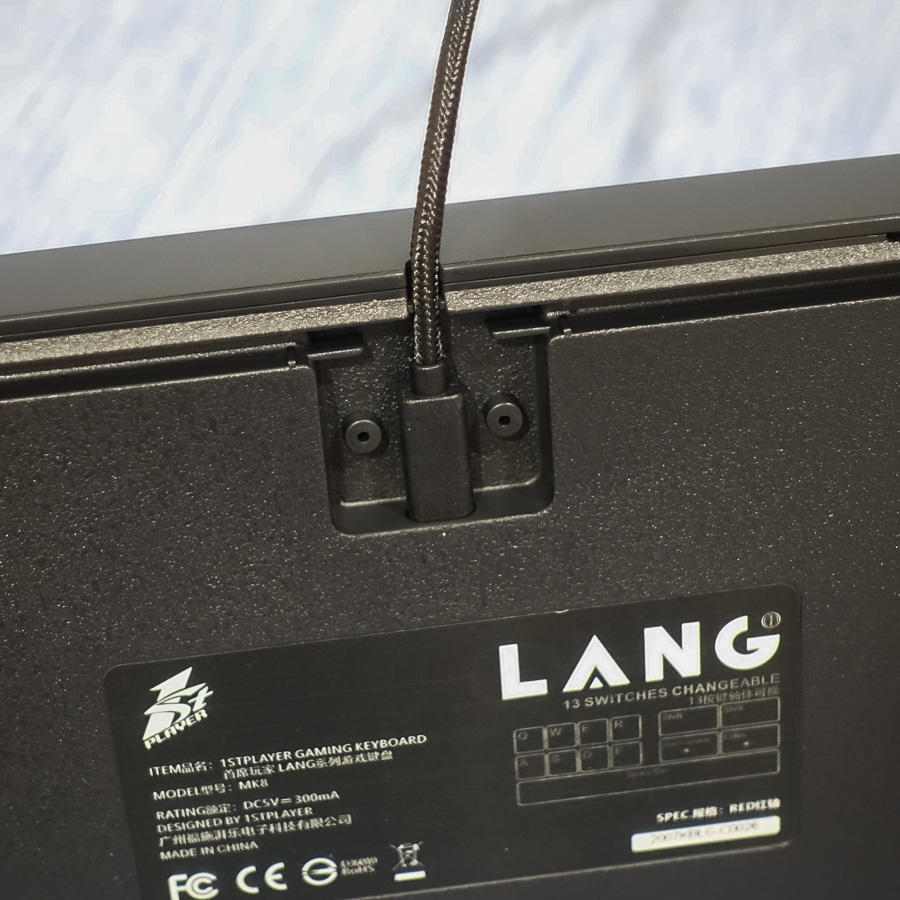
Flipping the keyboard around, we see the usual certification sticker in the middle. There are multiple rubber pads at the corners, as well as two feet which can be raised for a steeper angle if you wish. Both feet have a rubberized bottom for further friction against the resting surface.


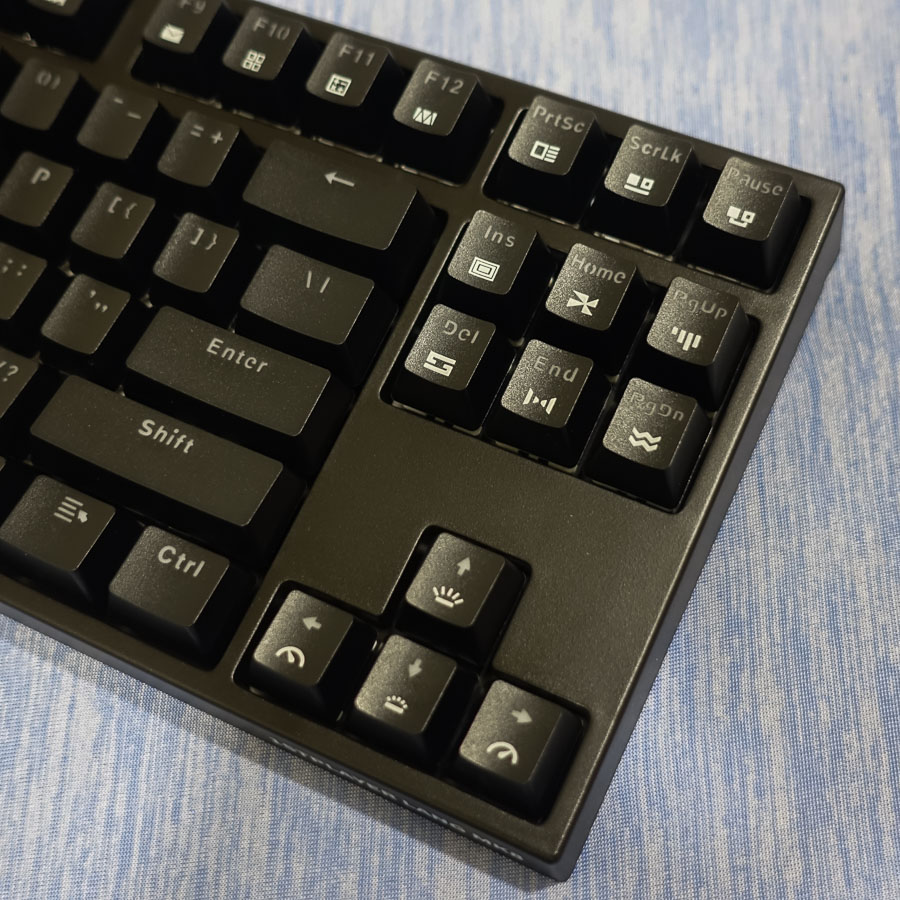
We saw the detachable cable on the previous page, and now we see where it plugs into. A recessed USB Type-C port is present in the middle on the back, with cable-routing channels on either side in addition to the default option straight out of the center. This allows for better cable management, including for users with other peripherals on different sides, or if you have your PC on the left instead of the usual right side. The cable fits into a USB Type-A port on your motherboard, and USB 2.0 suffices for power and data alike. The connector is also gold-plated to add that extra bit of oxidation resistance.


The side view also shows us that 1stplayer has gone with the OEM keycap profile with slanted rows—the usual six on this TKL form factor keyboard. These have tops sculpted similarly to just about every other mechanical keyboard today. The provided keycap puller works alright for keycap removal so long as you apply pressure inwards. It is one of the worst implementations of a metal wire keycapper puller I have seen to date. The keycaps are made out of ABS plastic, but thicker than usual to accommodate the doubleshot injected primary legends. The keyboard-specific legends appear to be pad-printed and will wear out sooner rather than later. Additionally, these are not backlighting compatible, so having them where the LED is typically weaker is irrelevant here.


1stplayer sought to send me one with the Gateron Yellow switch given their rarity on pre-builds; however, it ended up being so popular among buying customers at launch that I opted for another switch rather than waiting the weeks it would take to restock that SKU. As such, I have the Gateron Red version here, clearly seen due to the red stems. The larger keycaps use a Cherry-style stabilizer, which does feel like a homage rather than the real deal, but still makes for the mushy typing experience associated with these. The company has made a big deal about using branded Mobil oil lube here, and thankfully hasn't applied gobs of it, as I have seen with some zealous applications before. It really takes another identical keyboard with another lube to best compare against, but yes, it does seem quieter and smoother in action, especially compared to the CORSAIR K70 I also had at the same time with Cherry stabilizers and an unknown lube.


The CIY socket makes swapping switches easy. However, things are not that simple here. Indeed, 1stplayer has gone with only 13 swappable switch sockets, with their justification being that the end user does not typically change switches and the chosen 13 are the more common gaming-related ones. It sounds like another cost-saving measure to me personally. Their included switch removal tool is no different from any other of the same design and works well enough in practice. You hook into the middle notches on either side of a switch and wiggle it sideways while pulling upwards. Removing a switch also clearly shows where the associated RGB LED is placed, which confirms the use of central legends for backlighting on the keycaps.
Jun 16th, 2024 15:35 EDT
change timezone
Latest GPU Drivers
New Forum Posts
- Shadow Of The Tomb Raider - CPU Performance and general game benchmark discussions (527)
- new tv/display what one? what to avoid? (41)
- Last game you purchased? (345)
- How Should iGPU be tweaked in comparison to CPU & Cache? (11)
- RX 580 Sapphire Nitro 8gb | black screen when booting after disabling CSM and trying to turn on SecureBoot (18)
- Your PC ATM (34634)
- Optane 1600X 118GB - Lots of CDM benching and some thoughts (67)
- Linpack Xtreme Released (464)
- Can you live with one monitor? ;) (112)
- Should i upgrade my cpu (rtx 4070) ? (60)
Popular Reviews
- Pulsar Xlite V3 eS Review
- Aune AR5000 Headphones + S17 Pro Headphones Amplifier Review
- Upcoming Hardware Launches 2024 (Updated May 2024)
- Team Group T-Force G70 Pro 2 TB Review
- VAXEE Outset AX Wireless (4K) Review
- AMD Ryzen 7 7800X3D Review - The Best Gaming CPU
- Intel Lunar Lake Technical Deep Dive - So many Revolutions in One Chip
- NZXT H6 Flow RGB Review
- ASUS Radeon RX 7900 GRE TUF OC Review
- Thermal Grizzly KryoSheet Review - Tested on RX 7900 XTX with 475 W
Controversial News Posts
- Possible Specs of NVIDIA GeForce "Blackwell" GPU Lineup Leaked (133)
- NVIDIA RTX 5090 "Blackwell" Founders Edition to Implement the "RTX 4090 Ti" Cinderblock Design (118)
- AMD Ryzen 9000 Zen 5 Single Thread Performance at 5.80 GHz Found 19% Over Zen 4 (115)
- AMD Outs Ryzen 5000XT Processors for Socket AM4, an 8-year Old Socket (105)
- Nightmare Fuel for Intel: Arm CEO Predicts Arm will Take Over 50% Windows PC Market-share by 2029 (105)
- AMD Says Ryzen 9000 Series Won't Beat 7000X3D Series at Gaming (102)
- AMD Zen 5 Storms into Gaming Desktops with Ryzen 9000 "Granite Ridge" Processors (100)
- Biden Administration to Revive Trump-Era Tariffs on China-made GPUs and Motherboards (95)