 84
84
Windows 10 & Intel Core i9-12900K Alder Lake Performance Review - E-Cores Causing Any Trouble?
Conclusion »Workarounds for E-Core Issues
Every time you suspect that an app is executing on the wrong cores because its performance seems lower than expected, make sure to confirm in Task Manager first if the workload is actually getting scheduled on E-cores.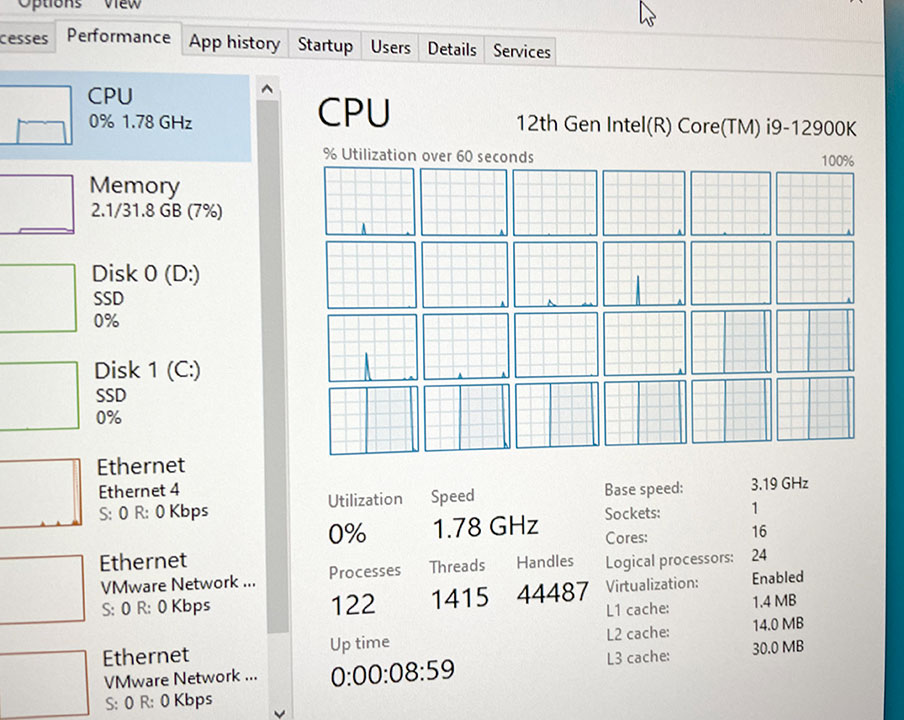
In Task Manager, the P-cores are displayed as the first entries (16 for the 12900K), and the E-cores then follow (8 for our 12900K). As you can see, whatever was executing on our system ran on E-cores exclusively, and as the 100% utilization shows, fully loaded them, which clearly looks like a scheduling issue—running it on P-cores would be faster, and probably use less energy, completing sooner.
Your first option to fix workloads executing on E-cores is to check if your software vendor has released an update to their software which makes it Alder Lake Hybrid core architecture aware. We're convinced that in the coming weeks and months, all major software vendors will improve Alder Lake support in their software. The Windows operating system includes several APIs that are not exclusive to Windows 11 and let software developers provide hints to the operating system regarding thread scheduling. Intel's Alder Lake Developer Guide has more information on that.
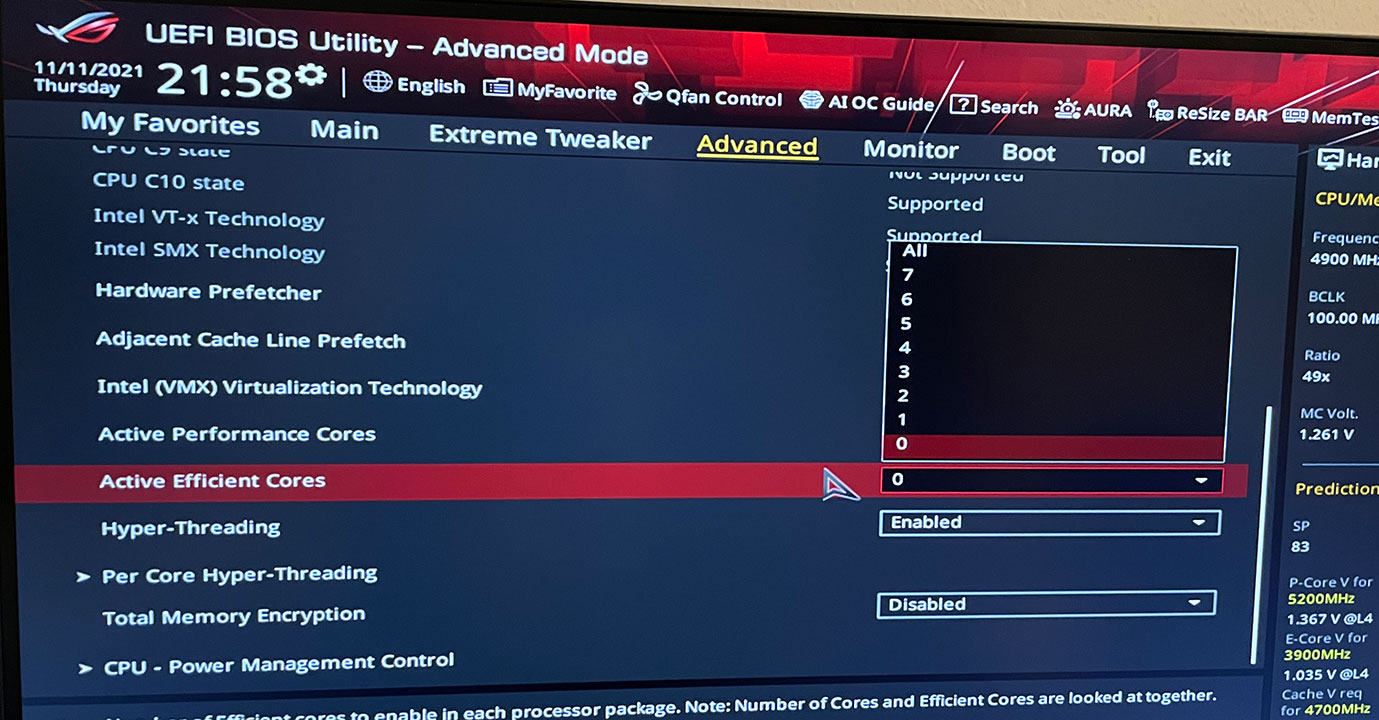
A brute-force, instant solution is to simply shut off the E-cores in BIOS. Every Alder Lake compatible motherboard we've encountered so far has options to select the number of active P-cores and E-cores. While at least one P-Core has to be active at all times, you can easily disable all the E-cores, which solves the problem. However, take a closer look at our performance results and you will figure out that this is not an optimum approach for a general usage computer—many applications run faster with E-cores enabled, even on Windows 10.

If your BIOS lacks an option to adjust the number of active E-cores, you can also tell Windows not to use more than a specified number of processors no matter how many are actually available. The command to do so is "bcdedit /set {current} numproc NUMBER_OF_CORES," so for our Core i9-12900K, it would be "bcdedit /set {current} numproc 16" to just keep the P-cores enabled. After a reboot, you can check Task Manager to verify the number of active cores. To revert this change, use the command "bcdedit /deletevalue {current} numproc."

If you have a long-running software task you'd like to manually "move" onto the P-cores, "affinity" is what you want. Processes can declare which processor cores they'd like to run on—this choice overrides anything the Windows Scheduler or Intel Thread Director will do, and it can be user selected via Task Manager, too. Open Task Manager, go to the "Details" tab, select your program, right-click "Set Affinity" and untick the E-cores (the last eight on 12900K). As soon as you click "OK," the process will respect your affinity choice—no program restart needed.
If your workload spawns many short-lived processes, you won't be able to set their affinity fast enough manually. This happens with our compiler benchmark, for example. Every one of the hundreds of source code files is compiled through its own process, and setting the affinity manually for just one of those really makes no difference. The solution for that is a little known peculiarity of the Windows operating system. Affinity is inherited by child processes, so when one program starts another, Windows copies the parent program's selected affinity and applies it to the new process automagically. That means if you change the affinity of the parent process, all new processes spawned from there on out will respect the processor affinity selection.
There's many more approaches to adjust affinity, let us know of those you know in the comments.
May 6th, 2024 00:14 EDT
change timezone
Latest GPU Drivers
New Forum Posts
- Only some humans can see refresh rates faster than others, I am one of those humans. (142)
- Free Games Thread (3781)
- TPU's WCG/BOINC Team (34421)
- Apparently Valve is giving refunds on Helldivers 2 regardless of hour count. Details inside. (77)
- What software are you using to monitor CPU temps during gaming session? (21)
- Overheating/undervolt/setup issues (2)
- Alphacool CORE 1 CPU block - bulging with danger of splitting? (101)
- Current Sales, Bundles, Giveaways (10227)
- FINAL FANTASY XIV: Dawntrail Official Benchmark (84)
- The Official Thermal Interface Material thread (1157)
Popular Reviews
- Finalmouse UltralightX Review
- ASRock NUC BOX-155H (Intel Core Ultra 7 155H) Review
- Meze Audio LIRIC 2nd Generation Closed-Back Headphones Review
- Cougar Hotrod Royal Gaming Chair Review
- Upcoming Hardware Launches 2023 (Updated Feb 2024)
- Montech Sky Two GX Review
- AMD Ryzen 7 7800X3D Review - The Best Gaming CPU
- HYTE THICC Q60 240 mm AIO Review
- ASUS Radeon RX 7900 GRE TUF OC Review
- Logitech G Pro X Superlight 2 Review - Updated with 4000 Hz Tested
Controversial News Posts
- Intel Statement on Stability Issues: "Motherboard Makers to Blame" (240)
- Windows 11 Now Officially Adware as Microsoft Embeds Ads in the Start Menu (167)
- AMD to Redesign Ray Tracing Hardware on RDNA 4 (156)
- Sony PlayStation 5 Pro Specifications Confirmed, Console Arrives Before Holidays (117)
- AMD's RDNA 4 GPUs Could Stick with 18 Gbps GDDR6 Memory (114)
- NVIDIA Points Intel Raptor Lake CPU Users to Get Help from Intel Amid System Instability Issues (106)
- AMD Ryzen 9 7900X3D Now at a Mouth-watering $329 (104)
- AMD "Strix Halo" Zen 5 Mobile Processor Pictured: Chiplet-based, Uses 256-bit LPDDR5X (103)