 0
0
ASUS ROG Gladius III Review
Sensor & Performance »Build Quality
Overall build quality is very solid. There is no rattle when shaking the mouse. When applying lateral pressure, no creaking or flexing of the shell can be observed. Activating the side buttons by squeezing the sides even when pressing in a remote spot is possible, but requires excessive force. Lastly, no accidental clicks occur when slamming down the mouse.Buttons


Main buttons on the Gladius III are excellent. Pre-travel is low and post-travel moderate to low, resulting in a firm and satisfying click response. Button stiffness is light. Despite being visually separated from the shell, lateral button movement is low and needs to be provoked; i.e., is not noticeable during typical use. ROG Micro Switches are installed by default, but can be replaced with either Omron D2F Series (D2F, D2F-F, D2F-01, D2F-01F) or Omron D2FC Series (D2FC-F-7N, D2FC-F-7N (10M), D2FC-F-7N (20M), D2FC-3M) switches. In addition to that, the second-generation push-fit sockets are also mechanically and electrically compatible with the 5-pin Omron optical switch series (Omron D2FP-FN), a set of which is included in the box. These switches provide a distinctly different click feel: stiffer, firmer, and louder, with a more mechanical-sounding reverb upon release. For illustration, please refer to the sound test below. Changing the switch is as simple as pulling the old one out and putting the new one in.


Side buttons are excellent. Both pre and post-travel are minimal, and the actuation point is even across the entirety of these, resulting in a firm and satisfying button response. Due to not being that large and placed up high, those positioning their thumb more towards the bottom or having a smaller thumb in general may struggle with reaching them properly, however. A set of Kailh switches (grayish shell, red plunger) is used.
At the top of the mouse is a single button for cycling through the set CPI steps, and at the bottom of the mouse is a button for cycling through the set profiles. Both of them work just fine. A seemingly unbranded tactile switch is used for the former.
Scroll Wheel

The scroll wheel is very good. Scrolling in either direction is rather quiet, and tactility is great, resulting in tight and controlled scrolling. However, during use I noticed that the steps aren't always registered clearly, leading to situations where input was registered despite the scroll wheel not or just barely being moved (i.e., not enough to move a notch), which had me swapping weapons unintentionally. The encoder comes from Kailh (EN8080 series). The middle (scroll wheel) click requires medium force for actuation. A seemingly unbranded tactile switch is used for this one.
Coating
The Gladius III features a whole host of surface materials. The top and main button pieces have a smooth matte surface not unlike that of the Keris and Keris Wireless. Whereas the right side features riffle lines, the left side has a non-ordered pattern. In either case, grip is fine, and the top surface doesn't attract fingerprints, dirt, or the likes too much, and is easy to clean with no signs of wear left after doing so. The side patterns, on the other hand, attract dirt quite a bit, and getting it out of there is all but easy. All in all, very good materials.Button Sound Test
Disassembly

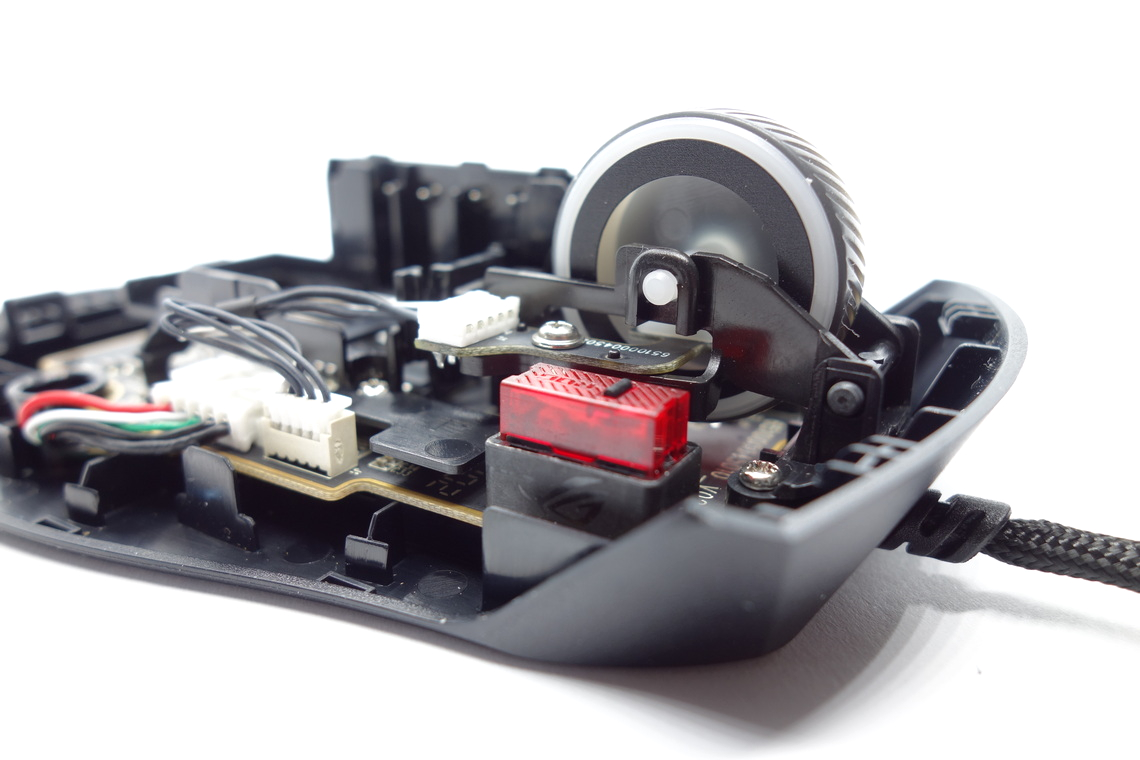
Disassembling the Gladius III is very easy. All screws are exposed, so just remove their covers and unscrew them. The top shell can then be pulled off fairly easily. When putting the mouse back together, make sure to clip the front in first. The internal design is somewhat complex. Given it shares the tooling with the Gladius III Wireless, a battery holder construction is placed right above the main PCB. Said construction also incorporates the assembly holding the side-button PCB, as well as the scroll wheel assembly. The latter in particular is noteworthy as the encoder isn't mounted onto the PCB, but, rather, embedded into an assembly that also doubles as a mechanism to actuate the wheel switch. The auxiliary PCB providing scroll wheel illumination too is screwed to said assembly, and the whole thing is screwed to the bottom plate, securing the main PCB alongside the other screws. The main PCB itself is rather compact and fairly thin. A 3-pin connector connects the wheel encoder to the main PCB, a 5-pin connector the auxiliary PCB, and a ribbon cable the side-button PCB. The MCU is an STM32F072CBU6, whose datasheet can be found here.


As for the soldering and general quality of the PCB, I'm unable to find any noteworthy flaws.
May 2nd, 2024 05:44 EDT
change timezone
Latest GPU Drivers
New Forum Posts
- Ryzen Owners Zen Garden (7271)
- TPU's Nostalgic Hardware Club (18488)
- Old high quality PSU, or semi-old mid-quality PSU? (37)
- Are all software/scheduling issues with e-cores fixed on Intel 12th to 14th Gen - Willing to give hybrid ach a chance now (84)
- Help with case fan configuration (13)
- Arctic MX-6 shelf life is just a couple months? (75)
- 14900k - Tuned for efficiency - Gaming power draw (350)
- Alphacool CORE 1 CPU block - bulging with danger of splitting? (71)
- What's your latest tech purchase? (20409)
- Current Sales, Bundles, Giveaways (10222)
Popular Reviews
- Ugreen NASync DXP4800 Plus Review
- Montech Sky Two GX Review
- HYTE THICC Q60 240 mm AIO Review
- Upcoming Hardware Launches 2023 (Updated Feb 2024)
- MOONDROP x Crinacle DUSK In-Ear Monitors Review - The Last 5%
- ASRock NUC BOX-155H (Intel Core Ultra 7 155H) Review
- Team Group T-Force Vulcan ECO DDR5-6000 32 GB CL38 Review
- AMD Ryzen 7 7800X3D Review - The Best Gaming CPU
- Thermalright Phantom Spirit 120 EVO Review
- ASUS Radeon RX 7900 GRE TUF OC Review
Controversial News Posts
- Intel Statement on Stability Issues: "Motherboard Makers to Blame" (219)
- Windows 11 Now Officially Adware as Microsoft Embeds Ads in the Start Menu (159)
- Sony PlayStation 5 Pro Specifications Confirmed, Console Arrives Before Holidays (117)
- AMD's RDNA 4 GPUs Could Stick with 18 Gbps GDDR6 Memory (109)
- NVIDIA Points Intel Raptor Lake CPU Users to Get Help from Intel Amid System Instability Issues (106)
- AMD "Strix Halo" Zen 5 Mobile Processor Pictured: Chiplet-based, Uses 256-bit LPDDR5X (103)
- AMD Ryzen 9 7900X3D Now at a Mouth-watering $329 (94)
- TechPowerUp Hiring: Reviewers Wanted for Motherboards, Laptops, Gaming Handhelds and Prebuilt Desktops (93)