 5
5
Corsair Carbide 678C Review
Assembly & Finished Looks »A Closer Look - Inside

Before we dive into the chassis interior, there is a noteworthy mention in regards to the solid side panel. Corsair has placed the same lining as on the front door here, although there is a cutout where the SSD brackets are to ensure they don't get in the way upon closing the side of the chassis.
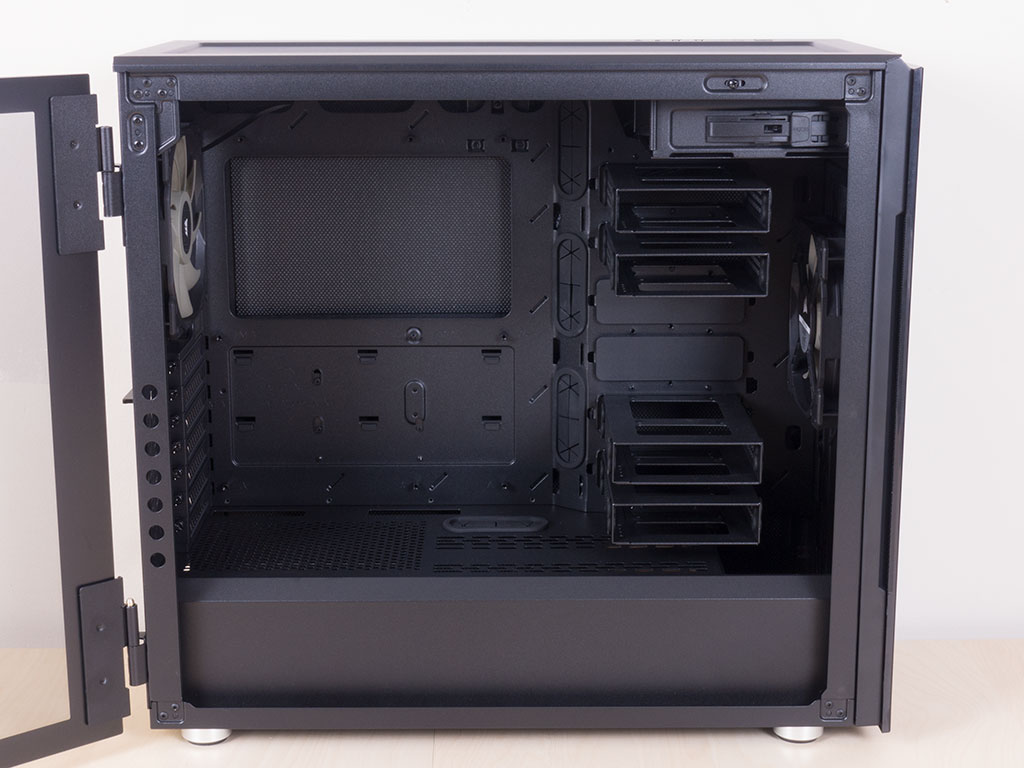


The Carbide 678C has a traditional layout with a few somewhat unique implementations. Firstly, the firmly attached shroud allows for a lot of venting, which is a bit unique. Not only does this allow for unobstructed access to air should you install the PSU with its fan facing upward, but as we will see later on, it also enables airflow to any fans or liquid cooling that may be installed in the floor of the chassis


In the back of the motherboard tray, you will find three possibilities to mount SSDs without the need of any tools. Above that is a fan controller for up to six fans, with the three pre-installed units already attached on one side. Last, but not least, there are the hard-drive bays. Corsair technically allows for up to eight drives within the case, but only provides six cages.


The reason for this is simple: two of the provided cages have been placed underneath the metal shroud. Should you want to remove these to place a 280 mm radiator here, you would then be free to place the two cages into their empty spots in the body of the chassis instead. There is enough room between the fan and hard-drive cages in the front for a slim radiator assembly to fit, which means you won't have to sacrifice any storage expansion options in the process.


In the rear, the PSU bay underneath the shroud is pretty straightforward. Above that, the 7+2 expansion slots are protected by individual covers with thumbscrews. If you wish to use the two vertical units, you will have to buy an additional PCIe ribbon cable to attach your GPU properly. In the very top, the aforementioned 140 mm fan is clearly visible. To line it up perfectly with your CPU cooler, it may be adjusted in height.

In the ceiling of the case, you will find the third and final 140 mm fan, which is also set to push air out the top of the case. You may remove the 5.25" drive bay to install a radiator assembly of up to 420 mm in size.


All the cables within the Carbide 678C are of the standard variety and completely black to match the interior of the case. The fan PCB employs a SATA plug to provide power to the cooling units.
Apr 25th, 2024 12:03 EDT
change timezone
Latest GPU Drivers
New Forum Posts
- Have you got pie today? (16317)
- Milestones (13874)
- WCG Daily Numbers (12496)
- TPU's Rosetta Milestones and Daily Pie Thread (1859)
- ThrottleStop 9.6 Voltage won't change (4)
- Folding Pie and Milestones!! (9008)
- Making Audio Enhancers Work on Windows (2649)
- Random blue screen from winload.efi error (0xc000000e) (1)
- which new soundcard or which 4.1 speakers kits ? (10)
- Alphacool CORE 1 CPU block - bulging with danger of splitting? (8)
Popular Reviews
- Fractal Design Terra Review
- Thermalright Phantom Spirit 120 EVO Review
- Corsair 2000D Airflow Review
- Minisforum EliteMini UM780 XTX (AMD Ryzen 7 7840HS) Review
- ASUS GeForce RTX 4090 STRIX OC Review
- NVIDIA GeForce RTX 4090 Founders Edition Review - Impressive Performance
- ASUS GeForce RTX 4090 Matrix Platinum Review - The RTX 4090 Ti
- MSI GeForce RTX 4090 Suprim X Review
- MSI GeForce RTX 4090 Gaming X Trio Review
- Gigabyte GeForce RTX 4090 Gaming OC Review
Controversial News Posts
- Sony PlayStation 5 Pro Specifications Confirmed, Console Arrives Before Holidays (116)
- NVIDIA Points Intel Raptor Lake CPU Users to Get Help from Intel Amid System Instability Issues (106)
- AMD "Strix Halo" Zen 5 Mobile Processor Pictured: Chiplet-based, Uses 256-bit LPDDR5X (101)
- US Government Wants Nuclear Plants to Offload AI Data Center Expansion (98)
- Windows 11 Now Officially Adware as Microsoft Embeds Ads in the Start Menu (93)
- AMD's RDNA 4 GPUs Could Stick with 18 Gbps GDDR6 Memory (85)
- Developers of Outpost Infinity Siege Recommend Underclocking i9-13900K and i9-14900K for Stability on Machines with RTX 4090 (85)
- Windows 10 Security Updates to Cost $61 After 2025, $427 by 2028 (84)