 9
9
JDS Labs Element II Desktop DAC/Amp Review
Audio Performance »Closer Examination


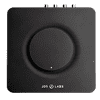
The JDS Labs Element II is not what I would call portable, coming in at 5.8x5.8x1.6 in. (~15x15x4 cm) and weighing just over 500 grams. There's also the wired AC power making it less tenable to begin with, but it does look quite the part on a desk next to or even under your monitor. I also appreciate there being three colored rings under that over-sized metal volume wheel, which is by far its biggest eye-catching feature with the small white dot for locating the wheel's position. This sample has the red ring, and you can get it in copper (think dark orange, as in the title photo on page 1) or just black if you wish to be more subtle. Subtle it otherwise surely is, with a predominantly black color scheme and rectangular cuboid form factor that has rounded corners. The Element II is a couple of years old now, but the aesthetic design is still on point. A smooth metal body and brushed finish for the metal frame on the sides for the I/O section keep things classy. Branding is well done with the white company name and logo on the top below the volume wheel in relatively small font. Most people will use the Element II with headphones and headsets, so the headphone output being the only thing on the front is apt. JDS Labs has opted for a single stereo 1/4" (6.35 mm) connector, which says a lot about the headphones the company anticipates customers to couple with the Element II. Those with 3.5 mm connector devices will need an adapter, and those with balanced cables will not only end up going single-ended, but need the less common adapter. When asked about this, JDS Labs said they are instead encouraging "highest performance connectivity," citing this FAQ wherein the company aims to address the perceived benefits of going with a balanced connector.


The rest of the I/O is on the back, including the expected USB Type-B port. The Element II also provides RCA in and out, again in a two-channel stereo configuration should you want to use it with speakers, for example. The power button on the right not only turns the device on/off with a single press, but also toggles between headphone out and RCA out when held down for a few seconds. The RCA plugs are color-coordinated for the two channels, and we see more of the brushed finish on the frame itself. As expected, the Element II in RCA mode bypasses the DAC and acts more like a preamp. There is also a gain button on the back, which allows the user to switch between low and high gain. Coax would have been nice; however, its absence is not a dealbreaker for any intended use cases.


Plastic with a rubber lining greets us on the back, where we see the company logo for no one to really see in use. Four small rubber pads on the corners lift the Element II, preventing scratches to the case while adding some friction against the resting surface. There are screws underneath each of the pads, which I promptly removed to examine what is going on inside.


Sadly, there isn't much to see here. The Element II is assembled such that you can't do a non-destructive disassembly owing to a retainer ring holding the volume wheel in place from the top, and the I/O connectors are quite snugly packed into the case to where there is no room to really move things much. All I can do is examine the back of the PCB, which is quite clean, admittedly. The company logo and name are seen here too, as well as confirmation that this PCB was specifically made for the Element II. There is some excess solder flux right below, which is nothing to worry about. In fact, the rest of the contacts are very well done, including for the connectors and ports themselves. JDS Labs states that the flux is of the no-clean variety as a result of the hand-mounted PCB and Alps potentiometer associated with the volume wheel, which in turn ensures centered alignment of the large wheel itself.


Connecting the Element II is quite simple, depending on what you go with. RCA cables are not provided by default, so you need to get your own if going that route. For the DAC, there is the option to connect with the UAC1 fallback cable optional accessory we saw on the previous page, which is especially useful for consoles. PC users will simply use the default cable, especially with the latest firmware having a software fallback anyway, and the power adapter for your region. Turn on the power switch and you will hear a click confirming the device is on. If you need visual feedback, white LEDs under the volume wheel turn on at this point for a subtle underflow effect I don't believe can be turned off, though I certainly would not want to. Aesthetics aside, it also help identify the volume wheel in the dark.
Jun 16th, 2024 21:35 EDT
change timezone
Latest GPU Drivers
New Forum Posts
- Last game you purchased? (348)
- How to completely reset all changes made by TS? (24)
- AMD RX 7000 series GPU Owners' Club (1120)
- Opinions on AI (267)
- Random Shutdown During Game play | MSI Codex R 32G 2tb (0)
- How Should iGPU be tweaked in comparison to CPU & Cache? (12)
- Good Bronze 750w PSU (95)
- What's your latest tech purchase? (20811)
- TechPowerUp Video Thread (MASSIVE 56K WARNING) (985)
- I should upgrade my gpu and psu? (17)
Popular Reviews
- Pulsar Xlite V3 eS Review
- Aune AR5000 Headphones + S17 Pro Headphones Amplifier Review
- Team Group T-Force G70 Pro 2 TB Review
- Upcoming Hardware Launches 2024 (Updated May 2024)
- AMD Ryzen 7 7800X3D Review - The Best Gaming CPU
- Intel Lunar Lake Technical Deep Dive - So many Revolutions in One Chip
- Sapphire RX 7900 GRE Nitro+ Review
- VAXEE Outset AX Wireless (4K) Review
- NZXT H6 Flow RGB Review
- ASUS Radeon RX 7900 GRE TUF OC Review
Controversial News Posts
- Possible Specs of NVIDIA GeForce "Blackwell" GPU Lineup Leaked (134)
- NVIDIA RTX 5090 "Blackwell" Founders Edition to Implement the "RTX 4090 Ti" Cinderblock Design (118)
- AMD Ryzen 9000 Zen 5 Single Thread Performance at 5.80 GHz Found 19% Over Zen 4 (115)
- AMD Outs Ryzen 5000XT Processors for Socket AM4, an 8-year Old Socket (106)
- Nightmare Fuel for Intel: Arm CEO Predicts Arm will Take Over 50% Windows PC Market-share by 2029 (105)
- AMD Says Ryzen 9000 Series Won't Beat 7000X3D Series at Gaming (103)
- AMD Zen 5 Storms into Gaming Desktops with Ryzen 9000 "Granite Ridge" Processors (100)
- Biden Administration to Revive Trump-Era Tariffs on China-made GPUs and Motherboards (95)