 7
Lenovo Legion Tower 5i (Intel i7-10700 + RTX 2070 Super) Review
(7 Comments) »Introduction

A big thank you to Lenovo for providing the review sample.
Lenovo has a long history, having been formed in 1984. Since then, they have grown to become one of the largest PC vendors in the world. It stands to reason that they would not overlook the PC gaming market either, and thus they have the Legion branding, which extends to both desktops and laptops. This drive to continue pushing forward has made them one of if not the largest vendor of personal computers in the world, serving customers in over 160 countries. But being the biggest doesn't mean the best, so it's time to put that to the test.

In today's review, I will be looking at the Lenovo Legion Tower 5i model number 90NC001LUS. Priced at $1449.99, it comes equipped with an Intel i5-10700, NVIDIA GeForce RTX 2070 Super, 512 GB NVMe SSD, ARGB lighting, and numerous other features associated with the PC gaming market. Considering its price point is roughly around the sweet spot for a proper high-end gaming experience, it will be interesting to see how Lenovo's relatively affordable offering performs when pushed to the limit.
| Specifications | |
|---|---|
| Manufacturer: | Lenovo |
| Model: | Lenovo Legion Tower 5i Model: 90NC001LUS |
| Chassis: | Custom Chassis 1x Power switch 2x USB 3.1 Gen 1 1x Combo headphone/microphone jack |
| Processor: | Intel Core i7-10700 2.9 GHz Base (4.8 GHz Boost) |
| CPU Cooling: | 150-watt TDP heatsink/fan |
| Motherboard: | Intel B460 chipset Custom Lenovo B460 MATX |
| Operating System: | Windows 10 64-bit |
| Integrated Graphics: | Intel UHD Graphics 630 |
| Dedicated Graphics: | NVIDIA GeForce RTX 2070 Super 8 GB GDDR6 3x DisplayPort 1x USB Type-C 1x HDMI |
| Memory: | 16 GB (2x 8 GB) SK Hynix CL 21-21-21 @ 2933 MHz DDR4 4x DIMM slots (2x occupied) |
| Storage: | 512 GB Western Digital PC SN730 NVMe SSD 1 TB Western Digital WD10EZEX 7200 RPM 3.5" HDD 2x 3.5" HDD bays (1x occupied) 2x M.2 PCIe slots (1x occupied) |
| Optical Drive: | Not included |
| Rear I/O: | 1x Set HD Audio 1x USB 3.1 Type-C Gen 1 2x USB 3.1 Type-A Gen 1 2x USB 2.0 Type-A Gen 1 1x Thunderbolt port 1x L/R line in 1x L/R line out 1x Mic in 1x RJ45 Ethernet port |
| Networking/Communication: | 1x Realtek RTL8168/8111 PCI-E Gigabit Ethernet 1x Intel Wi-Fi 6 AX200NGW |
| Audio: | Realtek ALC 887 |
| Input device: | USB mouse USB keyboard |
| Power: | FSP650-70ALA 650 W 80 Plus Gold |
| Warranty: | 1 years |
| MSRP: | $1449.99 |
Packaging and Contents

When it comes to the box, there isn't much to see. Lenovo keeps things simple, using your standard brown box with the Legion branding prominently displayed—other than the branding, there isn't anything special to see. As for the internal packaging, the system is encased in two foam inserts, which provide a fairly sizable space between the system and side of the box. Considering the system arrived with no damage or problems, it did its job. However, I would have preferred packaging that completely encases the system as it offers a much higher degree of protection for those days when your shipping carrier decides your system doesn't need to be handled carefully.

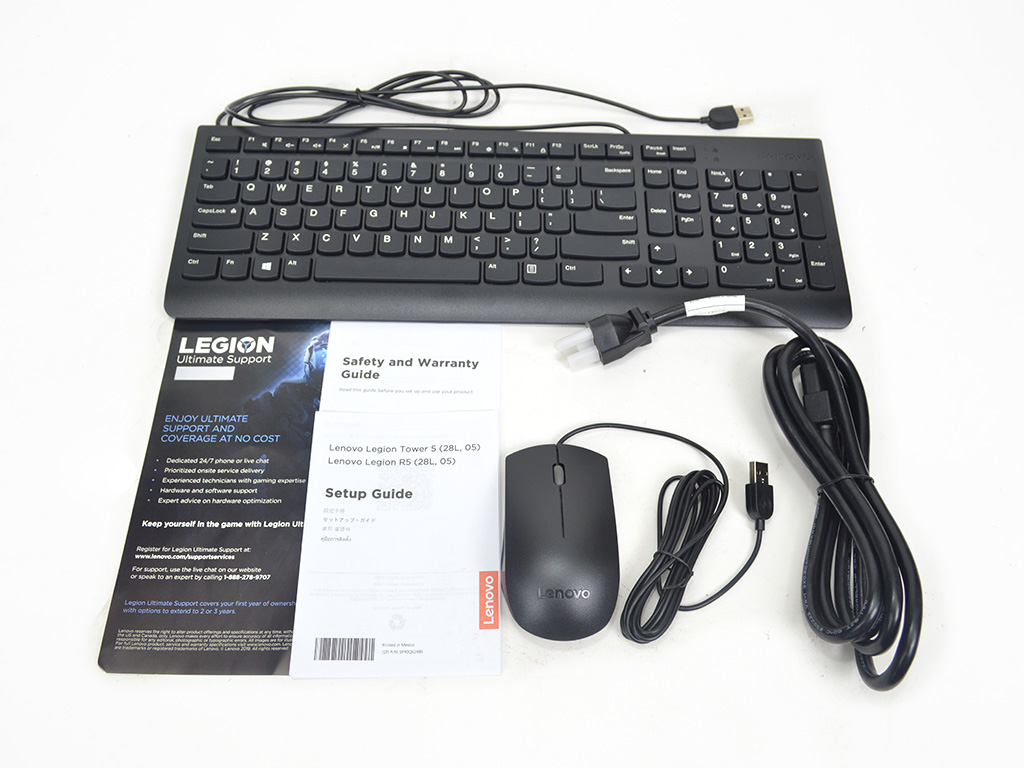
When it comes to whats in the box, it's a rather spartan affair. You get the system, keyboard, mouse, power cord, and some documentation. Lenovo keeps it simple here, same as they did with the packaging.
- Lenovo Legion Tower 5i Model: 90NC001LUS PC
- Power cable
- Keyboard
- Mouse
- Miscellaneous literature
A Closer Look


Lenovo certainly has a unique case design when it comes to the Legion Tower 5i. The Legion logo is prominently displayed on front, illuminated by LEDs for the quintessential gamer look. For added visual interest, the center panel has a carbon fiber appearance for good measure. Turning to the left side, you will find the side panel, which does have a window. However, unlike the in vogue tempered glass panels seen on other cases, you get a Lexan or acrylic panel. It does the job just fine by letting you see the internals, but does lack that more premium feel of a TG panel. It should also be noted that Lenovo did add some vents to the side of the front fascia for improved airflow, which is never a bad thing. A quick look at the back reveals a standard layout with a 120 mm exhaust fan. Rear I/O looks sparse, but we will get to that momentarily. The most interesting aspect of the chassis here is the rear handhold because Lenovo decided to include a spoiler, or at least that is how I view it.


The right side of the chassis is your bog-standard steel panel. The front fascia also has vents on this side, which is again nice to see. Meanwhile, the top of the chassis has your front panel I/O and, of course, the huge rear spoiler with the Lenovo brand prominently displayed. Other than that, there are no vented openings for top exhaust fans or radiator mounting. Finally, the chassis bottom has no openings either and is instead just a large flat slab of metal with large rubber feet to keep the chassis stable.


A closer look at the system I/O reveals it to be rather barren compared to a DIY build, with Lenovo providing 1x USB-C 3.2 Gen 1, 2x USB-A 3.2 Gen 1, 2x USB 2.0, and 1x RJ45 Ethernet. When it comes to audio output, you don't get much with just a 1x Mic-in, 1x L/R line in, and 1x L/R line out. Finally, the front panel has 2x USB-A 3.2 Gen 1 ports, a headphone jack, a microphone jack, and a power button. While the I/O as a whole is adequate, a few extra USB ports and a better audio configuration would have been appreciated, as well as at least an HDMI port for the Intel IGP. Some of these inclusions can be truly useful in the event of a hardware failure down the road.


When it comes to ARGB lighting, Lenovo missed the mark as well. The rear fan and CPU fan are ARGB and can be controlled with Lenovo's included Vantage software. However, the ambient lighting at the top of the chassis and the front logo have a blue hue and cannot be controlled. This means if the ambient lighting is turned on, it washes out any other color choice. So for this system, it's basically blue or nothing if you want the ambient lighting to look good. Even then, the green-glowing side of the RTX 2700 means nothing really meshes together well out of the box. It feels more like it's included for another checkbox on their marketing list.
A Look Inside

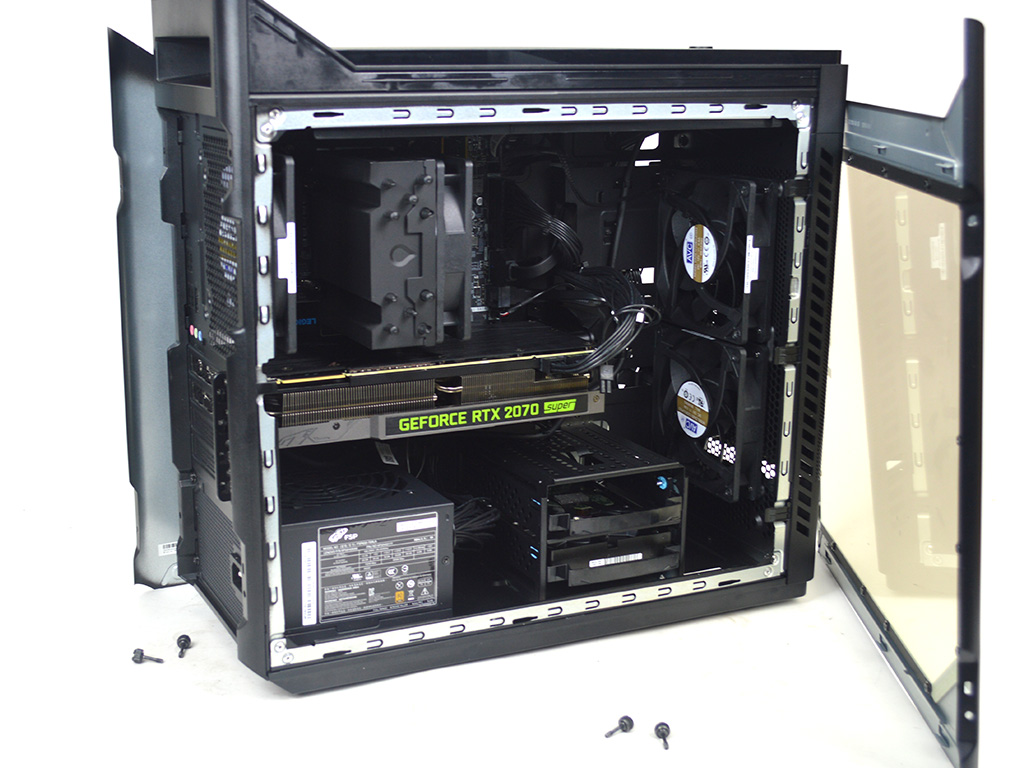

Thanks to the traditional system design, changing or upgrading components is fairly easy. To start with, removing four thumb screws will allow you easily remove the side panels by sliding them back until they come free. With the system opened up, it's easy to see Lenovo stuck with a tried and true design. Airflow is positive-pressure focused with two intake fans at the front and an exhaust fan at the rear, which should provide plenty of cooling. Sadly, with no PSU shroud, the drive cages, etc., will be visible.


Taking a closer look at the front panel, we can see Lenovo select AVC for their 120 mm fans. The model number is DAZE1225B2UP033, and it's a ball bearing design, which means it should hold up to years of abuse. Taking a look at the CPU cooler and the rear exhaust fan, these are from AVC and equipped with ARGB lighting. The heatsink is a traditional tower cooler, and while not overly large, does have five heat pipes.
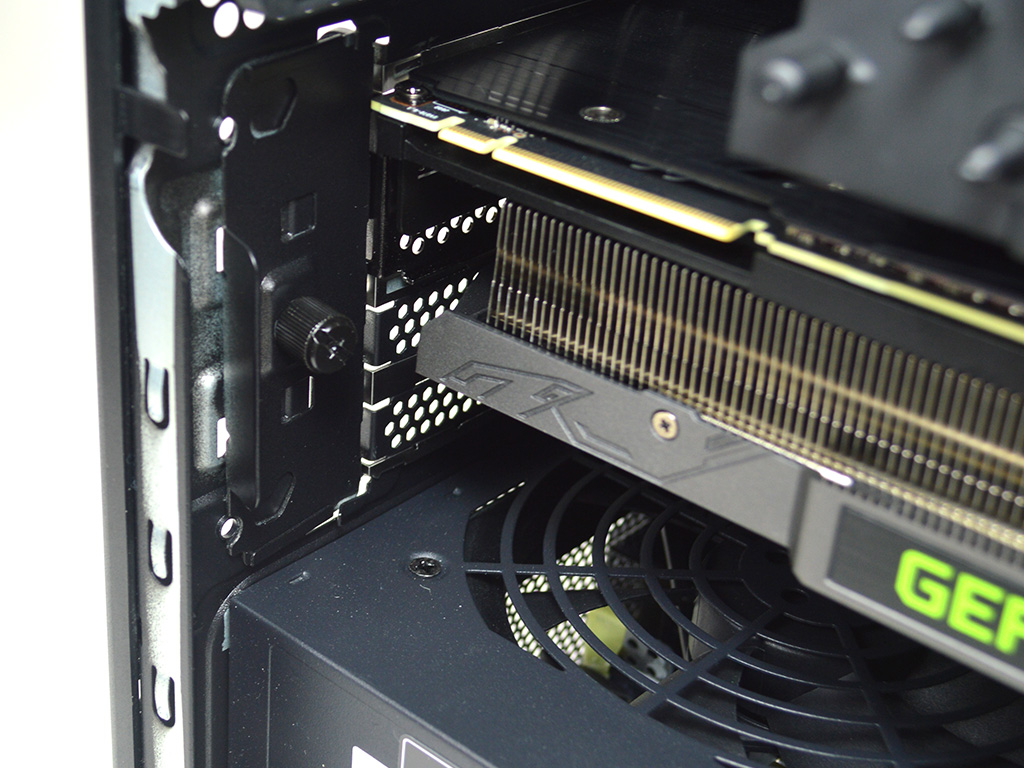
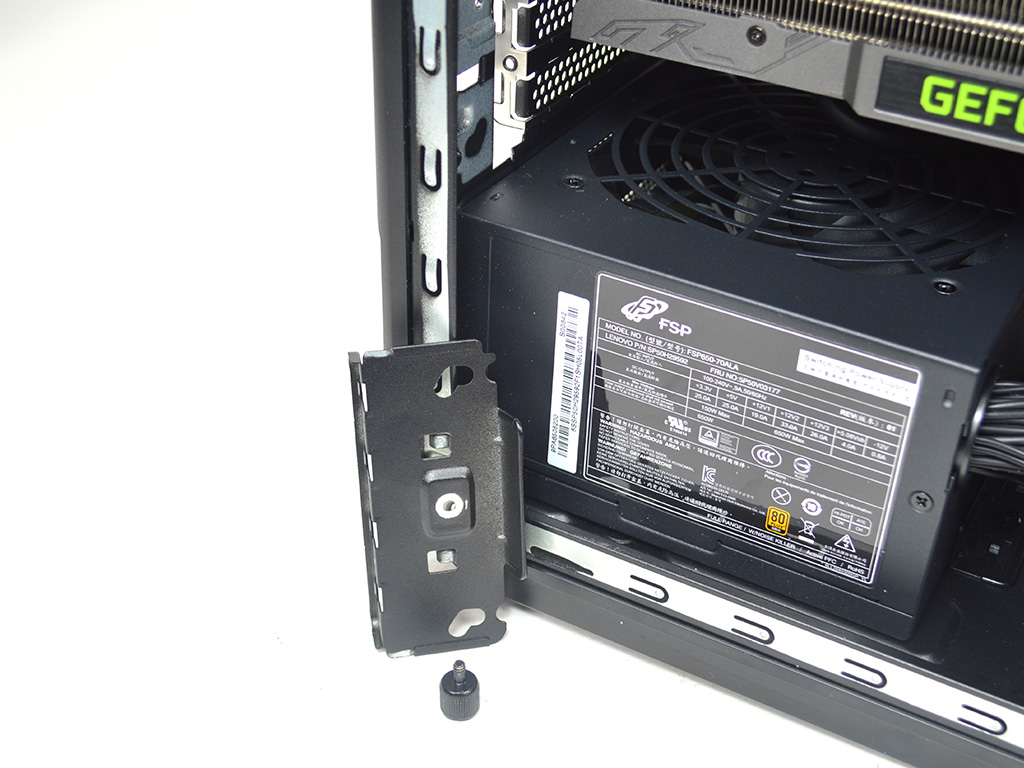
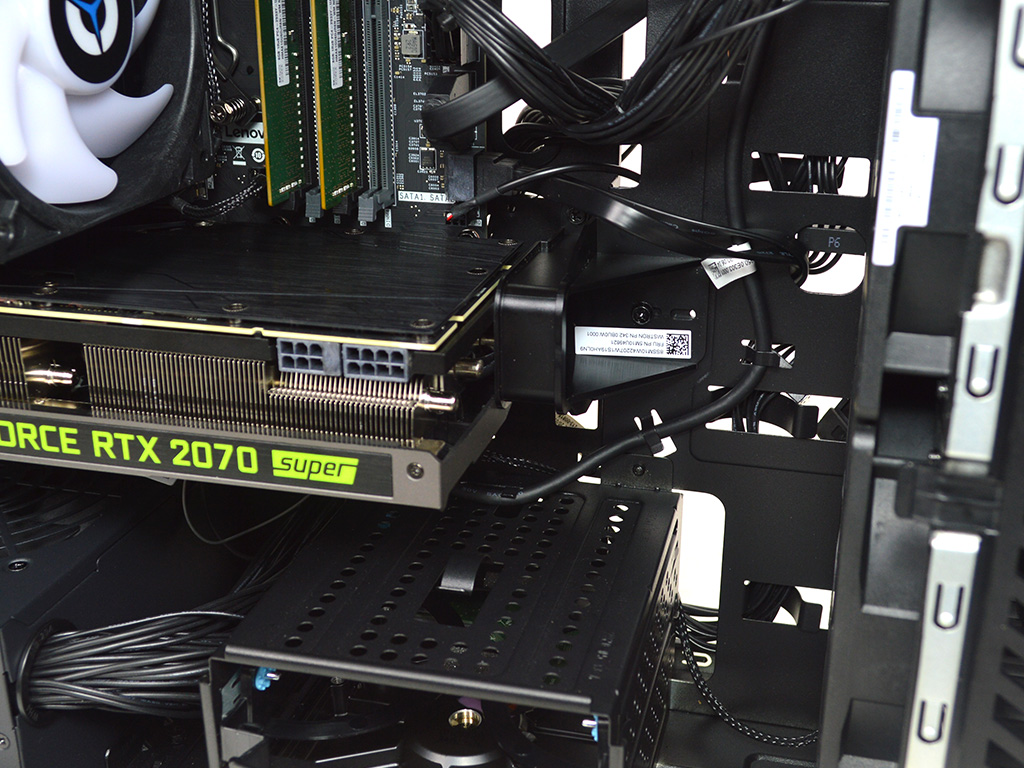
To remove the graphics card, users will need to undo the small thumbscrew holding the latch tight. Once removed, the rear latch can be taken out. Once that is done, unhook the power cables and remove the three screws holding the GPU bracket to the chassis (near the power cables). At that point, simple depress the PCIe latch near the socket to then pull out the graphics card.


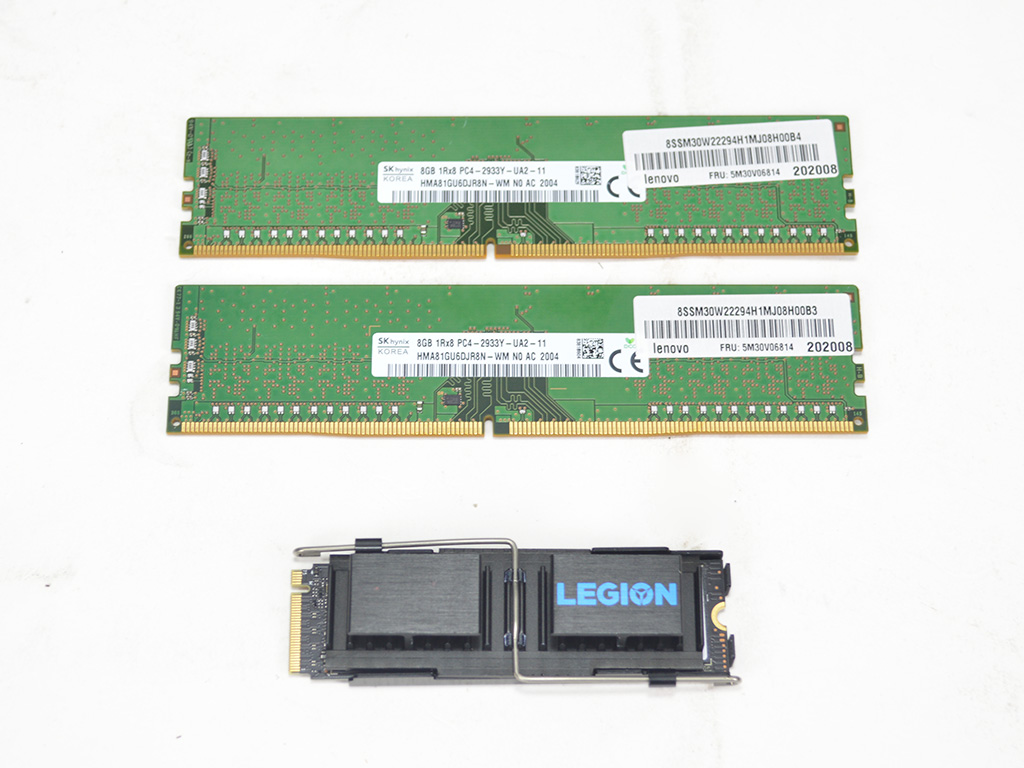
The graphics card is an MSI NVIDIA GeForce RTX 2070 Super with what appears to be a custom shroud for Lenovo. Considering MSI's software can allow for the GPU's lighting to be changed on some models, I did try it just to see if it would work, which it did not. With the graphics card removed, accessing the other components becomes a lot easier. The memory can be pulled out before or after, but we now have complete access to the M.2 SSD, which is from Western Digital (model number here). The memory is a 2x 8 GB kit from SK Hynix rated at 2933 MHz. It should also be noted that the system does have a second M.2 slot hidden by the graphics card, so you can double up on NVMe SSDs if you wish.
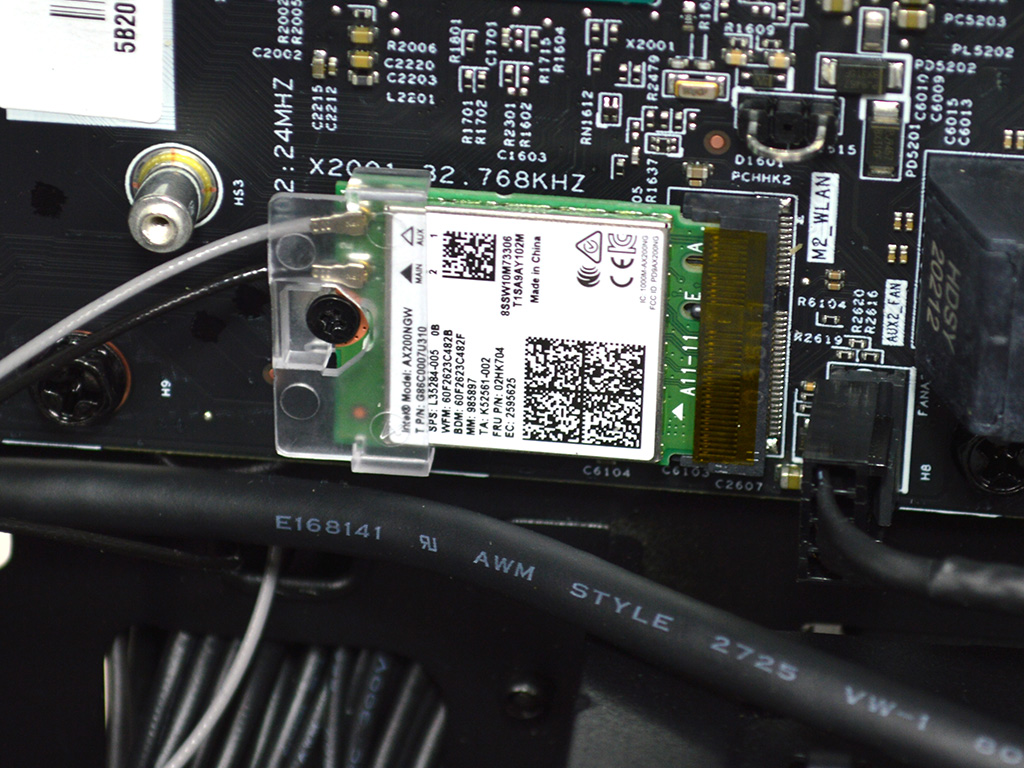
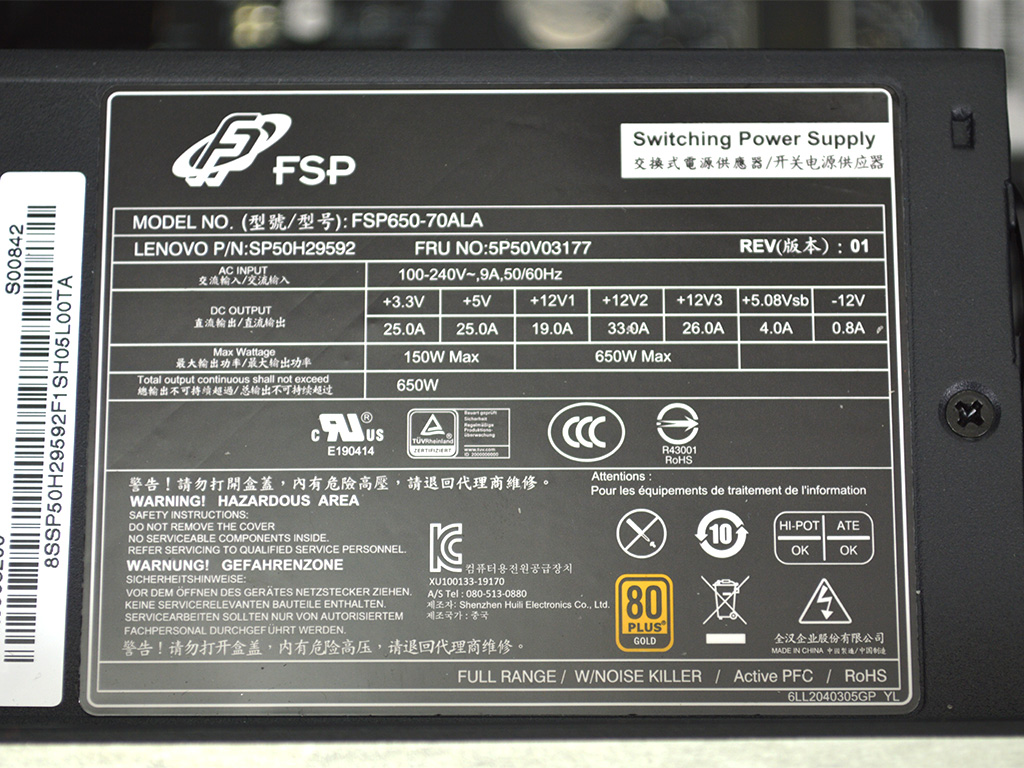
Lenovo does offer WiFi with these systems, with the inclusion of Intel's AX200NGW module that offers 802.11AX (2 x 2) and Bluetooth 5.0. As for the power supply, it's an FSP 80 PLUS Gold model rated at 650 watts—more than enough to meet this system's needs.
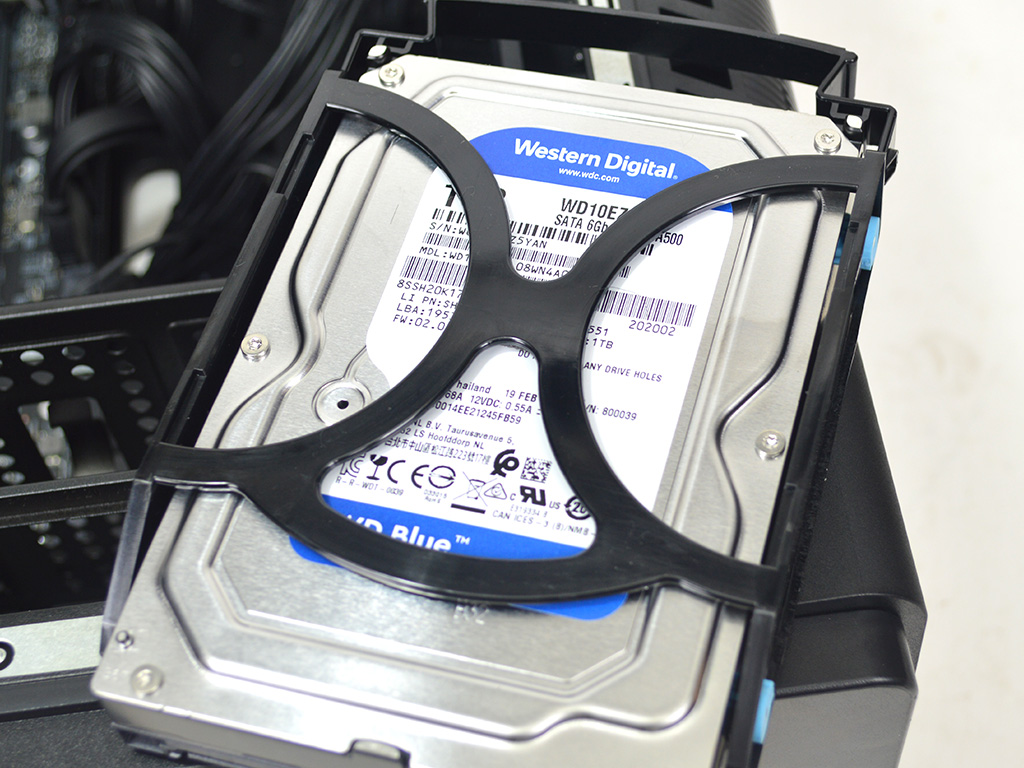
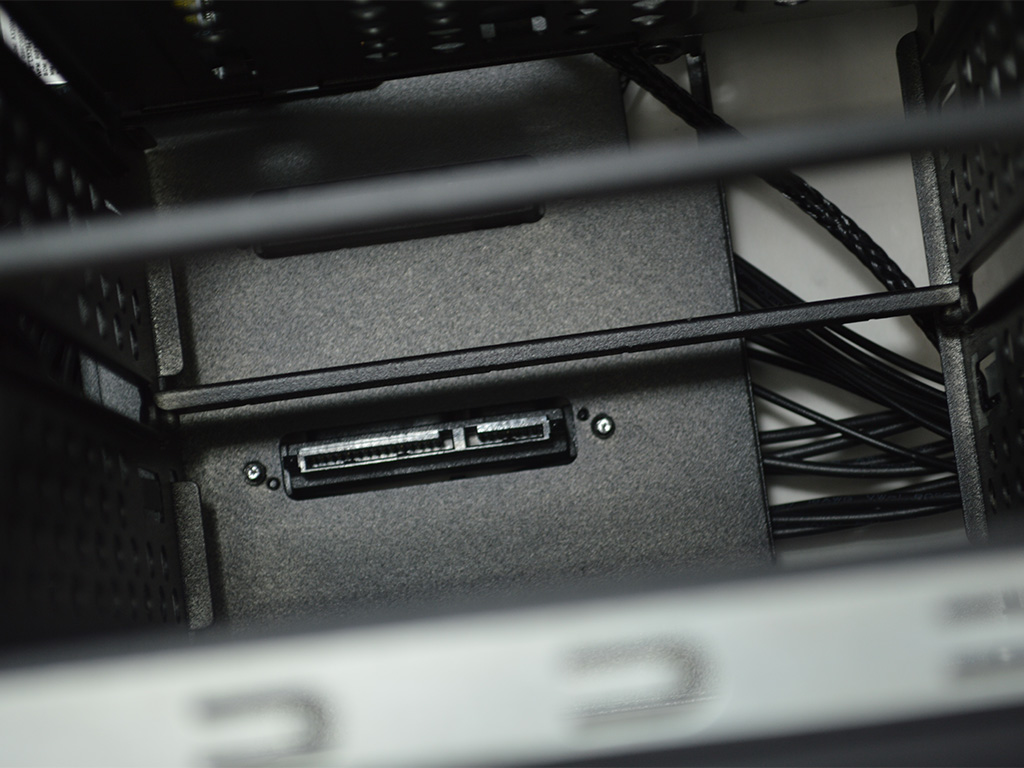
For bulk storage, Lenovo includes a Western Digital WD10EZEX 1 TB 7200 RPM HDD to go with the 512 GB NVMe SSD. Rather than run cables and wires, Lenovo did something different here by using a SATA backplane rather than traditional wiring. This means changing or adding another HDD is as simple as putting it into the drive sled that is slid down into place until it's firmly seated.
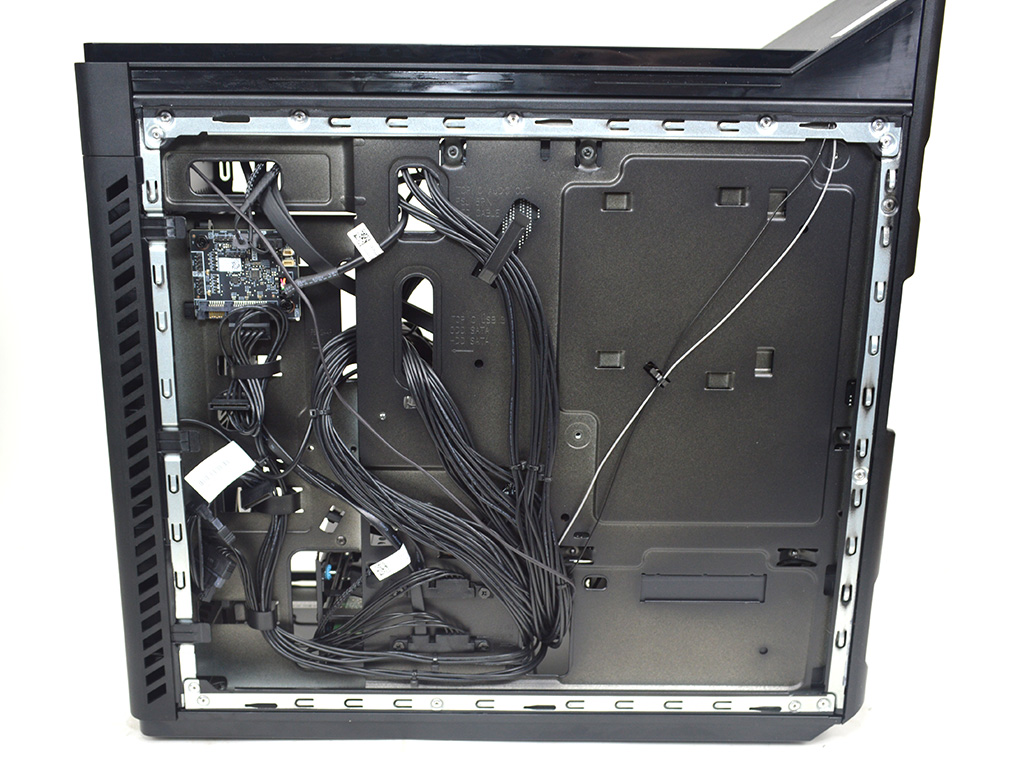
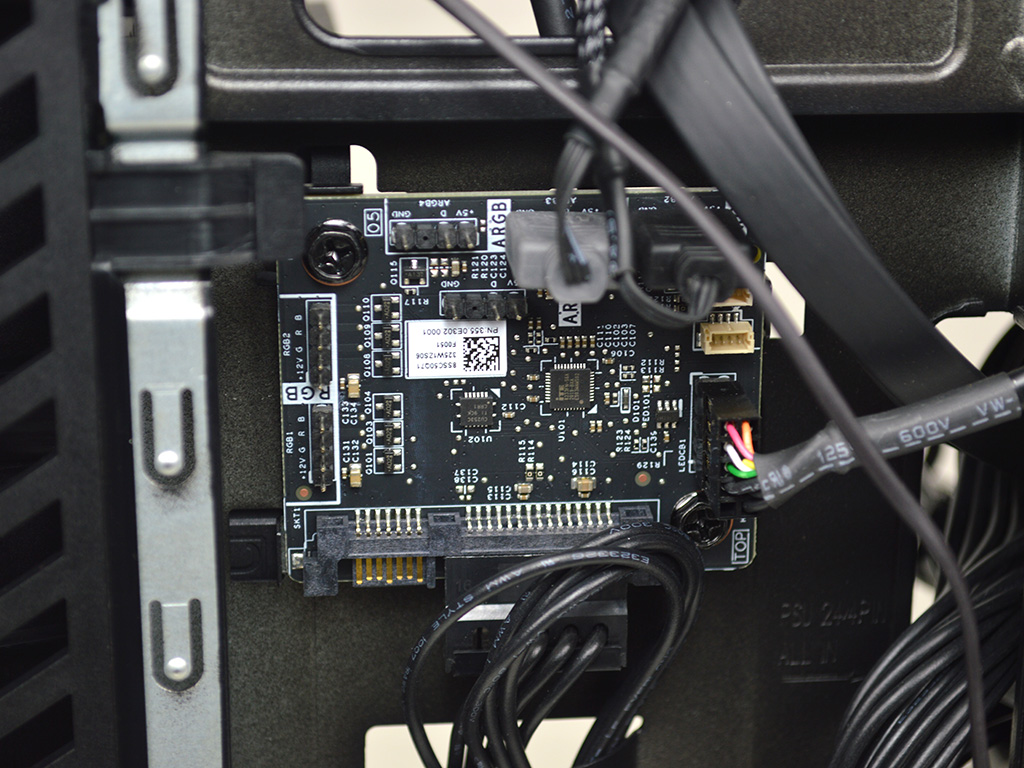
Cable routing, while not the best I have seen, is pretty clean, and considering how little space there really is behind the right-side panel, I must say it is also well laid out. For those wanting to add extra ARGB fans, the system does have an ARGB hub with some open ports for good measure.

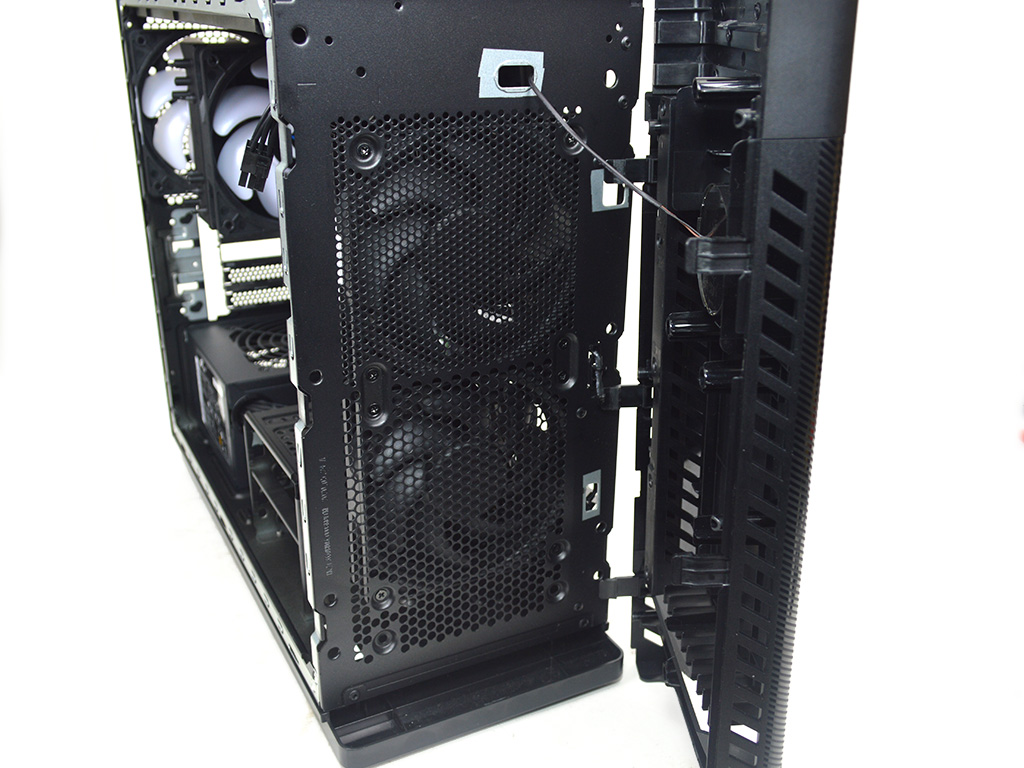
Finally, to clean the front fans and grills, you can remove the front fascia by unhooking the plastic clips on both sides, allowing you to remove it from the chassis frame gently. Just keep in mind there is wiring back here for the LED logo, so don't just rip it off.
Test Systems
General Disclaimer: As previously reviewed systems are returned, retesting is not always possible. Considering older drivers and Windows versions will impact performance and create some level of disparity, the results for previously reviewed systems shown in the benchmarks below are for reference only.| Test System "Lenovo Legion Tower 5i" | |
|---|---|
| Processor: | Intel Core i7-10700 |
| System Memory: | 16 GB (2x 8 GB) SK Hynix 2933 MHz |
| Motherboard: | Lenovo B460M Custom |
| Graphics card: | MSI NVIDIA GeForce RTX 2070 Super 8 GB |
| Power Supply: | FSP650 80 Plus Gold |
| SSD: | 512 GB Western Digital SN730 NVMe |
| HDD: | 1 TB Western Digital 7200 RPM |
| Test System "Corsair One i200" | |
|---|---|
| Processor: | Intel Core i9-10900K |
| System Memory: | 32 GB (2x 16 GB) Corsair Vengeance LPX 3200 MHz |
| Motherboard: | MSI Z490I Unify (Custom for i200) |
| Graphics card: | NVIDIA GeForce RTX 2080 Ti 11 GB |
| Power Supply: | Corsair SF750 80 Plus Gold |
| SSD: | 960 GB Samsung PM981 M.2 NVMe |
| HDD: | 2 TB Seagate BarraCuda 5400 RPM |
| Test System "Comino Otto Master" | |
|---|---|
| Processor: | Intel Core i9-9900K |
| System Memory: | 32 GB (2x 16 GB) G.Skill Trident Z 4000 MHz |
| Motherboard: | ASUS Z390I STRIX |
| Graphics card: | ASUS GeForce RTX 2080 Ti STRIX 11 GB |
| Power Supply: | CMNO 750W SFX Platinum |
| SSD: | 1 TB PNY CS3030 M.2 NVMe |
| HDD: | 2 TB Toshiba HDWL120 5400 RPM |
| Test System "MSI Trident X 9th" | |
|---|---|
| Processor: | Intel Core i7-9700 |
| System Memory: | 32 GB (2x 16 GB) Samsung 2666 MHz |
| Motherboard: | MSI Z370I GAMING PRO CARBON AC |
| Graphics card: | MSI GeForce RTX 2080 Ventus 8 GB |
| Power Supply: | Thermaltake Smart 650 W 80 Plus Gold |
| SSD: | 512 GB Samsung PM981 M.2 NVMe |
| HDD: | 2 TB Seagate BarraCuda 5400 RPM |
| Test System "iBUYPOWER L20IRG201" | |
|---|---|
| Processor: | AMD Ryzen 9 3900X |
| System Memory: | 16 GB (2x 8 GB) ADATA XPG SPECTRIX 3200 MHz |
| Motherboard: | ASUS TUF GAMING X570-PLUS |
| Graphics card: | MSI GeForce RTX 2070 Super Ventus OC 8 GB |
| Power Supply: | High Power 650 W 80 Plus Gold |
| SSD: | 1 TB Intel 660P M.2 NVMe |
| HDD: | None |
Our Patreon Silver Supporters can read articles in single-page format.
Nov 19th, 2026 15:13 CST
change timezone
Latest GPU Drivers
New Forum Posts
- Making a game in Godot engine (4)
- WarpCoreBench scores! (75)
- Dell Workstation Owners Club (3515)
- Windows 11 General Discussion (7735)
- DTS DCH Driver for Realtek HDA [DTS:X APO4 + DTS Interactive] (2815)
- Security Apps (2)
- How to prevent OLED burn damage due to PC freezes or power outtages? (28)
- Last game you purchased? (1408)
- Got the EOL 32GB TridentZ 6000 CL26 1.4V (11)
- GTA VI (7)
Popular Reviews
- Acemagic Retro X3 Review
- Ugreen NASync DXP4800 GT Review
- Upcoming Hardware Launches 2027 (Updated Nov 2026)
- Pulsar Office Tour & First Look at P1 Dual-Sensor Mouse
- AMD Zen 6 Technical Deep Dive
- Biwin Black Opal NV7400 2 TB Review
- Sapphire Radeon RX 7700 XT Pure Review
- Sapphire Radeon RX 7700 XT Pulse Review
- AMD Ryzen 7 9800X3D Review - The Best Gaming Processor
- Chieftec Iceberg PRO 360 DARK Review
TPU on YouTube
Controversial News Posts
- NVIDIA Co-Founder and CEO Jensen Huang Officially Resigns (486)
- Report: Jensen Huang Eyes NVIDIA Comeback (223)
- Open Letter Asking NVIDIA to Reinstate Jensen Huang Passes 115,000 Signatures (184)
- OpenAI CEO Argues Home PCs Waste the World's Limited DRAM Supply (152)
- NVIDIA Launches Investigation Into Jensen Huang's Relationship With Suspected Chinese Spy (136)
- Intel "Raptor Lake Next" 16-Core and 20-Core CPUs Surface (130)
- Legendary Game Studio BioWare Shuts Down Following EA Layoffs (104)
- Dell CEO Says the Memory Shortage Will Get Worse in 2027 (95)