 16
16
NETGEAR Orbi Pro SXK80 WiFi 6 System Review
NETGEAR Insight Mobile: Setup & Monitoring »Closer Look


The two-pack of the NETGEAR Orbi Pro AX6000 set is referred to as the SXK80, which in turn contains an SXR80 router and an SXS80 satellite. The AX6000 in the name is based on support for 802.11ax (WiFi 6) with a maximum combined throughput of 6000 Mbps across three bands. Helping differentiate this from the older Orbi Pro set is the color change from white and blue to white and black, which is what NETGEAR used with the newer Orbi WiFi 6 mesh systems as well. So how does the company differentiate between the Orbi and Orbi Pro visually? By using a different design, as it turns out. The Orbi Pro WiFi 6 units adopt a much more angular design akin to a rhombus on the side and still retains the wider base going to a narrower top as with other NETGEAR Orbi family products.
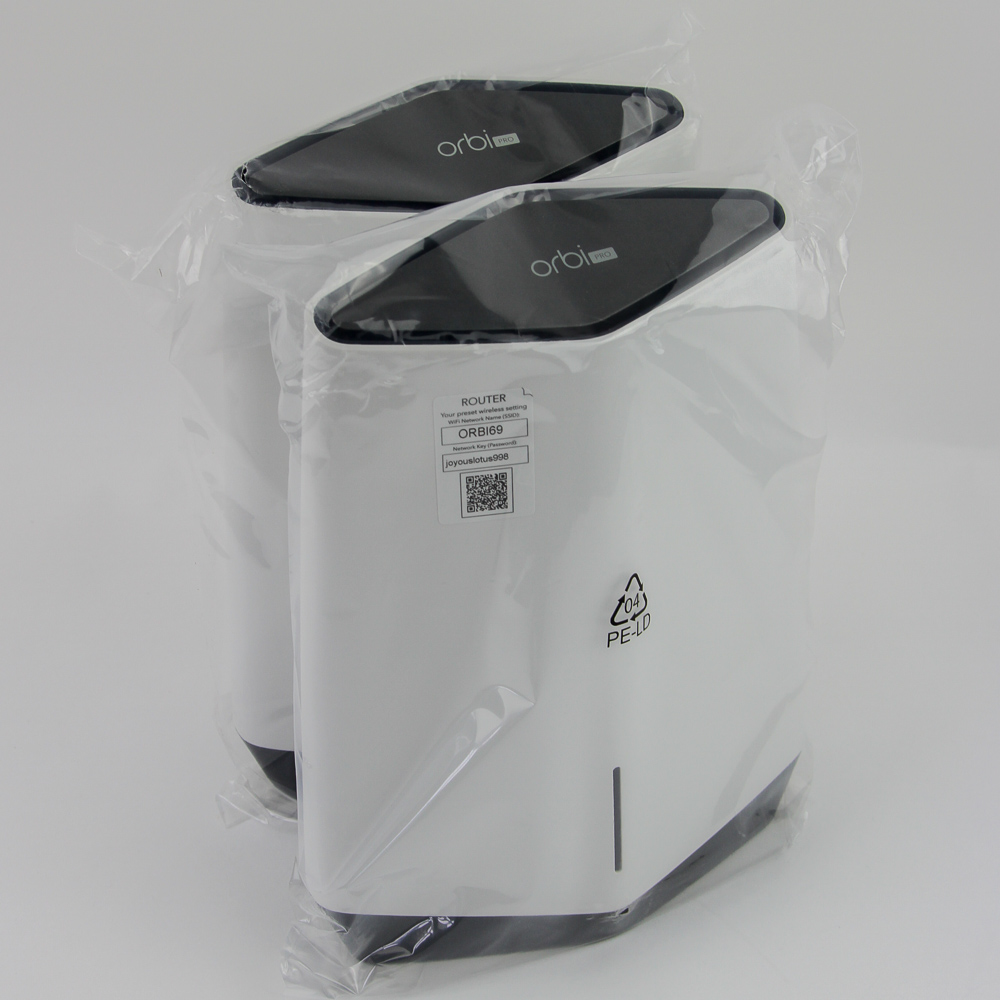
Both units come inside plastic wraps to keep them clean and free of dust out of the box, and I have to say I like the design of the Orbi Pro more than the consumer Orbi family. The indicator LEDs are also placed in the front rather than integrated inside the top, so there is little ambiguity with the clear cutout seen above. It is also easy to distinguish the router from the satellite when unboxing things as there is a sticker with the default log-in credentials on the router.


The top is not flat, and looking at it from the side best illustrates it. The Orbi Pro writing in white contrasts with the matte black top panel, which has a gap all around separating it from the body to allow for ventilation and cooling of the internal hardware. Speaking of which, this time around, NETGEAR shied away from sharing any information about what is powering the SXK80, and disassembly is not trivial. The two units are otherwise identical as far as footprint and weight goes and larger than the more budget-friendly SXK30 AX1800 WiFi system that is smaller in form and function alike.


More cooling holes are cut into a recess on the back of each unit, which also hosts the I/O. Both the router and satellite have a similar configuration with a Sync/WPS button on the left, outside the cutout. Then we get five RJ45 Ethernet ports, which split into a 1/2.5 GbE WAN or LAN port on the router, as opposed to LAN only on the satellite, and four other 1 GbE ports right after. The Orbi Pro SXK80 allows for the first two of these four ports to be formed into a Link Aggregation Group (LAG), which is quite cool for those who would rather not get a separate switch for that purpose. They are marked as such too, for easier identification. A pinhole Reset and the DC port for power round things off. Missing here, which is a confusing move, is an actual power on/off switch. We also don't get a USB port for local network storage applications or even something like a network-connected printer, which is a shame considering how many businesses have a wired printer that could have been used that way instead of taking up an Ethernet slot. The WAN port on the router is also indicated as such and yellow to further differentiate it from the LAN-only port on the satellite.


The certification information for each is on the bottom, and this is the first time we actually see the SXR80 and SXS80 naming schemes used for the router and satellite units respectively. Serial number and log-in credentials are marked here too, so you could peel the sticker on the router body off for a cleaner look. More ventilation holes as well as a sneak peek at the internals inside greet us, along with rubber padding for when you want to just position these upright on a surface. There are threaded metal inserts for when you want to use them with the provided wall mounts, which fit the base snugly and have enough of a gap for all the cables to go through the gap in the base of the wall mount for decent cable management.


With eight internal antennas, there is not much else to do in terms of hardware setup. The basic minimum for the router is the power cable as well as the provided Ethernet cable going from an available LAN port on your modem/gateway to the WAN port as seen above. The satellite itself is already paired to the router, so much so that actually setting it up separately isn't necessary. All you need is the power cable, and also make sure the two units aren't too far removed from each other for the initial setup. The indicator LEDs on the front are multi-color—the color code guide in the manual covers the various stages of operation for either unit. I also liked that the two units have a different color for normal operation, which further distinguishes the two; the LEDs can be turned off or only left on during start-up if you prefer them with absolutely no lighting, of course.
Jun 16th, 2024 14:51 EDT
change timezone
Latest GPU Drivers
New Forum Posts
- RX 580 Sapphire Nitro 8gb | black screen when booting after disabling CSM and trying to turn on SecureBoot (18)
- new tv/display what one? what to avoid? (40)
- Your PC ATM (34634)
- Optane 1600X 118GB - Lots of CDM benching and some thoughts (67)
- Linpack Xtreme Released (464)
- Can you live with one monitor? ;) (112)
- Should i upgrade my cpu (rtx 4070) ? (60)
- How to quickly & easily fix coil-whine(coil choke noise) (891)
- Bluetoothspeaker V1 - Cnc - Wallnut - 40hz (8)
- AAF Optimus DCH Audio Modded Driver for Windows 10/11 - For ALL HDAUDIO Enumerator Chips (667)
Popular Reviews
- Pulsar Xlite V3 eS Review
- Aune AR5000 Headphones + S17 Pro Headphones Amplifier Review
- Upcoming Hardware Launches 2024 (Updated May 2024)
- Team Group T-Force G70 Pro 2 TB Review
- VAXEE Outset AX Wireless (4K) Review
- AMD Ryzen 7 7800X3D Review - The Best Gaming CPU
- Intel Lunar Lake Technical Deep Dive - So many Revolutions in One Chip
- NZXT H6 Flow RGB Review
- ASUS Radeon RX 7900 GRE TUF OC Review
- Thermal Grizzly KryoSheet Review - Tested on RX 7900 XTX with 475 W
Controversial News Posts
- Possible Specs of NVIDIA GeForce "Blackwell" GPU Lineup Leaked (133)
- NVIDIA RTX 5090 "Blackwell" Founders Edition to Implement the "RTX 4090 Ti" Cinderblock Design (118)
- AMD Ryzen 9000 Zen 5 Single Thread Performance at 5.80 GHz Found 19% Over Zen 4 (115)
- AMD Outs Ryzen 5000XT Processors for Socket AM4, an 8-year Old Socket (105)
- Nightmare Fuel for Intel: Arm CEO Predicts Arm will Take Over 50% Windows PC Market-share by 2029 (105)
- AMD Says Ryzen 9000 Series Won't Beat 7000X3D Series at Gaming (102)
- AMD Zen 5 Storms into Gaming Desktops with Ryzen 9000 "Granite Ridge" Processors (100)
- Biden Administration to Revive Trump-Era Tariffs on China-made GPUs and Motherboards (95)