 8
8
NETGEAR Orbi RBK50 WiFi System Review
Closer Look »Packaging and Accessories


First impressions are often long-lasting, and NETGEAR wants to make sure you remember it all. The product box for the Orbi RBK50 is a big cube that comes wrapped in plastic and inside a four-sided cardboard sleeve over a blue cardboard box. No side of the sleeve has been left empty as we see a nice illustration of the Wi-Fi system along with the company and product name on front, although without the actual RBK50 part here. On the two sides of the sleeve, we get more information pertaining to the marketing features, including another illustration of the coverage area and a quick visual reminder to have the two units located at different places in your home/office. Similarly, we see some snippets from a few chosen reviews and media coverage on the box, but we will obviously judge the product ourselves for an informed decision in our conclusion.


The back of the sleeve houses more useful information—a quick list of contents inside to check and compare against your own kit, technical specifications and support, and a few QR codes to help get you started towards setting up the product via mobile apps if you decide to go that route. Turning the box over to one of two exposed sides the sleeve does not cover, we see that the inner blue cardboard box is actually made of two pieces. Sliding the sleeve off, it is recommended to have the larger part of the inner box facing upwards such that when you remove it the contents do not just spill out. Here, we can see the snug fit given to the router and satellite units via the packaging, as well as the accessories, such that they are held in place during shipping and handling.
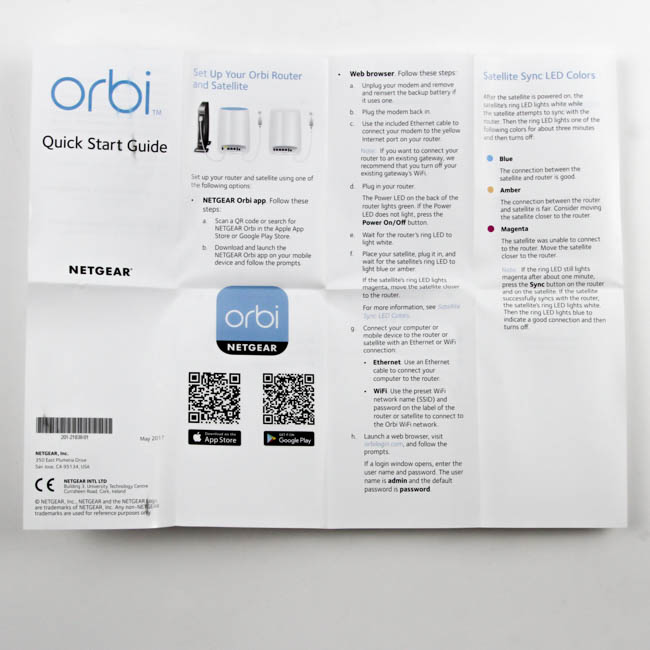


A quick start guide comes placed between the two units, and is naturally the first place to start examining things more carefully, so good placement there. I recommend keeping it close until the system is set up, if only because there are multiple ways to set up and monitor the Orbi system and you may want to be aware of your options. The guide is also good about giving you information on what the LED colors at the top of the units signify, which may save you some frustration and time. Between the two units comes also the accessory box, which houses a manual for more information about the unit as well as the relevant accessories neatly packaged in their own compartments for a flat fit. Here, we get two power adapters and two Ethernet cables, which will be used to get the system up and running.


The power adapter, in white to match everything else we have seen so far, works for a wide range of input voltages (100 to 240 V), but with a limited frequency range of 50-60 Hz. On a 110 V/60 Hz line, say, it takes in 1 A of max current for a rated power input of 60 W and outputs a max of 42 W over 12 VDC and 3.5 A. In theory, the two units could thus draw a max of 84 W in total, although power adapters tend to play it safe. I am not a fan of the plug configuration, however, since it ends up taking a lot of room sideways and could block more ports on a power adapter. If you plan to use this with a standard wall socket, you should be good to go. Another thing to note here is that the label on the adapter specifies 3.5 A whereas the product page says 2.5 A; in cases of such a discrepancy, always go with the certification label.
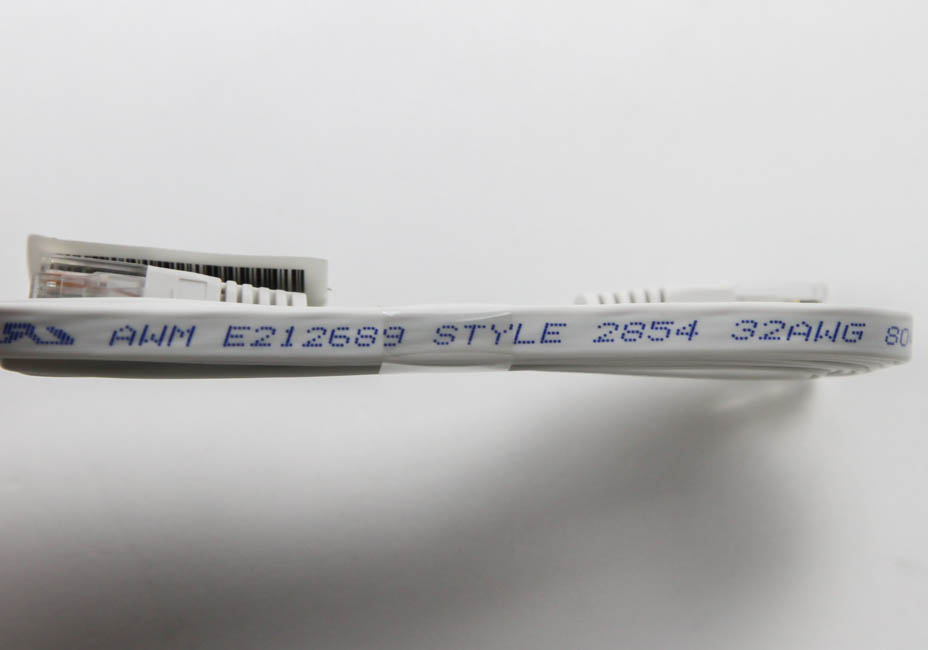
The provided Ethernet cables are flat and two meters long, which allows for a decent amount of room for cable management along a wall if needed. They terminate in a standard RJ45 connector on either end and are compatible with the 1 gigabit Ethernet LAN ports on the two units. The AWM style, 32 AWG 2854 hook-up wire used in the cable has been reliably used by other industries for harsher applications, so I am confident these two cables will work just fine.
Apr 25th, 2024 17:55 EDT
change timezone
Latest GPU Drivers
New Forum Posts
- Post your Cinebench 2024 score (450)
- Best SSD for system drive (77)
- Ubuntu 24.04 LTS released (2)
- Dell Workstation Owners Club (3054)
- Which new games will you be buying? (313)
- TPU's Nostalgic Hardware Club (18463)
- im new to throttelstop and i think i messed it up by copying others any hints would be very much aprreciated (2)
- Ryzen Owners Zen Garden (7243)
- What software are you using to monitor CPU temps during gaming session? (15)
- ROG Strix LC III 360 ARG AIO What should the pump speed be? (4)
Popular Reviews
- Fractal Design Terra Review
- Thermalright Phantom Spirit 120 EVO Review
- Corsair 2000D Airflow Review
- Minisforum EliteMini UM780 XTX (AMD Ryzen 7 7840HS) Review
- ASUS GeForce RTX 4090 STRIX OC Review
- NVIDIA GeForce RTX 4090 Founders Edition Review - Impressive Performance
- ASUS GeForce RTX 4090 Matrix Platinum Review - The RTX 4090 Ti
- MSI GeForce RTX 4090 Suprim X Review
- MSI GeForce RTX 4090 Gaming X Trio Review
- Gigabyte GeForce RTX 4090 Gaming OC Review
Controversial News Posts
- Sony PlayStation 5 Pro Specifications Confirmed, Console Arrives Before Holidays (117)
- Windows 11 Now Officially Adware as Microsoft Embeds Ads in the Start Menu (106)
- NVIDIA Points Intel Raptor Lake CPU Users to Get Help from Intel Amid System Instability Issues (106)
- AMD "Strix Halo" Zen 5 Mobile Processor Pictured: Chiplet-based, Uses 256-bit LPDDR5X (101)
- US Government Wants Nuclear Plants to Offload AI Data Center Expansion (98)
- AMD's RDNA 4 GPUs Could Stick with 18 Gbps GDDR6 Memory (87)
- Developers of Outpost Infinity Siege Recommend Underclocking i9-13900K and i9-14900K for Stability on Machines with RTX 4090 (85)
- Windows 10 Security Updates to Cost $61 After 2025, $427 by 2028 (84)