 14
NVIDIA Blueprints & NIMs to Build 3D Guided Artwork - From Prompts to Pixels
(14 Comments) »Introduction

Generative AI has rapidly moved from research labs into the hands of developers, artists, and product teams—enabling new forms of content creation for many industries, with the promise of greatly improved efficiency. But it's not so easy to get up and running, there are a lot of practical challenges: deploying large models efficiently, managing ever-changing dependencies, keeping up with hardware requirements, and maintaining reliable performance across environments.
While services like ChatGPT can make all this look very easy, doing AI work locally is complex. It will take weeks or months of setup—even for technical teams—to build a real-world application that uses modern AI models. Things commonly encountered are the massive model sizes, resolving compatibility issues with PyTorch, TensorFlow, ONNX, and CUDA, tuning for different GPU architectures, or writing custom inference code just to make a basic API call work in production.
NVIDIA Inference Microservices (NIMs) were developed to streamline and standardize the deployment workflow. These prepackaged, containerized AI models come with high-performance APIs optimized for NVIDIA hardware, and are ready for enterprise or edge deployment. Whether managing an image generation pipeline or a multimodal retrieval model, NIMs remove the burden of model serving, GPU acceleration, and scaling. They also include built-in monitoring and access control features, essential for ensuring everything runs smoothly in production environments.
In this article, we'll use a generative AI workflow powered by NIMs: we use a very basic 3D scene built in Blender that provides hints to several AI models in order to turn structured input into great-looking, stylized results. We'll cover setup, what this pipeline can and can't do, how to write effective prompts, performance benchmarks, and hardware compatibility.
What Are NVIDIA Blueprints and NIMs?


Think of NVIDIA NIMs as game-ready, pre-installed mod packs—but for AI algorithms. When you download a raw AI model, you'll have to put in substantial time to get it set up, so that your system can run them, this takes hours, sometimes days. NIMs give you a clean, optimized, plug-and-play container that "just works" on NVIDIA GPUs. NIMs are quite flexible in what they can contain, they are basically installers that have various AI components inside—like a diffusion model for generating images or a large language model for generating text—wrapped in an easy-to-use API you can invoke from your code. This provides an easy endpoint into the AI model, without having to configure everything manually.
NIMs are built and optimized by NVIDIA, so they are guaranteed to work well on their GPUs. As far as I know there is no support for running on other hardware like AMD or Intel.

Next, Blueprints, and I'll try to use a gaming analogy here, too. If NIMs are like individual characters in a co-op game—each with a specific role, like tank, healer, or DPS—then NVIDIA Blueprints are the team comp and strategy that brings them all together to win the match. Each NIM handles one job (text generation, image generation, search, etc.), but on its own, it won't get you to the objective. A Blueprint sets up the full squad: which NIMs to use, what tools connect them (like APIs, databases, or user interfaces), and how to coordinate their strengths into one smooth, working system. Just like NIMs, most Blueprints are provided by NVIDIA, but I've also seen a bunch of them from other vendors. You can browse the list of Blueprints on NVIDIA's website.
Please note that of course it is possible to build your own workloads with NIMs, limited only by your imagination. The Blueprints are intended as reference examples to help understand the mechanics of complex workloads for specific scenarios.
What This Pipeline Does (and Doesn't Do)
Text-to-image generation is one of the most popular applications of generative AI. You type in a short description—like "a spaceship flying over Tatooine at night"—and the AI produces a completely new image that tries to match your words. Tools like Stable Diffusion, Flux, and various cloud-based solutions have made this process widely accessible, especially for artists, designers, and game developers looking to quickly visualize ideas. These systems all have one weakness though, they rely entirely on the textual prompt to decide what's in the image, how it's laid out, and how it looks stylistically.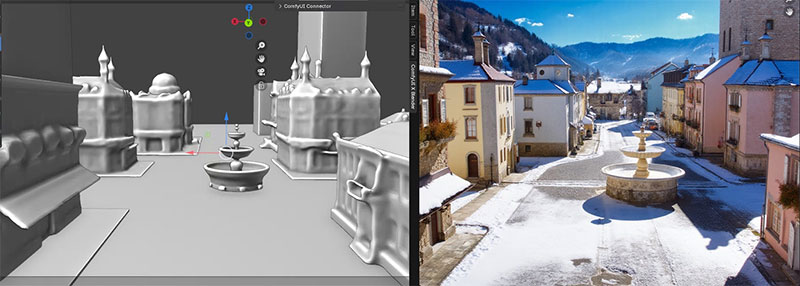
If you've ever worked with an AI-powered chatbot or image generator, you've probably wondered: "Can't I just give you a rough sketch or layout to show what I mean?" That's exactly the gap this pipeline fills—but instead of needing to draw, you build a simple 3D scene in Blender. This gives you total control over layout, camera position, and object placement, which the AI then uses as a visual guide. Traditional text-to-image tools rely entirely on the prompt, often giving unpredictable results when you want something specific. By feeding in a structured 3D scene alongside your prompt, this pipeline lets you steer the output much more precisely.
Under the hood, the 3D scene you create in Blender is converted into a simplified view that captures its basic structure—like where objects are in space and how far they are from the camera. The resulting output is called a "depth map"—it does not include textures or lighting, but acts like a grayscale sketch showing where stuff is and how it's shaped.

That visual guide is then passed into a system powered by the generative AI, which uses it to control how the final image is composed. Alongside this, your text prompt provides the creative input—telling the AI what kind of scene to render, what style to use, and what elements should appear. The result is a blend of both: the structure comes from the 3D scene, and the look and feel come from the prompt.
The more technical explanation is that Blender generates the depth map, based on your 3D input. Flux.dev acts as the orchestration layer, taking the 3D-derived layout image and routing it into a ControlNet-compatible pipeline. It handles the formatting, preprocessing, and scheduling needed to integrate the depth-based composition guide with a prompt-driven generative model. The ControlNet module itself extends the base diffusion model by conditioning the generation process on external inputs—such as depth, pose, or edge maps—allowing spatial information from the 3D scene to constrain and guide how the image is rendered. ComfyUI serves as the modular inference runtime, providing a node-based interface for chaining together model components (like text encoders, ControlNet, and the base diffusion model) in a visually configurable graph. This allows for flexible experimentation and adjustment of weights, styles, and input influence—without touching low-level code.

That data is passed into Flux.dev, which uses ControlNet to guide a diffusion model running in ComfyUI. Meanwhile, your text prompt provides the style, subject, and thematic details. The AI model blends both inputs: the depth map anchors the composition, and the prompt defines how it looks, resulting in an image that's both visually coherent and creatively styled.
Our Patreon Silver Supporters can read articles in single-page format.
Nov 22nd, 2026 17:28 CST
change timezone
Latest GPU Drivers
New Forum Posts
- UPS what one to get? (48)
- Honestly, do you care about GTA VI? (265)
- Your PC ATM (36458)
- Gacha Games - Discussions, Pulls, Updates, etc. (1157)
- Last game you purchased? (1414)
- Making a game in Godot engine (19)
- Intel D270 (5)
- X870E AORUS ELITE WIFI7 thread with setting and OC (69)
- Gigabyte Aorus Master X570 settings / 7900XTX / 5950x /32GB Samsung B-die (13)
- Asus TUF Gaming X870-PLUS WIFI Optimization (2)
Popular Reviews
- Microsoft Surface Laptop Ultra Review - The Next-gen Arm Laptop
- Corsair RM1200e (Second Generation) Review
- Pulsar Office Tour & First Look at P1 Dual-Sensor Mouse
- Upcoming Hardware Launches 2027 (Updated Nov 2026)
- Ugreen NASync DXP4800 GT Review
- AMD Ryzen 7 9800X3D Review - The Best Gaming Processor
- Biwin Black Opal NV7400 2 TB Review
- AMD Zen 6 Technical Deep Dive
- Phantom Blade Zero Performance Benchmark Review - 35 GPUs Tested
- AMD Ryzen 7 5800X3D 10th Anniversary Review
TPU on YouTube
Controversial News Posts
- NVIDIA Co-Founder and CEO Jensen Huang Officially Resigns (492)
- Report: Jensen Huang Eyes NVIDIA Comeback (266)
- Open Letter Asking NVIDIA to Reinstate Jensen Huang Passes 115,000 Signatures (184)
- OpenAI CEO Argues Home PCs Waste the World's Limited DRAM Supply (152)
- NVIDIA Launches Investigation Into Jensen Huang's Relationship With Suspected Chinese Spy (136)
- Intel "Raptor Lake Next" 16-Core and 20-Core CPUs Surface (130)
- NVIDIA GeForce RTX 50-Series Scheduled for up to $500 Price Hike This Week (89)
- Intel Razor Lake Gets a 12 P-Core bLLC Chip With No E-Cores, Per Leak (86)