 20
20
Raijintek Pan Slim ITX Review
Assembly & Finished Looks »Raijintek EOS 240 RBW - Liquid AIO Cooler


Raijintek was kind enough to also provide us with the EOS 240 RBW, which is a 240 mm AIO cooler. It ships in a full-color box with an image of the cooler and specifications. The unit itself and all its parts are held in place inside a shaped cardboard box with a foam layer on top.


The EOS 240 RBW ships with all the mounting hardware you would need for a modern Intel or AMD socket. All the bags are clearly labeled, which makes it easy to sort out just those you need. A detailed manual goes over the assembly for each socket as well.

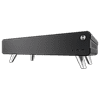
The AIO itself comes with braided tubing for added protection and a very compact CPU block compared to some other brands out there owing to the somewhat unique setup of the pump having been integrated into the radiator.


The base is made out of copper, square, and secured by silver screws. On the top is a design with a Raijintek logo to cap it off. You may pop it off and rotate it to have the logo upright regardless of your internal system layout. As the only electronic element within the CPU block is the RGB lighting, only a single cable that is meant to be daisy-chained with the fans or connected directly to your 5 V header on your motherboard is included. Unfortunately, Raijintek uses a proprietary connector housing, which makes sharing a single header with non-Raijintek components difficult.


The two 120 mm fans have center-mounted RGB LEDs and opaque blades with little finned edges for better performance. The corners of these cooling units are lined with rubber as an anti-vibration measure, and each has two leads; for the proprietary 5 V RGB plug and 3-pin motherboard connector for the fan itself.


Assembly is really straightforward. Simply use the universal backplate with the mounting pins and spacer screws to secure it around the socket of your motherboard. With that done, place the right mounting frame for your socket on the CPU block. Screw it down with the large thumb screw for tight contact with your processor. Naturally, do remove the protective film and use the included thermal paste.
Sep 20th, 2024 21:03 EDT
change timezone
Latest GPU Drivers
New Forum Posts
- Next-Gen GPUs: What Matters Most to You? (59)
- TPU's Nostalgic Hardware Club (19008)
- Which RAM to choose for AMD 7950X3D and keep a 1:1 ratio (39)
- Horizon Zero Dawn Remastered: Speculation, Assumptions? (62)
- Game Not Launching (Windows 11, Nvidia Graphics) (1)
- Is Microsoft Deliberately Limiting AMD CPU Performance? (129)
- LG OLED club (34)
- It checks out as authentic (45)
- Free Games Thread (4049)
- Advise me before buying (48)
Popular Reviews
- Final Fantasy XVI Performance Benchmark Review - 35 GPUs Tested
- Fractal Design Era 2 Review
- TerraMaster F4-424 Review
- Warhammer: Space Marine 2 Performance Benchmark Review - 35 GPUs Tested
- HYTE Y70 Review
- Warhammer 40000: Space Marine 2 Handheld Performance Review
- Gigabyte C102 Glass Ice Review
- Upcoming Hardware Launches 2024 (Updated Jul 2024)
- Colorful iGame Loong Edition DDR5-7200 32 GB CL32 Review
- AMD Ryzen 9 9950X Review - The New Flagship
Controversial News Posts
- AMD Confirms Retreat from the Enthusiast GPU Segment, to Focus on Gaining Market-Share (255)
- Sony Reveals the PlayStation 5 Pro, Launches November 7th (179)
- AnandTech Shuts Down, an Icon of Tech News and Reviews Rides into the Sunset (151)
- AMD Ryzen Branch Prediction Optimizations Now Available to Windows 11 23H2 (131)
- Cyberpunk 2077 Update Adds AMD FSR 3 and Frame Generation for PC Players (120)
- AMD Ryzen 5 7600X3D Launched in the US as a MicroCenter-exclusive for $300, Part of a Bundle (116)
- Report: Intel Could Spin Out Foundry Business or Cancel Some Expansion Plans to Control Losses (113)
- NVIDIA's RTX 5060 "Blackwell" Laptop GPU Comes with 8 GB of GDDR7 Memory Running at 28 Gbps, 25 W Lower TGP (108)