Wednesday, March 16th 2022

EK Water Blocks Announces Flexible Leak Tester

EK, the premium liquid cooling gear manufacturer, is releasing a new leak tester purposed for PC liquid cooling. EK-Loop Leak Tester Flex is a fast and safe way to test for possible leaks in your custom water cooling loop. While traditional leak testing works, it is slow and requires actual liquid leaks in order to diagnose the issue. Using air as a test for leaks, does the job way faster, less messy, and ultimately just better.

Traditional leak testing requires the user to fill up the entire loop with coolant, wrap joints with paper towels, and wait for hours constantly checking if any of the paper towels are wet. With air testing with the help of a leak tester, the user doesn't have to fill the loop, allowing much easier disassembly in case of a component leaking, way fewer risks for the PC hardware, and to top it off, less hassle and time spent for the user.
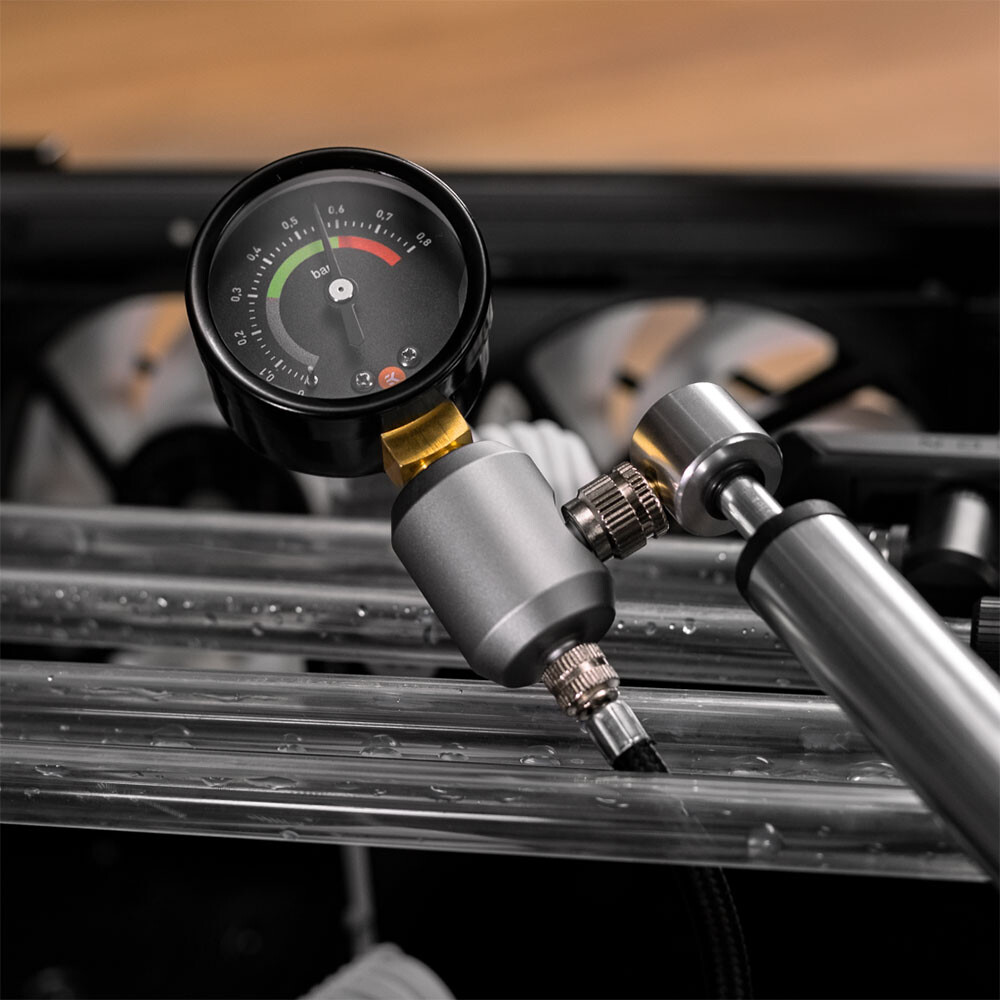
EK-Loop Leak Tester Flex has a flexible tube on one end, allowing you to easily reach any port in your loop and avoid stressing it when pumping. It is fitted with a revolvable male G1/4" connection port so it can be directly screwed into any standard G1/4" port in your liquid cooling loop. The other end is hooked up with a non-return valve which will make sure that no air is escaping through the tester unit itself. A small pump for pressurizing the loop is also included.

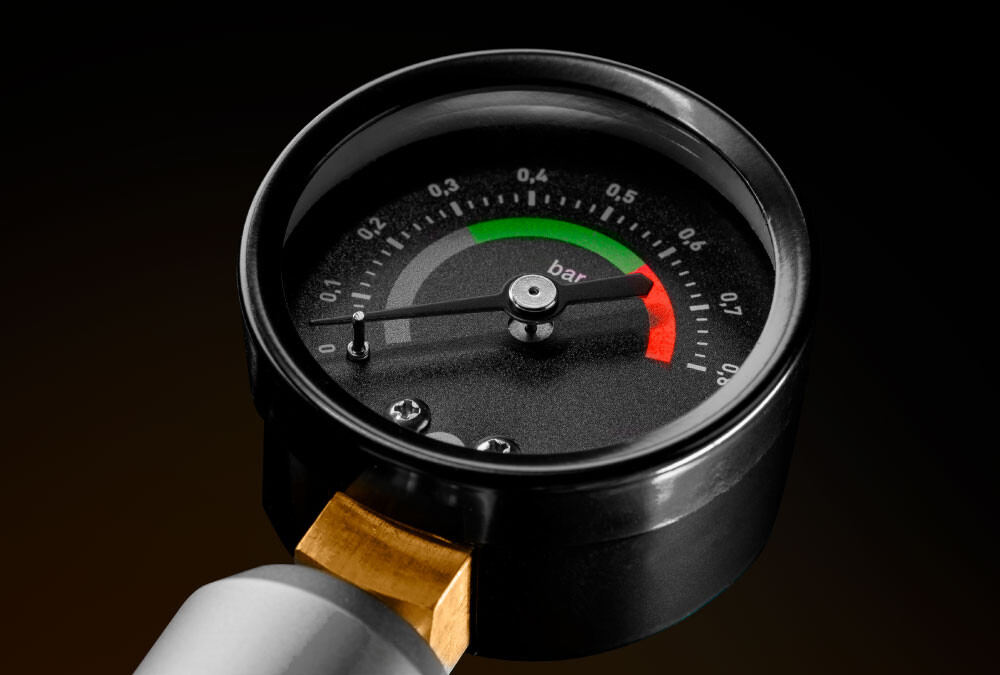
The top-mounted pressure gauge is custom made for liquid cooling loop testing purposes which clearly marks the safe pressure for testing. In order to prevent damage to your liquid cooling loop, keep the pressure only in the predefined zone marked on the gauge. Please read the user manual before using the EK-Loop Leak Tester Flex.

The EK-Loop Leak Tester Flex is available for purchase through the EK Webshop and Partner Reseller Network. In the table below, you can see the manufacturer suggested retail price (MSRP) with VAT included.

MSRP: 29.90€. For more information, visit this page.
Add your own comment

20 Comments on EK Water Blocks Announces Flexible Leak Tester

#1
tabascosauz
Just my luck that they wait till now :rolleyes: the old leak tester is good but it's a pain to have to prop or hold it up all the time so as not to strain my rotary drain valve with its weight
Posted on Reply
#2
Haile Selassie
tabascosauzJust my luck that they wait till now :rolleyes: the old leak tester is good but it's a pain to have to prop or hold it up all the time so as not to strain my rotary drain valve with its weight
Yes, a sh!t design is a sh!t design.
"So, let's overcomplicate the design and do a big PR stunt around it instead of fixing the glaring issue." seems to be the motto of this company.
Posted on Reply
#3
DeathtoGnomes
The only drawback of using air is that if there is a small leak, you wont be able to tell exactly where it is.
Posted on Reply
#4
Valantar
Looks like a nice redesign - the long, flexible tube connecting to the system is a nice change. Not quite sure about the pump being attached directly to the housing, but I guess it works, and it might minimize the issues people have of pump-side leaks/pressure drops. Removing the need for a manual shut-off valve is also a nice addition. Overall the unit looks easier to handle, looks better, and seems to have fewer points of failure (as long as that non-return valve works well). Should be a good upgrade, though definitely not worth ditching my perfectly fine current unit for.
Posted on Reply
#5
skizzo
DeathtoGnomesThe only drawback of using air is that if there is a small leak, you wont be able to tell exactly where it is.
exactly what I thought clicking on this article. got me thinking of find leaks in inflatable tubes, you put them in water to see where the bubbles will form.....I think we all can advise against dunking your entire PC in the bathtub to find out where that slow leak is forming lol. you're still gonna have to fill the loop and find that joint(s) that's slowly leaking like a faucet that drips a tablespoon of liquid an hour
Posted on Reply
#6
huggi
DeathtoGnomesThe only drawback of using air is that if there is a small leak, you wont be able to tell exactly where it is.
It's still much more convenient to do a 15 minute air test than a full leak test. If there's no air leaks, you're good to go. If there is a leak, then you do the leak test or you can try a bit of water mixed with dishwashing soap and wet around the fittings so that any air leaks will create bubbling.
Posted on Reply
#7
Unregistered
So the best way is still to fill it, pressurise the res and see if it leaks from any joints.
DeathtoGnomesThe only drawback of using air is that if there is a small leak, you wont be able to tell exactly where it is.
Exactly.
#8
DeathtoGnomes
TiggerSo the best way is still to fill it, pressurise the res and see if it leaks from any joints.
yes and no, using air will tell you there is a leak, but it wont show you where it is, using water will pinpoint where it is.
Posted on Reply
#9
Unregistered
DeathtoGnomesyes and no, using air will tell you there is a leak, but it wont show you where it is, using water will pinpoint where it is.
What if fluid lvl in res goes down with NO apparent leaks? I get that there must be a leak from somewhere, but no drips, or water under case or visible moisture anywhere in the case.
#10
Valantar
skizzoexactly what I thought clicking on this article. got me thinking of find leaks in inflatable tubes, you put them in water to see where the bubbles will form.....I think we all can advise against dunking your entire PC in the bathtub to find out where that slow leak is forming lol. you're still gonna have to fill the loop and find that joint(s) that's slowly leaking like a faucet that drips a tablespoon of liquid an hour
From my experience using one of these, the "where is my leak?" troubleshooting steps are as follows:
- Listen for hissing noises (effective most of the time)
- Going over and tightening all fittings by hand (in case something was missed)
- Taking out a bowl of soapy water and carefully rubbing some along various joins where you suspect it might be leaking (nearly 100% effective, unless your leak is somewhere really weird)

If you can't find your leak using any of these, your loop likely needs a complete teardown anyway.
Posted on Reply
#11
ThrashZone
DeathtoGnomesThe only drawback of using air is that if there is a small leak, you wont be able to tell exactly where it is.
Hi,
Well if you were a plumber you'd use a soap and water solution and spray it on the joints and look for bubbles
Not very practical around electrical equipment :laugh:

So yeah air pressure testing is a unnecessary process if using soft tubing and barb fitting
Might be useful in hard pipping seeing there is more chances of assembly error but then again hard tubing is something I'd never use it's to much trouble to do simple tasks like changing thermal paste/...
But then again I also love QDC's so removing swapping gpu/ cpu/.. is effortless, blasphemous I know not buying ek trivial unneeded assessors :laugh:
Posted on Reply
#12
skizzo
ValantarFrom my experience using one of these, the "where is my leak?" troubleshooting steps are as follows:
- Listen for hissing noises (effective most of the time)
- Going over and tightening all fittings by hand (in case something was missed)
- Taking out a bowl of soapy water and carefully rubbing some along various joins where you suspect it might be leaking (nearly 100% effective, unless your leak is somewhere really weird)

If you can't find your leak using any of these, your loop likely needs a complete teardown anyway.
So I was going off the assumption you cannot fit your head into the case close enough to tell exactly which joints may have the leak, like it's not powerful/big enough of a leak to hear, or even feel with your hands. But, good point, I forgot about the soapy water method which is a good one I think. which, @ThrashZone, this method would be fine around electronics taking the necessary precautions. The proper way to test a loop is to not have any power to the motherboard/system. You should only power the pump with an auxiliary PSU, a spare one you keep around for such occasions. water and electricity don't mix, but an electronic part getting wet isn't the end of the world usually as long as it isn't currently receiving power when it gets wet. if it is given the opportunity to dry before being powered on again, you are in the clear
Posted on Reply
#13
Valantar
skizzoSo I was going off the assumption you cannot fit your head into the case close enough to tell exactly which joints may have the leak, like it's not powerful/big enough of a leak to hear, or even feel with your hands. But, good point, I forgot about the soapy water method which is a good one I think. which, @ThrashZone, this method would be fine around electronics taking the necessary precautions. The proper way to test a loop is to not have any power to the motherboard/system. You should only power the pump with an auxiliary PSU, a spare one you keep around for such occasions. water and electricity don't mix, but an electronic part getting wet isn't the end of the world usually as long as it isn't currently receiving power when it gets wet. if it is given the opportunity to dry before being powered on again, you are in the clear
You could also do what I did the last time I changed my loop: assemble everything, attach the leak tester, see it lose pressure immediately, spend literally 30 minutes going through all of those steps before realizing that the connection between the air pump and pressure gauge was loose. Not my proudest moment :p This new design looks like it would minimize the chances of that happening though.

As for fitting your head into the case to listen, a funnel over your ear (wide end, not the narrow one - ouch!) makes for a passable DIY mechanics' stethoscope (unless you happen to have one of those), allowing for decent pinpointing of sound sources by ear alone.
Posted on Reply
#14
ThrashZone
Hi,
Radiator is the only item worth using an air pressure tester on
But you sure don't need to install the rad first to use it that way kind of stupid to do it that order

Besides before you install a rad you'd want to clean/ flush the rad and by then you'd notice a leak if it had one.
So air testing may make you feel better but just a waste of time to an already long process of cleaning dirty radiators.

But if you listen to ek you don't need to clear their radiators just buy their air tester :laugh:
Posted on Reply
#15
Valantar
ThrashZoneHi,
Radiator is the only item worth using an air pressure tester on
But you sure don't need to install the rad first to use it that way kind of stupid to do it that order

Besides before you install a rad you'd want to clean/ flush the rad and by then you'd notice a leak if it had one.
So air testing may make you feel better but just a waste of time to an already long process of cleaning dirty radiators.

But if you listen to ek you don't need to clear their radiators just buy their air tester :laugh:
My EK PE (that is now retired, but was in service for something like four years) didn't really need flushing - I did give it a simple flush, but it was pretty much squeaky clean from the factory. That's of course just one experience, and several years ago. The same was mostly true for my current Corsair XR5. Though given how I flush radiators I definitely wouldn't notice if they had a leak at that point - flushing happens in the sink, with tons of spilling and mess all around.

But regardless of this, where's the harm in using a pressure tester to ensure that everything is securely clamped down? It's a cheap and easy safety valve to avoid the terror that can come from filling a newly assembled loop. Saves you a ton of paper towels too! Put it this way: no matter how many times you check everything, there's always a chance you've forgotten something or made some silly ovesight. A single pass of pressure testing tells you what you need to know: whether or not air - and thus also water - will escape from the loop under moderate pressure.

It's not necessary, but it's very nice to have, taking the guesswork out of safe assembly.
Posted on Reply
#16
ThrashZone
Hi,
No harm just more expense
Hell you can make one from home depot parts or any hardware store.

Besides shaking rads clean never works
I setup a loop outside the case and do all flush plus use a filter to catch the crap so yeah it's a tad different lol

This is just a simple designed mora 360 but i clean all rads like this
Live and learn how to really test items and clean them
Posted on Reply
#17
Valantar
ThrashZoneHi,
No harm just more expense
Hell you can make one from home depot parts or any hardware store.

Besides shaking rads clean never works
I setup a loop outside the case and do all flush plus use a filter to catch the crap so yeah it's a tad different lol

This is just a simple designed mora 360 but i clean all rads like this
Live and learn how to really test items and clean them
I've never had any gunk buildup in any of my cold plates, so clearly my rads have been sufficiently clean. I also never said I shake them clean - typically I run a hose straight from the tap and into the rad, which has far more pressure than any pump will produce, and should get out anything that's in there. No need for a filter either when it's going down the drain. If there's corrosion I just hook up my spare pump/res and run it with some white vinegar for an hour or two before flushing it out, which was sufficient to clean out a rad i had lying around unused (still damp inside!) for a literal decade.

And sure, you could make your own pressure tester - nobody has said you can't - but good luck doing so with G1/4 compatible components at a manageable size without spending more than the cost of this or spending hours sourcing and assembling everything. The gauge, valves and connectors are likely easily found, but a pump that can be fit onto that easily? Yeah, that's not a standard hardware store part. So, a bike pump plus a hose to connect it? Starting to sound very practical, this.

So, this might not be for you, but it's an incredibly handy thing to have around, and it's by far the best way to reduce the stress and risk of assembling a loop and ensuring that it's leak free. In light of a decent loop costing hundreds of dollars, and this being reusable essentially forever, €30 is a pretty low price for that imo.
Posted on Reply
#18
ThrashZone
Hi,
Sadly you don't know how complex radiators are so there's no use in trying to talk to you.
Posted on Reply
#19
Valantar
ThrashZoneHi,
Sadly you don't know how complex radiators are so there's no use in trying to talk to you.
Complex? Lol. Sure, you have different flow patterns, port layouts, materials, pressure tolerances, etc., but ultimately it's two or more tanks, a couple of ports, some tubes between the tanks, and some fins soldered to the tubes. Hardly a very complex thing, even if the assembly process can leave them quite dirty (and poor qc can leave you with a leaky unit). Radiators are simple things with few points of failure once properly assembled and tested.

And frankly I don't see how this is relevant to the product at hand - it's for testing entire loops, not just radiators. Loops have far more points of failure, far more room for human error, and thus necessitate care in building. This eases that burden on builders a tad, for a price that's mostly negligible compared to the cost of a loop.
Posted on Reply
#20
sollord
tabascosauzJust my luck that they wait till now :rolleyes: the old leak tester is good but it's a pain to have to prop or hold it up all the time so as not to strain my rotary drain valve with its weight
Ya I replaced the fitting with a rotary one from xspc because of how much the included one sucks
Posted on Reply
Add your own comment
May 17th, 2024 22:46 EDT change timezone

New Forum Posts

Popular Reviews

Controversial News Posts