 0
0
Quick Look: Saramonic BlinkMe Smart Wireless Microphone System
Introduction
Shenzhen Jiayz Photo Industrial. Ltd. was founded in 2007 and specializes in the manufacturing and supply of photographic accessories such as image stabilization systems as well as sound input/output systems for mainstream media, media studios, and photo/video enthusiasts alike. It has three brands including Saramonic whose claim to fame are products including wireless one-to-two interview microphones, lavalier microphones, GoPro microphones, camera mixers/preamplifiers, and recording pens. A marketing representative reached out to us to see if we would like to cover its latest offering that targets content creators and thus here we are taking a quick look at the new Saramonic BlinkMe microphone system.

The Saramonic BlinkMe is a portable dual channel wireless microphone system that consists of two transmitters, each with a touch screen, and a receiver that doubles up as a charging dock too. You would plug the receiver to your camera, or even use the system as-is for on-board recording, and then have up to two separate channels for audio inputs allowing you to easily conduct interviews at, say, Computex, or just have better audio when capturing video from a camera. The wireless transmitters have their own batteries and Saramonic boasts of many features including a highly customizable app to make the most of the BlinkMe for professional use too. Let's thank Saramonic for providing a review sample to TechPowerUp as we aim to find out more about the BlinkMe in this quick look article beginning with a look at the product specifications below. Be sure to click the image twice to fully open it and go through all the details.

Packaging and Accessories


The Saramonic BlinkMe, which you will notice is also referred to as BlinkMe B2, ships in a relatively compact and dense product box. On the front is the brand and product name along with salient features and a render of the microphone system. This continues on the back with more illustrations in addition to a useful list of contents inside and a reminder to use the first-party app. Open the box from the top or bottom to reveal a second cardboard box that also has renders on it and opens from the side to reveal some paperwork right away. We get a detailed user manual (online copy here) as well as a handy quick start guide that goes over the app too. A warranty card and two stickers complete this section.


Saramonic provides a useful storage/carry case for the BlinkMe which makes it more likely that people will actually take this with them for use on the go. It's a hard case with a durable outer fabric that is branded on the top, has a nice carry handle, and comes with an oversized zipper to make it easy to open/close the case. Inside we find the BlinkMe system itself in a thick foam sheet that has a machined cutout to snugly protect it and other accessories are in a separate compartment to the top, as seen above.


We get screen protectors for the two transmitters as well as the screen on the receiver unit, two faux fur windshields for the microphones in the transmitters, a short USB Type-A to Type-C cable for data and charging, a short 3.5 mm TRRS to 3.5 mm TRRS audio cable to connect the receiver to your camera, two magnetic clips, a magnetic 1/4" cold shoe adapter, and four magnet disks. There's also a slightly flexible dock/holder with a 1/4" thread that you can place the BlinkMe into and hold via a tripod, for example, or even any phone holder accessory.
Closer Look and User Experience


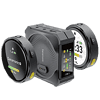
The Saramonic BlinkMe comes with the two round transmitters and the rectangular cuboid receiver packed together. Indeed, you will see that the receiver is also a storage/charging dock using magnetic pins to hold and charge the two transmitters on either side to make for a fairly compact solution. Be sure to peel off the sticker on the pins and charge everything fully before using. The transmitters are ~47 x 47 x 12.5 mm in size and weigh ~30 g each whereas the receiver comes in at 56.5 x 56.5 x 25 mm and 70 g in mass.


There's the expected condenser microphone in each transmitter that you can place the fur windshields over as well as a dedicated power button and a noise reduction (NR) button. The power button also helps lock/unlock the screen whereas the NR button can also be used to toggle onboard recording as well as to mute/unmute the microphones. The receiver has more going on as expected including the expected 3.5 mm TRRS analog audio output that is auto-sensing and switches to TRS depending on the connection. Next to it is a 3.5 mm headphone jack allowing you to plug in headphones/IEMs to monitor the audio being sent from the transmitters—it's not a powerful connector so plug in something less demanding—as well as the Type-C port to charge the combo and transfer data via a wired connection. The opposite side has a power button that also helps lock/unlock the integrated display in addition to +/- buttons to raise/lower the output gain levels of the receiver in 3 dB increments from +12 to -12 dB on the fly. The third side has the touch screen itself which is rectangular in shape and 0.96" diagonal in size. It has a dedicated button on the side to help go through the menu and an indicator LED above (or below, depending on how you place it).


The 1.3" round TFT LCD displays in the touch screen integrated on the transmitters are more vibrant and responsive thankfully. There is also an indicator LED here helping visualize the pairing status as well as the battery level during charge/discharge cycles. When charging everything the screen on the receiver is probably much easier to use though.

Here is a GIF going through the onboard menu on the transmitters, which does seem to take some inspiration from smart watch dials. It's quite intuitive with swipes and the provided paperwork helps in case there is any confusion. There is onboard recording available courtesy an 8 GB flash module in each transmitter and battery life is on the order of 5 hours if you do this which increases to 8 hours if you go with a pure transmitter mode that sends the audio data to the receiver and, in turn, the client device itself. The receiver has a battery life of 24 hours and can charge a transmitter module completely from zero to 100% if needed. These are also contingent on the display brightness and gain levels used.


Using the BlinkMe is quite simple courtesy the magnets used. I had the receiver connected via the cold shoe mount to my test camera—the Insta360 OneR—and the transmitter can be secured via magnet clips to anything you wish to record. The receiver screen can also be turned around depending on if you are vlogging/streaming or recording someone else. You can choose to have single (mono) or dual channel (stereo or redundancy) audio inputs too and the recordings have minimal latency to make it easy to sync with the video channel too. I was also impressed with the audio quality outdoors as well as the range on offer—I asked a friend to wear one and walk away from me until I lost the signal in an open field and we measured a 91 m distance between us at the time which is close enough to the rated 100 m by Saramonic. The microphones are highly sensitive though so I would recommend turning down the gain when indoors unless you are covering a busy trade show, for example. Compared to my Rode Wireless Go II system that I also have here, I personally thought the BlinkMe did a better job with noise reduction as well as offered more options and features on the device. Where the Rode system takes an edge is with its accessory ecosystem—I can purchase a interview microphone dummy holder that I can plug the Wireless Go II transmitter into, for example, rather than having to clip it on someone's shirt each time.

The home page of the receiver's screen allows you to see how many transmitters are paired—they automatically pair when removed from the dock, or can be manually paired too—and the current operating status and battery level. You can also see if the receiver is in stereo/mono/safety channel mode, the current transmitter input gain level and receiver output gain level, the connection strength between the devices, the audio level, whether or not recording is on and also whether any of the microphones are muted. This is a lot of info to be placed on a relatively small screen so you will have to get familiar with how these come and go depending on the use case. There is a simpler menu here too with options such as changing the gain level, display brightness, operating mode etc.


The Saramonic BlinkMe is also supported by a first-party mobile app available for both Android and iOS. I do recommend going through the quick start guide here if you need to better understand the features on offer. You will be prompted to open an account unfortunately, but you don't need to do anything with it so just open a temporary email address unless you wish to have the settings saved on the user account. The app allows you to change the button assignment as well as add custom themes to transmitter screens. It's one way to personalize the BlinkMe but ultimately I never found the app to be a must-have.
There is a lot you can do with the Saramonic BlinkMe, and this article will hopefully be of interest to content creators interested in a wireless microphone system such as this one. I do think the BlinkMe offers a cohesive package you can use in a variety of applications and is quite competitive in the market too. It costs $249 from the Saramonic US store and slightly less if you were to purchase it from the Saramonic Aliexpress store. However, other regions seem to get the shaft with prices much higher including in the UK where the official store asks for £290 (inc. VAT). Street pricing is lower and yet not as good a deal as in the USA, so all I can say is Saramonic needs to work more on pricing parity.
May 29th, 2024 04:27 EDT
change timezone
Latest GPU Drivers
New Forum Posts
- Looking for recommendations to upgrade the GPU (49)
- Core counting (20)
- Liquidextasy waterblocks (60)
- be quiet! Customer Service - so far is absolutely awesome. (6)
- 2022-X58/1366 PIN Motherboards NVME M.2 SSD BIOS MOD Collection (690)
- Bright flashing lights in 3Dmark Port Royal (7900XT) (0)
- Question about controller thumbsticks (replacement) (3)
- Would you pay more for hardware with AI capabilities? (80)
- 7950x idle question (10)
- AMD Radeon Pro v540 Research Thread (270)
Popular Reviews
- Upcoming Hardware Launches 2024 (Updated May 2024)
- Lian Li O11 Dynamic EVO XL Review
- Senua’s Saga: Hellblade II: DLSS vs. FSR vs. XeSS Comparison Review
- Senua's Saga: Hellblade II Performance Benchmark Review
- Montech Titan Gold 1000 W Review
- Waizowl OGM Cloud Review
- Ghost of Tsushima Performance Benchmark Review - 35 GPUs Tested
- Montech HyperFlow ARGB 240 AIO Review
- Ghost of Tsushima: DLSS vs. FSR vs. XeSS Comparison Review
- AMD Ryzen 7 7800X3D Review - The Best Gaming CPU
Controversial News Posts
- AMD to Redesign Ray Tracing Hardware on RDNA 4 (227)
- NVIDIA to Only Launch the Flagship GeForce RTX 5090 in 2024, Rest of the Series in 2025 (154)
- AMD Hits Highest-Ever x86 CPU Market Share in Q1 2024 Across Desktop and Server (140)
- AMD RDNA 5 a "Clean Sheet" Graphics Architecture, RDNA 4 Merely Corrects a Bug Over RDNA 3 (139)
- NVIDIA RTX 5090 "Blackwell" Founders Edition to Implement the "RTX 4090 Ti" Cinderblock Design (108)
- AMD Ryzen 9 7900X3D Now at a Mouth-watering $329 (104)
- Core Configurations of Intel Core Ultra 200 "Arrow Lake-S" Desktop Processors Surface (101)
- Biden Administration to Revive Trump-Era Tariffs on China-made GPUs and Motherboards (95)