• Welcome to TechPowerUp Forums, Guest! Please check out our forum guidelines for info related to our community.
  • The forums have been upgraded with support for dark mode. By default it will follow the setting on your system/browser. You may override it by scrolling to the end of the page and clicking the gears icon.

How to Create a Universal Windows 7 Disc (AIO) with both 32 and 64-bit versions.

Status
Not open for further replies.

newtekie1

Semi-Retired Folder
Joined
Nov 22, 2005
Messages
28,473 (4.00/day)
Location
Indiana, USA
Processor Intel Core i7 10850K@5.2GHz
Motherboard AsRock Z470 Taichi
Cooling Corsair H115i Pro w/ Noctua NF-A14 Fans
Memory 32GB DDR4-3600
Video Card(s) RTX 2070 Super
Storage 500GB SX8200 Pro + 8TB with 1TB SSD Cache
Display(s) Acer Nitro VG280K 4K 28"
Case Fractal Design Define S
Audio Device(s) Onboard is good enough for me
Power Supply eVGA SuperNOVA 1000w G3
Software Windows 10 Pro x64
What you will need:
  • Windows 7 x86 Disc or ISO(Version doesn't matter, the disc/ISO actually contains them all, I'll be using a Home Premium ISO)
  • Windows 7 x64 Disc or ISO(Version doesn't matter, the disc/ISO acutally contains them all, I'll be using a Home Premium ISO)
  • The Windows Automated Installation Kit(AIK) for Windows 7
  • IMGBurnIMGBurn's installer now contains malware and will install Conduit Search if you do not uncheck the boxes when you install IMGBurn.
  • 7Zip or some other software to extra ISO images if you are using ISO images instead of physical disc.


1.) Create two folders in the root of the C drive called "Win 7 x86" and "Win 7 x64".

2.) Extract the ISO images, or copy the files from the real discs, into their respective folders.

3.) Run WAIK command prompt (Deployment Tools Command Prompt) As Administrator (Start > All Programs > Microsoft Windows AIK > Deployment Tools Command Prompt).
Win7universal1.png


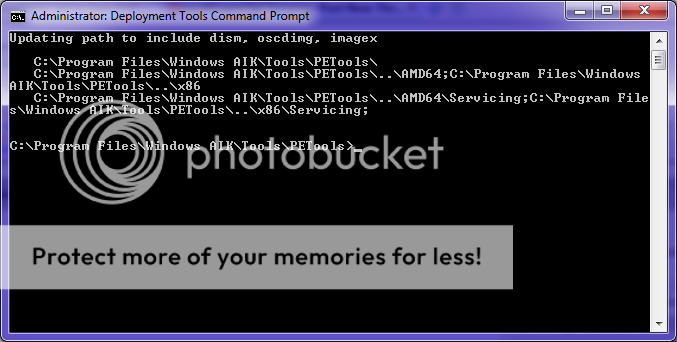
4.) Now execute the following commands:

Code:
imagex /export "c:\Win 7 x64\sources\install.wim" 1 "c:\Win 7 x86\sources\install.wim" "Windows Home Basic"
imagex /export "c:\Win 7 x64\sources\install.wim" 2 "c:\Win 7 x86\sources\install.wim" "Windows Home Premium"
imagex /export "c:\Win 7 x64\sources\install.wim" 3 "c:\Win 7 x86\sources\install.wim" "Windows Professional"
imagex /export "c:\Win 7 x64\sources\install.wim" 4 "c:\Win 7 x86\sources\install.wim" "Windows Ultimate"
Win7Universal2.png


5.) Now navagate to "C:\Win 7 x86\sources\" in explorer, and delete ei.cfg.

The Win 7 x86 folder now contains a universal Windows 7 install that will allow you to install any version of Windows 7 in both x86 and x64 flavors. But we need to make it a bootable ISO image to really make it useful.

6.) Start up IMGBurn and select "Create image file from files/folders".
Win7Universal3.png


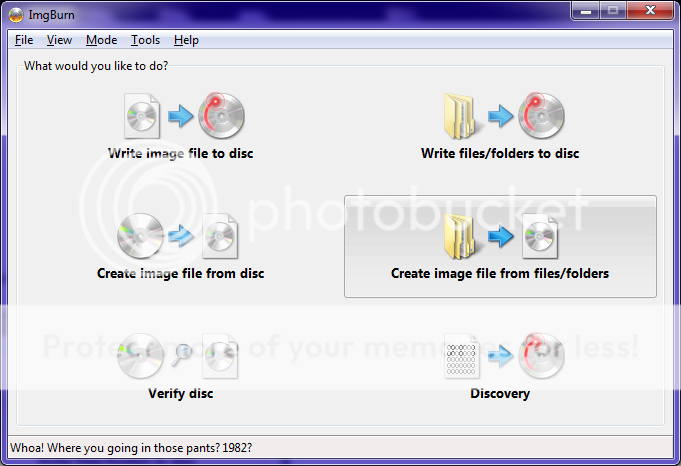
7.) Add the "C:\Win 7 x86" folder to the Source box.
Win7Universal4.png


8.) Go to the "Advanced Tab" and select the "Bootable Disc" tab under that.
Win7Universal5.png


9.) Check the "Make Image Bootable" box.
Win7Universal6.png


10.) Point the "Boot Image" path to "C:\Win 7 x86\boot\etfsboot.com"
Win7Universal7.png


11.) Change the "Sectors to Load" option from 4 to 8.
Win7Universal8.png


12.) Click on the "Options" tab and change the file system to "UDF".
Win7Universal10.png


13.) Click on the "Labels" tab and enter a label.
Win7Universal11.png


14.) Now click the "Build" button.
Win7Universal9.png


15.) Select where to save the file and what to name it when prompted.

16.) Let it build the iso file.

You now have an ISO image file that you can either burn to a DVD, it is still under 4GB so you can fit it on a single layer DVD, or you can put it on a flash drive using my guide here.

When you boot from the DVD/USB Flash drive you will now see an option box like the following with every version of Windows 7 both x86 and x64:
Win7Universal13.png


And remember, your free to install and test any of these version for 30 days, so if you have Home Premium, you can install Pro/Ultimate and see what you are missing, or install Starter and see just how shitty it is.;)
 
Last edited:
bonus stuff:

a) get ei.cfg remover

http://www.technibble.com/ei-cfg-removal-utility-repair-tool-of-the-week/

If you don't wanna mess with image, nor rebuild it. This little thing will do everything.

b) You don't need whole WAIK (~ 2 GB LOL!). You need only imagex (4 MB), get it here:

http://rapidshare.com/files/31591623/Integrate_KB_in_Vista_v.0.07_Tools.7z

It's in tools\amd64 and x86 folder. Which one you need is up to your running os. You can delete the rest.

c) use imagex export commands like newtekie1 says and if you wanna compress them a bit:

imagex /compress maximum /export "c:\Win 7 x64\sources\install.wim" 1 "c:\Win 7 x86\sources\install.wim" "Windows Home Basic"

d) You can make your dvd bootable with oscdimg

http://depositfiles.com/ru/files/d8zxuifur

example:

oscdimg.exe –l<Disc_Label> -t<MM/DD/YYYY:HH:MM> -m -u2 –b<path_of_bootable_img_file> <path_of_installation_source> <path_with_filename_is_to_be_created>

e) when iso is done you can burn it with windows built in burner
 
@newtekie1

Does it work for Enterprise versions too? I would like to have both 32 and 64 bit on one usb stick?
 
Ive got a usb drive that installs pretty much the same thing, all windows 7 32bit and 64bit including enterprise.
 
bonus stuff:

a) get ei.cfg remover

http://www.technibble.com/ei-cfg-removal-utility-repair-tool-of-the-week/

If you don't wanna mess with image, nor rebuild it. This little thing will do everything.

b) You don't need whole WAIK (~ 2 GB LOL!). You need only imagex (4 MB), get it here:

http://rapidshare.com/files/31591623/Integrate_KB_in_Vista_v.0.07_Tools.7z

It's in tools\amd64 and x86 folder. Which one you need is up to your running os. You can delete the rest.

c) use imagex export commands like newtekie1 says and if you wanna compress them a bit:


d) You can make your dvd bootable with oscdimg

http://depositfiles.com/ru/files/d8zxuifur

example:

oscdimg.exe –l<Disc_Label> -t<MM/DD/YYYY:HH:MM> -m -u2 –b<path_of_bootable_img_file> <path_of_installation_source> <path_with_filename_is_to_be_created>

e) when iso is done you can burn it with windows built in burner

Useful tips, though ei.cfg remove is pretty pointless since you are already extracting the iso anyway.:)

@newtekie1

Does it work for Enterprise versions too? I would like to have both 32 and 64 bit on one usb stick?

Yes, if you extract the two to different directories you can use the same imagex command on them, it would look like
Code:
 imagex /export "c:\Win 7 x64 Ent\sources\install.wim" 1 "c:\Win 7 x86 Ent\sources\install.wim" "Windows 7 Enterprise"
 
I get the message: Image name (Windows 7 Enterprise) already exists in target file.
I used this command:
imagex /export "c:\Win 7 64\sources\install.wim" 1 "c:\Win 7 32\sources\install.wim" "Windows 7 Enterprise"

Should i just change the name to Enterprise 64?

I tried changing the name to "Windows 7 Enterprise 64" but it didnt work. When booting from USB there is no option to choose from, just a bank line, not even enterprise 32bit.

Any thoughts?
 
Last edited:
The Win 7 64 folder contains the Windows 7 Enterprise files correct?
 
Both folders contain Windows 7 Enterprise files, the Win 7 x64 Ent folder contains 64bit files, and the Win 7 x86 folder contains 32bit files.
 
Hmm... I'm not quite sure why that would be giving you that error. It shouldn't care about the name, when exporting the other versions they have the same names also...
 
Thanks anyway, i just thought it would be nice to have both versions on 1 usb stick. I guess not with Enterprise...

Edit: The thing is, that when i changed the name to "Windows 7 Enterprise 64", exporting worked, but when burned to the usb and booted, there would be nothing to choose from, just a blank line.

I know it is possible with Enterprise, there are other guides on the net on doing it with enterprise, but without access to Enterprise discs I can't test it or reproduce the errors you are recieving to troubleshoot.:(

Edit: I also played around with the compressiong settings. The difference between Fast compress, which is the default if you don't specify, and Maximum is very minor. So minor in fact that in the end the disc image is still 3.8GB, it might be a few MB smaller, but nothing that really matters. And sense it still fits on a single layer DVD, I don't think it is worth.
 
Last edited:
I get the message: Image name (Windows 7 Enterprise) already exists in target file.

imagex /export "c:\Win 7 64\sources\install.wim" 1 "c:\Win 7 32\sources\install.wim" "Windows 7 Enterprise"

Any thoughts?

The number after wim represents the edition. The number of enterprise edition is not 1. To know what editions your wim has use:

dism /get-wiminfo /wimfile:install.wim

And to get more info about particular edition use:

dism /get-wiminfo /wimfile:install.wim /index:x

where x is the number of edition that you want
 
When running the command:
dism /get-wiminfo /wimfile:install.wim

I get error 87, the command get-wiminfo is unknown

Any ideas?
 
You have to run that command from the folder where the wim is. Else type the full path for wim image.
 
Meh, given up on this. I will just download a AIO version, with all windows versions included. I have my legit activation anyways. Just hope the downloaded images are not full of viruses/trojans.

Thanks anyway.
 
WOW!! THNX newtekie1 :D I already have both 32 and 64 discs for my Home Premium, but this is a much better idea than having 2 discs (bought 32 and made an ISO of my friends 64 bit so I could use my Key with it).
 
The number after wim represents the edition. The number of enterprise edition is not 1. To know what editions your wim has use:

dism /get-wiminfo /wimfile:install.wim

And to get more info about particular edition use:

dism /get-wiminfo /wimfile:install.wim /index:x

where x is the number of edition that you want

Or you can use

Code:
[B]Imagex /info[/B] [I]<path_of_wim_file>[/I]

From everything I've read, if you have an Enterprise disc that only has enterprise on it, then the number is 1. However, as I said, without actual discs for me to test this, I can't be sure.

WOW!! THNX newtekie1 :D I already have both 32 and 64 discs for my Home Premium, but this is a much better idea than having 2 discs (bought 32 and made an ISO of my friends 64 bit so I could use my Key with it).

It is really helpful when you do a lot of computer repair and have to re-install a lot.:toast:
 
From everything I've read, if you have an Enterprise disc that only has enterprise on it, then the number is 1. However, as I said, without actual discs for me to test this, I can't be sure.

That is correct, the enterprise disk's only have the enterprise version on them.

so the command is

Code:
imagex /export "c:\Win 7 x64 Ent\sources\install.wim" 1 "c:\AIO.wim" "Windows 7 Enterprise"
for the 64 bit

and

Code:
imagex /export "c:\Win 7 x86 Ent\sources\install.wim" 1 "c:\AIO.wim" "Windows 7 Enterprise"
for the 32 bit
 
Why would you want the enterprise version anyway, the only difference from Ultimate is the activation method that is supports... enterprise supports the KMS server, and thats it...
 
How Will I Make Windows 7 All in One Installation Disc With custom wim file?
I mean with antivirus, microsoft office and other applications... any help will do. tnz!
 
Very useful thread, good work
 
How Will I Make Windows 7 All in One Installation Disc With custom wim file?
I mean with antivirus, microsoft office and other applications... any help will do. tnz!

In situations like this, I generally use ninite installer to install most of the programs I need. The good thing about this is that the installer itself is is very small, so it can easily fit on the DVD with Windows 7, once it is run it goes out and downloads the latest versions of each program I want installed. So the latest versions of everything are usually installed.
 
Awesome post!! Was searching for threads like this! <commented so I won't loose it>
 
Hello Great Post! but I have a question, At this point 5.) Now navagate to "C:\Win 7 x86\sources\" in explorer, and delete ei.cfg. Do I have to do this in the x64 folder as well? I only ask as I have followed your instructions step by step and when I get to boot, it does not offer me the options screen and goes directly to the install
 
Status
Not open for further replies.
Back
Top