 12
Minisforum Venus Series NPB5 Mini-PC (Intel i5-13500H) Review
(12 Comments) »Introduction

A big thank you to Minisforum for providing the review sample.
Minisforum, founded in 2018, has rapidly expanded into a global player in the Mini-PC space. They provide a vast number of innovative small form factor systems to fit nearly any and all needs, be it ultra-low power systems or high-performance options that can fit in the palm of your hand. Considering how far they have come in such a short period, it will be interesting to see where they go from here.

Today, I will be taking a look at the Minisforum NPB5 Mini-PC. The review sample comes with 16 GB of DDR5 4800 MHz SO-DIMM memory in dual-channel, a 512 GB SSD, and Windows 11 Pro pre-installed. It also features an Intel Core i5-13500H with 4P + 8E cores and Iris Xe Graphics. As the first Minisforum system to come in for review, I am quite excited to see what it is capable of, but before that, let's take a closer look at what the unit has to offer before it gets punished with numerous benchmarks.
| Specifications | |
|---|---|
| Model: | Minisforum NPB5 |
| Processor: | Intel Core i5-13500H (4P + 8E = 12 Cores / 16 Threads) Clock Speed P-Cores: 2.6 GHz (Base) 4.7 GHz (Boost) Clock Speed E-Cores: 1.9 GHz (Base) 3.5 GHz (Boost) |
| Integrated Graphics: | Intel Iris Xe Graphics G7 80EU |
| Memory: | 2x 8 GB Kingston Fury Impact DDR5 4800 MHz 2x 262-pin DDR5 SO-DIMM slots (As listed: 32 GB Max / 4800 MHz) |
| Storage: | M.2 NVMe Kingston 0M8PGP4512Q-A0 512 GB 1x M.2 2280 PCIe Gen 4 x4 (2 TB Max) 1x 2.5-inch SATA 3.0 |
| Optical Drive: | None |
| Audio: | Intel Raptor Point-P HDMI Audio Realtek ALC 269 |
| Connectivity: | 1x Headphone & Microphone combo jack (front) 2x HDMI 4K @ 60 Hz (back) 2x 2.5 GbE LAN (back) 1x USB 3.2 Gen 1 Type-C (front) 2x USB 3.2 Gen 2 Type-A (front) 2x USB 3.2 Gen 2 Type-A (back) 2x USB4 (Supports DisplayPort 4K @ 60 Hz (back) |
| Communications: | MediaTek RZ608 Wi-Fi 6E 2x2 Bluetooth 5.2 2x Intel I225-V 2.5 GbE |
| Cooling: | Active cooling (heatsink/fan) |
| Operating System: | OS tested: Windows 11 Pro OS included: Yes |
| Warranty: | Two years |
| MSRP: | $619.00 (as tested) $459.99 (Sale price at time of review) |
Packaging and Contents


The box is pretty simple, with the top simply denoting this system as part of Minisforum's Venus series. Adding to the packaging's visual element is the use of various shades of blue to make the electrical traces they are meant to represent pop a bit more. As for the sides, they are pretty much the same as the top. Only the bottom has any actual information, and it is here that you will find the product model and base specifications.

Internally, the system is encased in foam which is always nice to see, with the remaining accessories, such as the power brick, VESA mount, etc., all being placed underneath the system.

Overall, the bundled accessories package is decent. No, it's not earth-shattering, but it's still nice to see a VESA mount, along with a provided HDMI cable. Sure, most of us likely have a few of these kicking around already, but it always helps to have a brand-new one on hand.
- Minisforum NPB5 Mini-PC
- Power brick
- VESA mounting plate
- VESA screws
- SATA cable
- SATA Storage screws
- HDMI cable
- Manual
A Closer Look


The Venus Series NPB5 is a fairly compact system but still sits in roughly the same form factor as other Mini-PCs in that it measures 127 x 127 x 55.5 mm (5 x 5 x 2.1875 inches). While all systems differ to a certain degree, the NPB5 is very similar to its peers in regards to overall size. Build quality is quite good externally as the system uses a metal chassis with plastic top and bottom plates. The top plate can be removed by pressing on each corner, giving quick and easy access to all the internal components. The bottom plate is vented for improved airflow.


The Front I/O consists of 2 USB 3.2 Type-A ports and a USB 3.2 Type-C port, a power button, and a Headphone / Microphone combo jack. Moving onto the left side, there is a massive vented opening that works as an air intake.


Looking at the back I/O, you will find 2x USB 3.2 Type-A ports along with 2x USB4 Type-C ports that support DisplayPort, allowing for the system to run four Displays when used in conjunction with the two HDMI ports. The HDMI outputs support 4K at 60 Hz; meanwhile, DisplayPort over USB4 supports 8K at 60 Hz, according to Minisforum. Rounding out, the I/O is 2x Intel I225-V 2.5 GbE for your networking needs, should you prefer hardwired vs. Wi-Fi connectivity. There is also a Kensington lock, should you need it.

To power the system, Minisforum is using a SOY-1900630-410-B, which is rated to output 19 volts with a max of 6.3 amps for a total of 119.7 watts.
A Look Inside


Upgrading or preparing the system if you opt to go barebones is incredibly easy. To start with, just touch the plastic top on the corners, which will result in it popping up and being easy to remove. At this point, you have access to the M.2, DDR5 SO-DIMM slots, Wi-Fi module, and the SATA plug on the board. Essentially, that one quick step gives you full access to just about everything you need.


The review unit comes equipped with 2x 8 GB Kingston DDR5 SO-DIMM memory rated at 4800 MHz. To completely disassemble the system, you will need to remove the memory.


With that done, you will need to unplug the SSD fan and then remove the SSD and the Mediatek RZ608 Wi-Fi module.


Next, you will need to remove the rubber feet from the bottom plate since the four screws holding it on are located underneath them. With the bottom plate removed, you now have access to the heatsink, which is quite hefty. With two exhaust ports and two heatpipes, it should be more than enough to handle the I5-13500H this system comes equipped with.


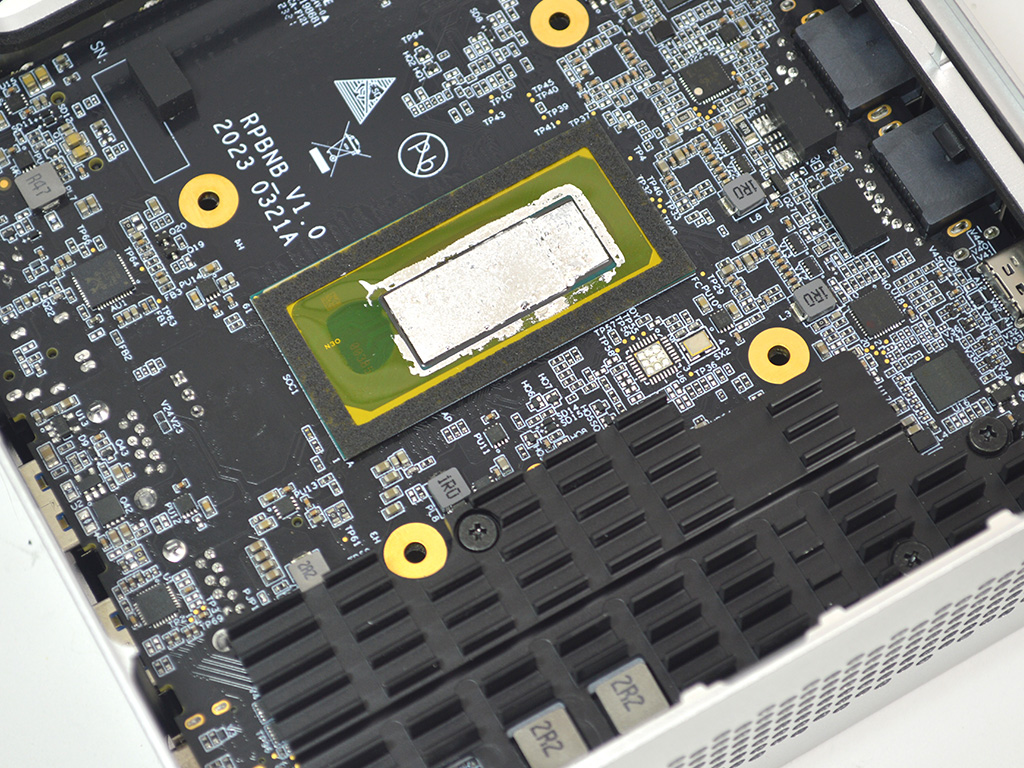
To get the motherboard out of the chassis, you are going to need to remove the black plastic I/O shield, which is held in with clips. You can simply pop them out from the inside, and the shield can then be pulled out. Now, at this point, the entire motherboard and heatsink should pull right out, and if the chassis was plastic, that may be possible. However, Minisforum's metal chassis means you need to remove the heatsink, something they recommend you do not do since they use a liquid metal thermal interface material. I never was good at following directions, though, so subsequently, you need to remove the four screws holding the heatsink in place. These four screws are hidden under the system's memory and the Wi-Fi module we removed earlier. Once the screws are out, you will need to remove the heatsink, which is also held in place via an adhesive gasket. I would only remove the heatsink if you absolutely need to.


Regardless with the heatsink off, you can remove the four screws holding the motherboard to the chassis, and it will then come right out.
Overall, I am not a fan of this unit's design in that the heatsink must be removed to remove the motherboard. A slightly better chassis design would have allowed for complete disassembly without the issue of destroying the gasket, helping keep the liquid metal TIM from causing any potential shorts.
Our Patreon Silver Supporters can read articles in single-page format.
Nov 13th, 2026 10:21 PST
change timezone
Latest GPU Drivers
New Forum Posts
- Microsoft Exchange/365 outages? (50)
- inside Case Mod gallery, non modded cases are posted? (1)
- Debunking 10-Year-Old Myths: How a Properly Tuned FX-8320 (4.21 GHz) Beats i5-8400, i7-4770, Ryzen 5 1500X, and Even a 4.92 GHz FX-9590 in 3DMark Time (7)
- WarpCoreBench scores! (27)
- The TPU Darkroom - Digital SLR and Photography Club (4496)
- TPU's Nostalgic Hardware Club (22154)
- To AiO CPU Cooler users? (9)
- Dual B70 or Dual R9700 Pro on Linux (3)
- Slow SSD read speeds - help! (3)
- I won't download games that are larger than 30–40 GB. (108)
Popular Reviews
- AMD Zen 6 Technical Deep Dive
- Corsair HX1000i Shift Crystal Review
- NZXT C1200 Platinum Review
- Upcoming Hardware Launches 2027 (Updated Nov 2026)
- Montech King 95 3D PRO Review
- NZXT H7 RGB+ Review
- NZXT H5 Review
- Phantom Blade Zero Performance Benchmark Review - 35 GPUs Tested
- XPG NIMBUS PLUS Review - Mid-range Chair With Strong Competitors
- Gigabyte Z890I Aorus Ultra Review
TPU on YouTube
Controversial News Posts
- NVIDIA Co-Founder and CEO Jensen Huang Officially Resigns (358)
- OpenAI CEO Argues Home PCs Waste the World's Limited DRAM Supply (152)
- NVIDIA Launches Investigation Into Jensen Huang's Relationship With Suspected Chinese Spy (136)
- Intel "Raptor Lake Next" 16-Core and 20-Core CPUs Surface (130)
- Legendary Game Studio BioWare Shuts Down Following EA Layoffs (104)
- Dell CEO Says the Memory Shortage Will Get Worse in 2027 (95)
- NVIDIA GeForce RTX 50-Series Scheduled for up to $500 Price Hike This Week (89)
- Modder Fits RTX 5090 With Four 8-Pin Connectors, Halving Current per Wire (80)