Monday, August 18th 2025
Raspberry Pi Announces New 5-inch Variant of Raspberry Pi Touch Display 2
Last year we launched the refreshed 7" Raspberry Pi Touch Display 2 as a successor to our original 2015 Touch Display, offering a simplified form factor and higher 720×1280-pixel resolution at the same $60 price point. Today we're excited to announce a new 5" variant, available to buy now from Raspberry Pi Approved Resellers. It shares the same resolution and easy setup as the 7" variant, at the low price of $40.
Key features
Except for its size, the specification of the new 5" variant is almost identical to that of its bigger sibling: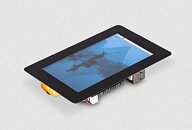

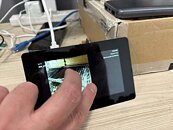 A plug-and-play multi-touch display
What makes Raspberry Pi Touch Display 2 particularly appealing is its seamless integration with the rest of the Raspberry Pi product ecosystem.
Its capacitive touch screen works out of the box with full Linux driver support - no manual calibration required, no hunting through device trees, and no wrestling with incompatible touch controllers. Connect it to your Raspberry Pi (our installation guide shows you how, including connecting to the Raspberry Pi's standard 5 V GPIO supply for power), and you have a fully functional multi-touch display that just works. Now you can concentrate on your project instead of hardware hassles.
To illustrate our new 5" display's capabilities, I decided to create a simple slideshow application using AI-assisted development. This seemed like a perfect opportunity to explore and demonstrate both the hardware's multi-touch features and modern development workflows.
Developing code with AI
Not everyone thinks AI is the future of software engineering, but I find it important to understand how technology advances, so this year I've been dipping my hand into coding with AI. To give you an idea of how easy this is, I thought I'd share all the prompts I gave to Cursor (using the Claude Sonnet 4 model) to develop a very simple slideshow application for the 5" variant of Raspberry Pi Touch Display 2.
You can see the prompts I used to drive the model in the italicised text below. After each prompt or set of prompts, I've included some notes about why I used them and how effective they were at getting me closer to the result I wanted.
A brief for a touch display slideshow application
I began by giving the AI a high-level, but quite specific, brief:
Capturing touch events
Translating coordinates
Keeping the AI on task
Great, that works correctly, can you extract the code and make a library from it?
This is an important point: in real software engineering, when we get something like this working it's important to extract its functionality and create a library for it, so the functionality can be shared with other applications. AI generally doesn't do this very well and will keep editing a single long piece of code, which can get edited and modified without you asking as it hallucinates random changes for no apparent reason. By extracting the code into a separate library (which has some test functionality), we can make sure the AI is focused on the application.
Tidying up
Running the touchscreen slideshow code yourself
If you'd like to try running the code yourself, or if you'd like to reuse and improve the multi-touch library, you can do the following:
Here, it's taken me just a couple of hours to generate an application that I couldn't otherwise have produced nearly as quickly. However, I still don't know how the application is architected, if I wanted to add some functionality I'm not sure I'd know where to start, and I'm not convinced the application is complete or bug-free!
For some applications, using AI to generate code is really useful and can speed up software development significantly; writing test applications or development systems are two examples of where it can be very helpful. But it's critical to be aware of the limitations of this approach. At Raspberry Pi we're taking a strictly targeted and heavily supervised approach, using these new tools only on test software and build scripts, and reviewing their output very carefully.
Build cool stuff with the new 5" Raspberry Pi Touch Display 2
I hope my quick demo has given you an idea of how easy it can be to develop interactive applications with our multi-touch displays. Touch Display 2 offers a straightforward way to integrate a high-quality user interface into countless applications, whether those are personal builds, research projects, or commercial solutions, and our new 5" variant provides an even more compact option if you're targeting the smallest form factors.
Both 5" and 7" variants of Raspberry Pi Touch Display 2 are available to buy now from our worldwide network of Approved Resellers. As ever, we'll enjoy seeing what you do with it.
Sources:
Raspberry Pi, Raspberry Pi 5" Touch Display 2
Key features
Except for its size, the specification of the new 5" variant is almost identical to that of its bigger sibling:
- 5" diagonal display
- 62 mm × 110 mm active area
- 720 (RGB) × 1280 pixels
- True multi-touch capacitive panel, supporting five-finger touch
- Fully supported by Raspberry Pi OS
- Powered from the host Raspberry Pi
- All necessary cables, connectors, and mounting hardware included


What makes Raspberry Pi Touch Display 2 particularly appealing is its seamless integration with the rest of the Raspberry Pi product ecosystem.
Its capacitive touch screen works out of the box with full Linux driver support - no manual calibration required, no hunting through device trees, and no wrestling with incompatible touch controllers. Connect it to your Raspberry Pi (our installation guide shows you how, including connecting to the Raspberry Pi's standard 5 V GPIO supply for power), and you have a fully functional multi-touch display that just works. Now you can concentrate on your project instead of hardware hassles.
To illustrate our new 5" display's capabilities, I decided to create a simple slideshow application using AI-assisted development. This seemed like a perfect opportunity to explore and demonstrate both the hardware's multi-touch features and modern development workflows.
Developing code with AI
Not everyone thinks AI is the future of software engineering, but I find it important to understand how technology advances, so this year I've been dipping my hand into coding with AI. To give you an idea of how easy this is, I thought I'd share all the prompts I gave to Cursor (using the Claude Sonnet 4 model) to develop a very simple slideshow application for the 5" variant of Raspberry Pi Touch Display 2.
You can see the prompts I used to drive the model in the italicised text below. After each prompt or set of prompts, I've included some notes about why I used them and how effective they were at getting me closer to the result I wanted.
A brief for a touch display slideshow application
I began by giving the AI a high-level, but quite specific, brief:
- I would like to create a simple application running on the Raspberry Pi remote device which has a touch panel attached. The application should display images from a local directory as a slideshow. Touching the display should stop the slideshow and allow the user to manipulate the position and be able to zoom in using standard gestures
Capturing touch events
- Two finger zoom doesn't work, does the application use the multi-touch interface to handle zoom gestures?
- The "touches" in the top left are always zero, even though there are multiple cursors on the screen with multiple touches
- The raw test is detecting two presses when there is only one
- The display is a portrait display, but it is being rotated. So the coordinates need to be adjusted
- You should use kmsprint on a modern device
- Both axes are inverted, can you reverse the direction?
- That is not working correctly, how about you put some boxes on the screen and I'll tap them so you can identify the correct mapping
Translating coordinates
- Can you just display one box at a time for me to press so you can confirm the correctness of the raw touch positions for a single touch. Then repeat with two boxes for two finger touch?
- That is correct left-right although the box doesn't go past around 700
- No that's still not working. How about you place a box into each corner of the screen one at a time and I'll click them. From that you should have all the information to translate a single finger touch event
- The top right box is not in the top right, it's closer to middle top… Does your code correctly get the screen size
Keeping the AI on task
Great, that works correctly, can you extract the code and make a library from it?
This is an important point: in real software engineering, when we get something like this working it's important to extract its functionality and create a library for it, so the functionality can be shared with other applications. AI generally doesn't do this very well and will keep editing a single long piece of code, which can get edited and modified without you asking as it hallucinates random changes for no apparent reason. By extracting the code into a separate library (which has some test functionality), we can make sure the AI is focused on the application.
- I think the code is getting confused between panning and zooming the images. It looks like when trying to pan it's also zooming as well.
- The problem is that the zoom is being significantly over estimated, there should be a 1:1 ratio of the size of the zoom to the size of the change in the two touch points
- To test the zoom, can you temporarily disable panning so I can just zoom an image
- Ok, that is working, but the center of the image is changing with the zoom
- The zoom now works correctly, can you re-enable the panning but track both pan and zoom at the same time.
Tidying up
- Please remove any reference to key processing or mouse processing. This is only touch controlled.
- Please remove any debug or logging print calls
Running the touchscreen slideshow code yourself
If you'd like to try running the code yourself, or if you'd like to reuse and improve the multi-touch library, you can do the following:
git clone https://github.com/ghollingworth/slideshowCoding with AI: Advantages, limitations
cd slideshow
./run.sh
Here, it's taken me just a couple of hours to generate an application that I couldn't otherwise have produced nearly as quickly. However, I still don't know how the application is architected, if I wanted to add some functionality I'm not sure I'd know where to start, and I'm not convinced the application is complete or bug-free!
For some applications, using AI to generate code is really useful and can speed up software development significantly; writing test applications or development systems are two examples of where it can be very helpful. But it's critical to be aware of the limitations of this approach. At Raspberry Pi we're taking a strictly targeted and heavily supervised approach, using these new tools only on test software and build scripts, and reviewing their output very carefully.
Build cool stuff with the new 5" Raspberry Pi Touch Display 2
I hope my quick demo has given you an idea of how easy it can be to develop interactive applications with our multi-touch displays. Touch Display 2 offers a straightforward way to integrate a high-quality user interface into countless applications, whether those are personal builds, research projects, or commercial solutions, and our new 5" variant provides an even more compact option if you're targeting the smallest form factors.
Both 5" and 7" variants of Raspberry Pi Touch Display 2 are available to buy now from our worldwide network of Approved Resellers. As ever, we'll enjoy seeing what you do with it.
2 Comments on Raspberry Pi Announces New 5-inch Variant of Raspberry Pi Touch Display 2
I love how companies tout features that can never be used. Five finger touch on a five inch screen? I'd like to see that in action.
It's like motherboards with "7.1 surround sound" with no analog or digital outputs to support it.